Pedestal supports and preassembled wood tiles simplified install…
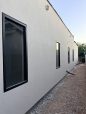
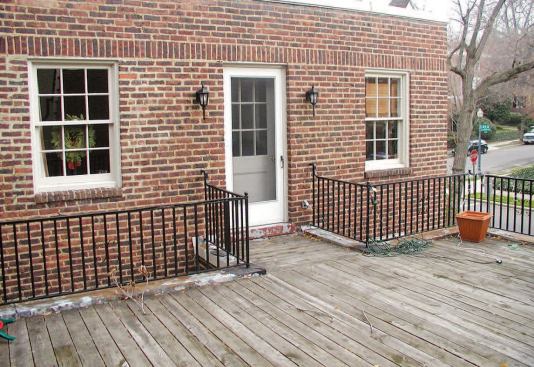
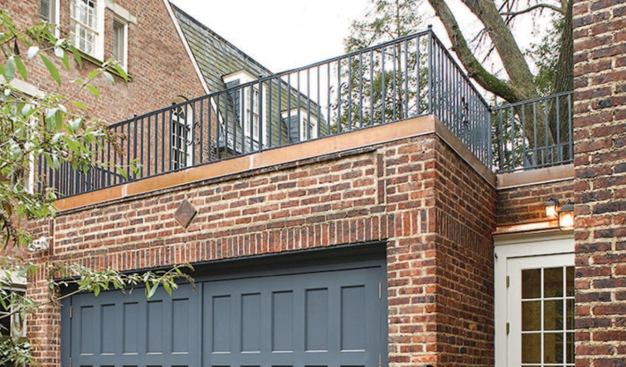
Last year, my remodeling company worked on a classic two-story brick Colonial Revival home in one of Washington, D.C.’s historic districts. Part of the job involved replacing an aging rooftop deck located at the rear of the house over the garage, which is separated from the house by a 3-foot-wide breezeway. The deck faces south, so it gets lots of sun; accessed via a short bridge from the den, it’s a nice adjunct to the living space on this small lot.
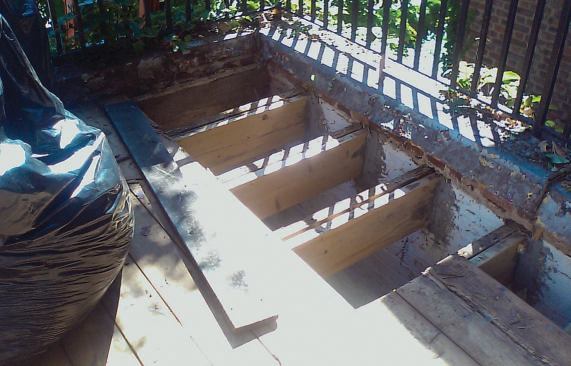
The existing deck, with a surface of 2×6 pressure-treated lumber, rested upon wood sleepers placed directly on a poorly installed and leaking rubber membrane roof. The roof framing was recessed inside a level parapet topping the 8-inch-thick brick walls, with single 2×10 Doug fir joists set in the wall at 12 inches on-center. A shallow 1/2-inch slope drained the roof to the rear, with a scupper and downspout directing runoff to the garden below.
Though most of the joists were in decent shape, a few required replacement. Many years’ worth of wet leaves were trapped and rotting under the deck surface, and once the roof membrane failed, portions of the joists — as well as areas of the 1×6 sheathing — rotted too.
To begin, we demolished the old deck and stripped the roofing membrane and corroded parapet flashing, then removed the affected roof sheathing and rotted joists. The original joists had been mortared solidly into the wall and showed no signs of decay there at the bearing points, so we simply widened the pockets to accommodate a second member sistered on. We used pressure-treated 2×10 southern pine for the sistered joists, nailed them thoroughly to the originals, then patched the pockets with mortar.
The joists spanned 17 feet, and even though they were now doubled, our engineer thought that the roof might still be too bouncy when loaded with people. Since we were also converting the garage to living space — with drywall and a decorative beam treatment on the ceiling — we didn’t want problems with nail pops or cracking. To help stiffen the roof, we added two 9 1/4-inch LVL beams at one-third intervals along the roof’s 22-foot length. The beams are set in new beam pockets, which we made by breaking out some of the interior face bricks, then patching with mortar. Once the joist repairs and reinforcement were completed, we replaced the 1×6 sheathing and called in the roofing contractor.
For the new roofing membrane, I specified .060 mil EPDM over 1/2-inch medium-density fiberboard underlayment. That’s heavier than the standard .045 EPDM, but it seemed like a good idea to provide some extra wear resistance to offset eventual maintenance under the new deck. The brick parapet received new, flat-seamed copper flashing. An existing iron railing surrounded the rooftop, with its posts embedded in the masonry. The railing was in good condition, so we simply cleaned it and protected it with a fresh coat of rust-inhibiting paint. The roofing crew cut the flashing around the iron posts, applying Fillgard pourable sealer (800/428-4442, firestonebpco.com) to seal the penetrations.
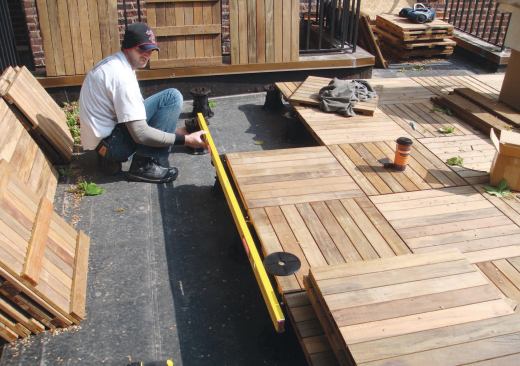
As with the original surface, we planned for the new decking to sit a few inches below the top of the parapet. The parapet was generally level but somewhat irregular from point to point; by recessing the new deck below the top, we could avoid highlighting the discrepancies. Instead of shimming or tapering a conventional deck frame to sit level on the sloped roof, we opted for an innovative system that our production manager, Steven Barnard, had recently seen demonstrated at a JLC Live show.
Pedestal System
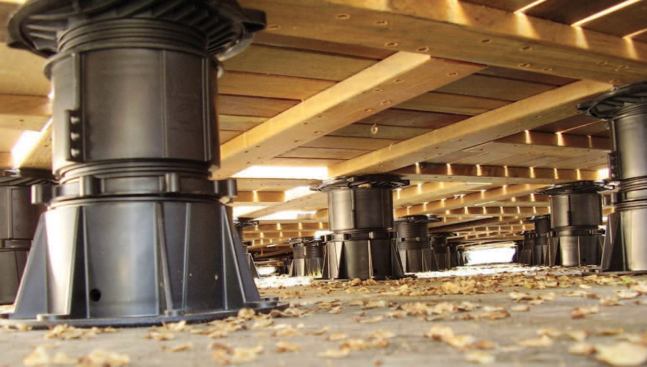
The Versadjust deck-support system (800/ 333-4324, bisonus.com) is based on a height-adjustable pedestal made of high-density polypropylene. The pedestals are designed to support a stone, masonry, composite lumber, or wood “tile” surface. A rotatable eccentric disk built into their base allows you to dial in slope compensation — handy for holding plumb on roof slopes up to 1/2/12. Adapters are also available to adjust for slopes up to 1 inch per foot. Four pedestal models are available, with heights ranging from 2 1/4 inches to 9 3/4 inches. Pedestal height can be precisely adjusted by twisting the threaded shaft over a 4 3/4-inch range. If needed, the tallest unit can be extended in 4-inch increments up to a maximum height of 24 inches using optional snap-on couplers. Each pedestal is rated for a 1,500-pound working load. (However, pedestals must not be installed over roofing underlayments with a density of less than 20 psi.)
The pedestals are not just for rooftops. They can also be installed over an existing patio or directly on grade using an optional base support. The decking does require some kind of site-specific edge restraint to prevent the surface from shifting laterally, and nothing but gravity holds it down. If wind uplift is a concern, you’ll want to consider another method.
We contacted our local dealer and found that it offered a package including both the deck pedestals and wood decking “tiles” made of tropical ipe. After viewing the pedestals and wood samples, our client gave us an enthusiastic go-ahead.
Wood Tiles
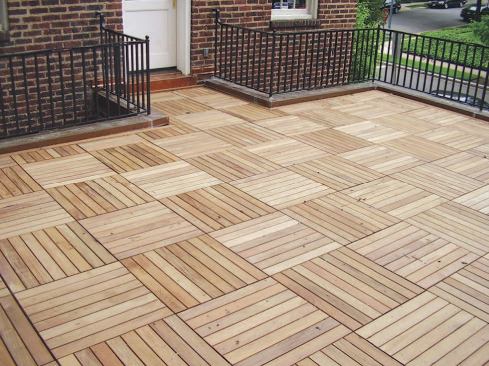
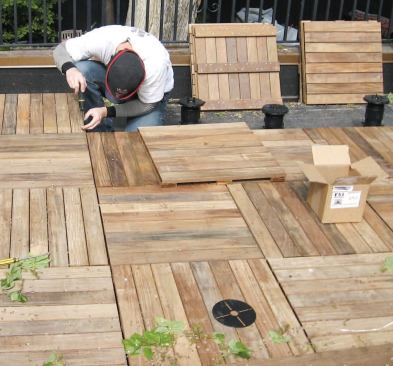
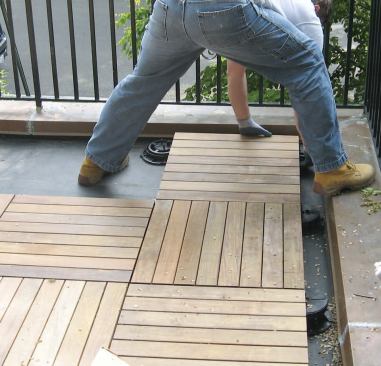
Because the roof had an end-to-end slope of about 11 inches overall, we required all four pedestal heights for this job. The nominal 24-by-24-inch wood tiles sit directly on the pedestals, with one pedestal installed beneath each four-way tile junction. To establish an overall level line for the deck, we shot a few reference marks with a laser. After that, we simply shifted a bubble level across the tops of the pedestals as we set them, fine-tuning their height as needed.
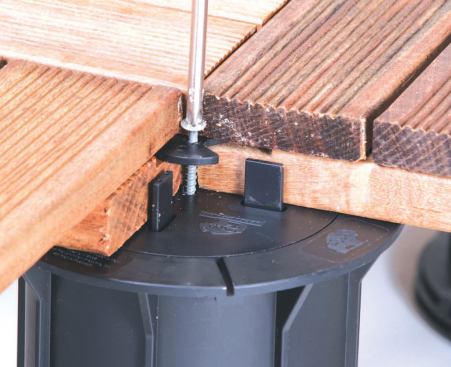
The tiles are preassembled using stainless steel screws through cleats from the underside, presenting a fastener-free surface and saving considerable on-site labor. Exposed end grain comes factory-sealed with wax to repel water; field cuts should be similarly treated. We used Panel-Seal edge sealer (716/833-9366, uccoatings.com), a thin wax emulsion applied with a brush.
The tiles are undersized by 1/8 inch in both directions to create a 1/4-inch installed gap between them, controlled by four upright spacer tabs on the pedestal surface. There’s a 3/16-inch groove cut diagonally across each corner between the 3/4-inch-thick surface boards and the cleats on the underside. These grooves snugly accommodate a plastic disk that’s secured with a single screw into the center of the pedestal, creating a four-way hold-down for the tiles. There’s a pie-shaped cutout in the disk; with the disk rotated to engage four corners at once, you install three adjoining tiles and insert the screw. You then drop the fourth tile in, fitting it onto the disk. For maintenance access beneath the deck surface, the cutout can be realigned under a tile corner to allow removal. That’s a handy feature; the decades of rotting leaves trapped beneath the old deck no doubt contributed to the failure of the membrane. The feature also will make it easier to adjust pedestals should any shrinkage or settling occur in the supporting structure or grade.
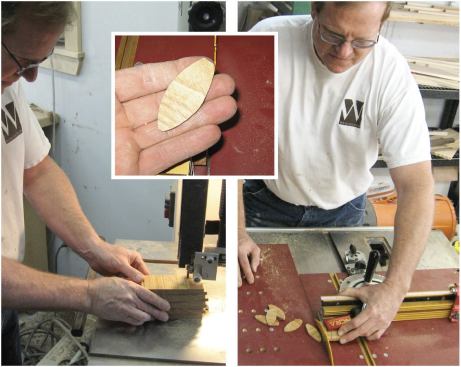
We edged the deck between the field tile and the parapet with a border of ipe planks. It’s important not to leave a finished gap wider than 1/4 inch around the perimeter. A wider gap could allow unsafe lateral deck movement. To help stiffen the border planks against deflection between the 2-foot-on-center pedestals, Steven made custom ipe biscuits, which we inserted on 12-inch centers.
The entire system of pedestals and tiles for this 374-square-foot deck cost a total of $6,300, excluding labor. Ipe is heavy; shipping costs alone for the 87 tiles ran to $770, and then we had to muscle them up onto the roof, something we’ll keep in mind for the next job.
Because the pedestal support system varies in height by model, it’s a good idea to have a product sales representative review the plans. Our local rep came to the site, measured the existing conditions, and provided shop drawings. The new roof deck combines functional beauty with low maintenance — and makes our company look smart.
Bruce Wentworth, AIA, is a registered architect and licensed contractor in Chevy Chase, Md.