


Callbacks and construction defects have made the national news again. A November 16, 2016, Nightline segment detailed shoddy construction in production homes around the country. The program, replete with teary homeowners, searched out only the most dramatic errors, including one home with melted siding and another with more than 800 drywall nail pops. The intended message was clear: Builders are doing shoddy work.
Smart builders will use such reports as an opportunity to differentiate themselves. Problems like the ones Nightline exposed are rare among pros who are serious about great work and great service. But even among serious builders, problems do occur. Which ones are most common? JLC asked industry pros—contractors, engineers, consultants, and home inspectors—around the U.S. to describe the most common callbacks and defects they see in their markets. Their responses ranged from visible, often minor issues to serious problems that can remain hidden for years before leading to catastrophic failure. What follow are the most-cited problems.
Aesthetic Issues
Not surprisingly, most everyone mentioned drywall cracks and nail pops. “These are cosmetic issues but some people come unglued over them,” Skip Walker, a builder in San Bruno, Calif., says. The best way to avoid them is by paying for good work. “We tried a less expensive drywaller on a few jobs, but those jobs had problems,” he says, adding that the bargain drywaller took shortcuts like skipping coats and not leaving sufficient drying time between coats (mud needs about three days to dry in his area in winter).
Drying the framing helps with a range of cosmetic issues—not only drywall pops, but also cracks in drywall around window heads, squeaks in floors and stairs, interior trim joints that open up, and caulking that pulls and cracks.
Fast construction schedules accelerate those problems, because the house framing barely has any time to dry on its own before the next stage of construction begins. Such “short cycle” houses are notorious for having a large number of drywall cracks and other cosmetic defects after a year of heating and cooling by the occupants.
The problems are commonly attributed to “settling,” but builder Matt Risinger, of Austin, Texas, says the more likely cause is wood movement produced by the frame drying. Before hanging drywall, he lowers the framing’s moisture content to 12% or so (checking with a moisture meter), using fans (see “Drying Wet Framing,” by Matt Risinger, Jun/13).
After the drywall is taped, Risinger employs a series of industrial dehumidifiers to absorb moisture from the curing mud (as well as from the slab and other materials used in the house) before installing woodwork (see "Conditioning Homes," by Matt Risinger, Nov/15). On some projects, he has also taken to setting up a full-size space conditioning system outside the building and running duct indoors to condition the home during the final stages of construction.


Annoying Squeaks
“Subflooring can be a big source of callbacks,” Risinger says. He adds that the use of commodity OSB makes squeaks inevitable and suggests upgrading to 1 1/8 subfloor AdvanTech or Sturd-I-Floor. He says that in some 10 years of using engineered subflooring, he has had no callbacks due to floor squeaks.
Risinger also says that it’s crucial to use a high-quality polyurethane subfloor adhesive. “Old school glues don’t stick to the newer subfloor panel products,” he says. Risinger prefers DAP Smartbond, or Huber’s AdvanTech subfloor adhesive. Both are a foam that collapses to an ultra-sticky gel, which bonds well to any type of OSB or plywood.
Sagging Floors
“I see a lot of framing errors that lead to uneven floors,” says Atlanta structural engineer Chris DeBlois. The problem has to do with the way today’s homes are designed. “In an older colonial,” he says, “you know the rooms will be stacked with a central bearing wall. No more.”
DeBlois says that with today’s open floor plans, some designers forget to account for the loads the floor will bear. For instance, he was called to look at a large kitchen with an 8x12 island topped with granite, but with no bearing wall under the joists (there was a media room directly below). He says, “Whoever did the framing layout didn’t take the weight of that granite into account, so the kitchen floor ended up settling and sloping toward the island, like a little bowl.” The builder had to go back, jack the floor up, and triple the joists. DeBlois has also seen settling in rooms with thickset tile or stone floors.

Roof and Sidewall Ripples
Another common problem is sheathing that swells and buckles, telegraphing waves through the cladding or roofing. The fix is simple: Leave a 1/8-inch gap between panels. The shank of a 10d common will make the proper space over rafters and studs, though you may want to use H-clips over rafter bays. But some framers seem unaware of this advice. “I hired two guys to help me frame an addition and neither one had heard of gapping sheathing panels,” notes Leavenworth, Kansas–based builder and remodeler Chip Kiper. He says he now inspects the sheathing before it’s covered: “If any sheets aren’t gapped, I use a saw to make a kerf between them.”
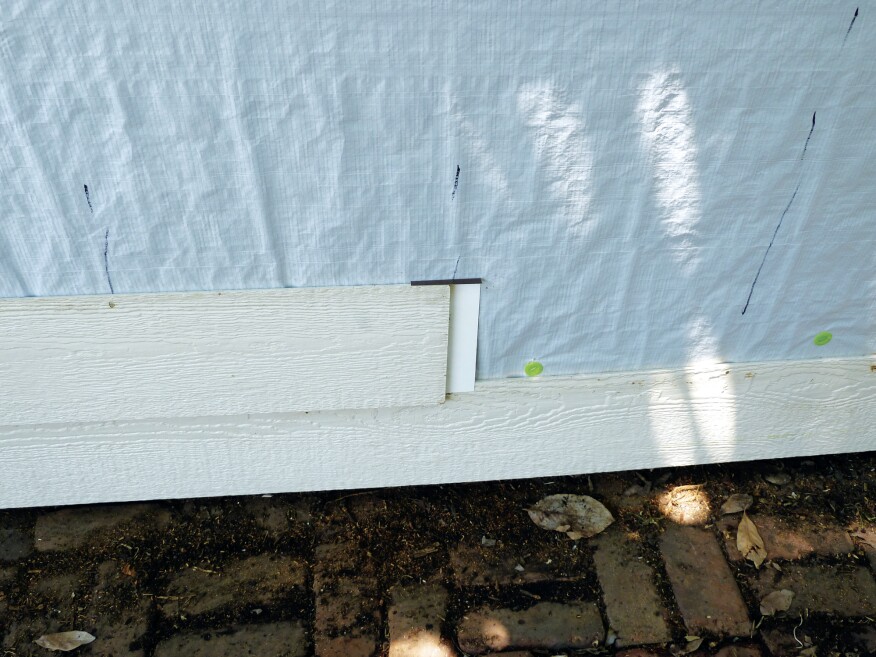
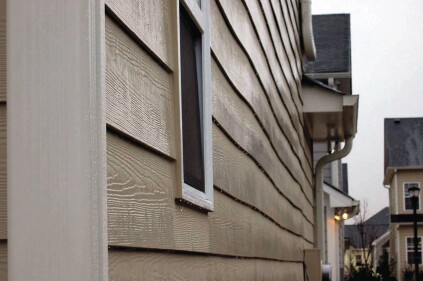
Swelling can also be a problem with fiber-cement siding, where joints between horizontal runs may need to be gapped and filled with sealant. Be sure to check the manufacturer’s installation instructions, as the requirements vary. Those that require caulking at joints do so for good reason. “If you ignore this advice, the board will soak up water and swell at the edges,” says Bill Robinson of train2build.com.
Damp Basements
“A leaky foundation is the worst callback because it costs so much money to fix,” says Risinger. He says many homes in his market have water seepage at the slab-to-wall connection. Even without visible water, a damp basement or crawlspace can turn into a mold generator.
He advises against using fluid-applied foundation waterproofing systems because they depend on near-perfect application. “They have to be installed at the right thickness with the right number of coats, and you need to make sure all the conditions for proper adhesion have been met.” Instead, he uses a peel-and-stick waterproofing membrane, such as Cosella-Dorken’s Delta-Thene.

This product requires a primer that helps bond the adhesive backing to the concrete. “Essentially you’re sticking an adhesive to an adhesive, which creates a very durable bond,” he says. Regardless of the waterproofing used, the most important ingredient is a gap between the foundation wall and the surrounding soil to relieve hydrostatic pressure. Without a gap, hydrostatic pressure can force an enormous amount of water through even the smallest penetrations in the wall. Risinger typically relies on a dimple mat covered by a geotechnical fabric to create this gap and allow free drainage to the footing perimeter drains.
On sites without a high water table, Kiper gets by with rigid foam insulation against the concrete, covering it with fiberglass resin panels to protect the foam from damage. He caps the assembly with sheet metal to keep termites out of the house.
Kiper also points out that the basement is more likely to stay dry with a sound structure. “Even a hairline crack can let moisture into the wall,” he says. He recommends wide footings with plenty of steel reinforcing over thoroughly compacted soil.
Stucco Failures
Getting stucco right seems to be a challenge on a lot of jobs. “It’s the most common problem we see,” Richard Baker, Builder Solutions Program Manager at IBACOS, says. Baker and his team perform regular quality-control assessments on product jobsites around the country. One cause of stucco problems is the same one behind a lot of the other problems mentioned here: The industry has lost its best craftsmen. He says, “We don’t see the skilled labor that we used to.”
Stucco errors fall into three categories:
Missing joints. The ASTM standards that govern stucco specify control joints every 144 square feet. They often get left out, however, because of ambiguity in how some stucco systems implement these standards, and because some builders don’t like the look of control joints.

Some installers also forget to put a flexible sealant where the stucco meets another material, such as around a window. The result is the same in both cases: When the stucco expands or contracts, it cracks, letting water into the structure.


Wrong mix. Too much sand can make the mix weak and prone to cracking. Too little sand leaves it brittle, so cracking tends to be dramatic. When brittle stucco cracks, “it can sound like a gunshot,” Baker says. He has even seen it shear the metal lath beneath the stucco. The solution to both problems is to use premixed stucco.
Poor hydration. Stucco needs to be kept hydrated for a few days after it’s applied. Some installers skip this step, causing the pH to stay too high and making the stucco less able to hold paint. “Some builders compensate by using pH-resistant paints, but this is not a silver bullet,” Baker says. “They really need to hydrate the stucco.”
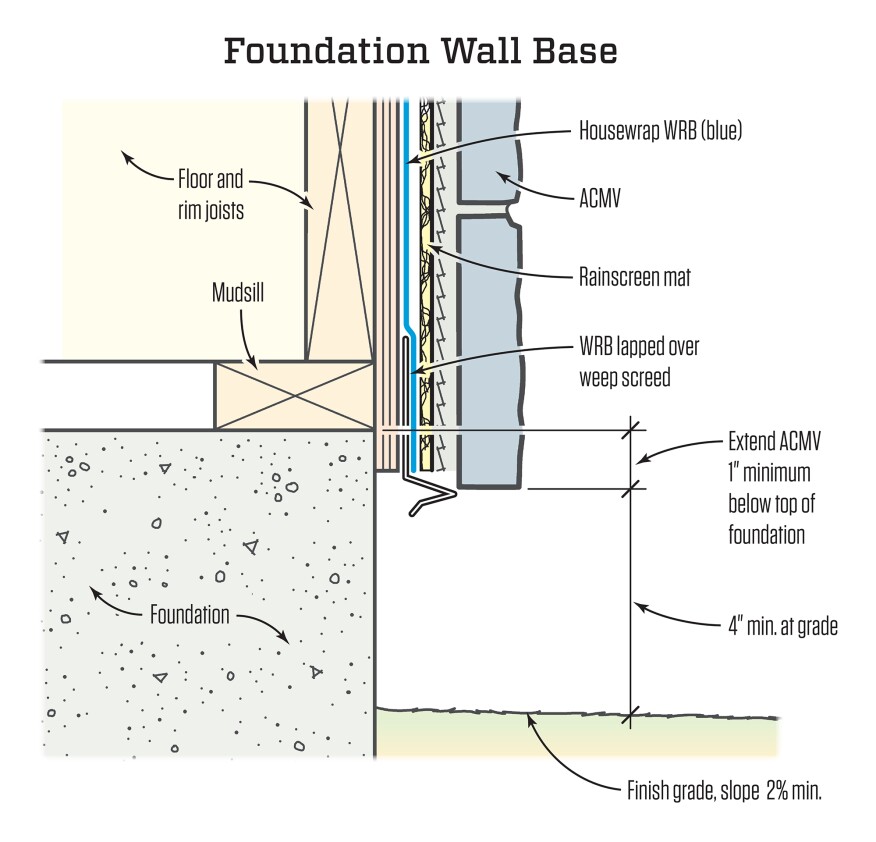
Mistakes that are common with stucco frequently occur with adhered masonry products, as well. “The adhered masonry veneer on every house I see is wrong,” says home inspector Bruce Barker, in Cary, N.C. “The biggest problems have to do with transitions: missing backer rod or sealant around window jambs, missing flashing at the transitions between dissimilar siding products, and missing weep screeds.”
The solution? As a first step, builders need to take care when hiring siding subs. They also need to write tighter specs and make sure the job super or lead carpenter is on site. “We advise more site supervision on the days stucco is being installed,” Richard Baker says.

Leaky Transitions
With exterior flashings, the most problematic spots are where brick or stone veneer meets another type of siding and where a roof dies into a sidewall.
“At least in my market, a lot of them don’t understand how their trade relates to the other trades,” Jim Schneider, a custom builder in Norfolk, Va., says. He has responded by providing scopes of work that detail exactly how the flashings have to be done and by making sure his job supervisor is on site to check the work.
Where a roof meets a wall, the roofer will often neglect to install kick-out flashing. The kick out is a bent piece of metal at the base of a step-flashing run that directs water into the gutter. When it’s missing, water can run down the wall below the gutter, working its way behind the siding and rotting the sheathing.
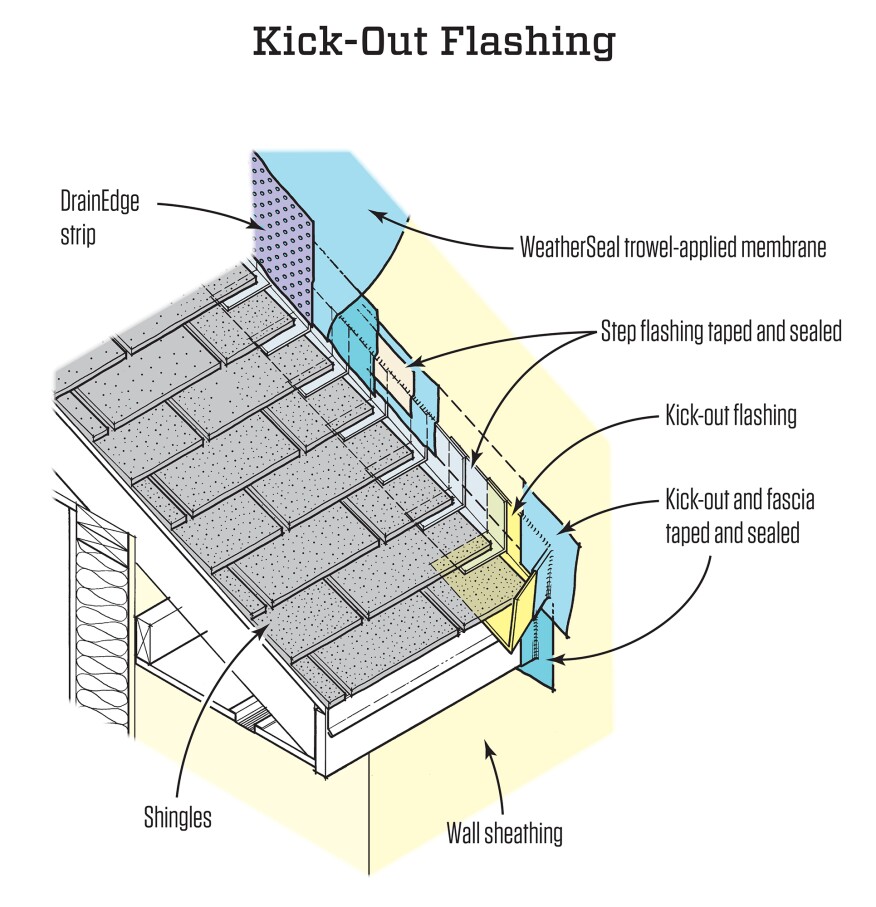
Some architects and homeowners don’t like the look of kick outs. An alternative (suggested by Bill Rose, author of “Water in Buildings: An Architect’s Guide to Moisture and Mold”) is to nail a pressure-treated 2x4 at the roof-wall intersection before installing roofing or siding. Then bend the step flashing over the 2-by and down onto the roof. This puts the flashing outboard from the cladding and directs water straight into the gutter.
Penetration Detailing
Installers have gotten better in recent years when it comes to window flashing. The one exception is the sill pan. “All exterior doors and windows need a sill pan but contractors in general aren’t using them,” Robinson says. “That’s fine if everything else is perfect, but it rarely is.”
Barker says that aluminum windows especially need a pan because installers can rack them during installation, breaking the seal at the bottom corners. “The IRC doesn’t require pan flashing on windows unless the window manufacturer does, and window manufacturers often don’t,” he says. By the time the homeowner sees a stain on the wall, there is already rot in the structure.


Leaky pipe and vent penetrations are also common. When installers cut a hole for a gas line or dryer vent, they need to flash it to the WRB. But they seldom do. “I see this done incorrectly all the time,” says Robinson. He says that the problem won’t be fixed until installers start taking wall penetrations as seriously as roof penetrations. He also recommends prefabricated boots like those made by QuickFlash.
He adds that the only caulks and sealants used around penetrations should be those with a high solid content. Silicone or polyurethane typically work best. As caulk cures, it shrinks down to its solid content, and if there’s not enough, you get gaps, Robinson explains.
Flat-Roof Leaks
Modern architecture is quite popular in some parts of the country, and modern architecture means flat roofs. “Flat roof problems are common in my market,” Risinger says. “We have to go to crazy extremes to make sure they don’t leak.”
While today’s roofing membranes are durable, it can be a challenge to integrate the roof and wall flashings. Even the smallest defect can cause a leak. Risinger learned this the hard way after a scupper in a parapet wall at the edge of a flat roof let water into the structure, causing several thousand dollars in damage. He now uses peel-and-stick or fluid-applied membranes on walls and parapets, and he brings the roofer in early to integrate the membrane with the roof flashing. Since he implemented those strategies, he hasn’t had a problem.
Hot and Cold Spots
Comfort complaints are rampant according to our sources, and the fault often lies with the ductwork. “A lot of residential ducts have excessively high static pressures,” says Jose de la Portilla, a technical training manager with HVAC Learning Solutions, in the Dallas-Ft. Worth area. “The mechanical equipment has to run longer and has to start and stop more often, making it more prone to breakdown and premature failure.”

The causes behind excessive pressures range from undersized ducts, to excessive bends, to sagging flex duct. Some installers suggest using rigid fittings for elbows and other directional changes, then stretching runs of flex duct taut between them. Many homes also have inadequate return paths that rely on door undercuts, leaving some rooms too hot and others too cold. The best way to avoid these problems is consult with the mechanical contractor during the design phase.

Another comfort killer is ducts that are run in unconditioned spaces without being properly insulated or sealed. An unsealed supply duct in an unconditioned space can waste as much as 500 cubic feet of air per minute, or more than a ton of heating or cooling capacity; leaky return ducts can pull hot or cold outside air into the system.
Custom Showers
Upgraded master baths with custom showers that feature built-in seats and multiple showerheads are a hot option among well-heeled homeowners. They tend to be on the second floor above a living space, so leak-proofing is crucial. But if, as is often the case, the seat is built into a corner, or the shower has an L-shape, the waterproofing membrane can be hard to detail correctly.

Baker is seeing more such installations than ever with pinhole leaks that are hard to detect but that let mold and rot slowly build up in framing cavities. “Complex showers need a higher level of waterproofing,” he cautions. For instance, while the membranes beneath most showers aren’t sloped, it’s worth the effort to slope the underlayment in the shower toward the drain before applying the membrane.

The Scheduled Callback
When it comes to serious issues like waterproofing and framing, getting it right the first time is crucial. When it comes to annoyances, however, the easiest course may be to schedule a callback ahead of time.
When he closes out a job, Mark Scott, a builder and remodeler in Cabin John, Md., schedules two follow-up quality inspections—one in six months and the other in a year. “During the six-month inspection, we look for anything unusual, like abnormal settling, and address those issues within two weeks,” he says. At the 12-month inspection, he takes care of all the cosmetic stuff: “We tell the customers that the home needs to go through a heating and cooling cycle in order to reach equilibrium, then we can fix nail pops and such, and they will stay fixed.”
Not only has this reduced the number of calls he gets in the interim, he says, but it has also enhanced his company’s reputation for customer service: “No one else around here proactively does follow-up quality control inspections, so it really sets us apart.”


