When attendees at the JLC Live expos see the schedule in front of my demonstration clinic, they come up and ask, “Why would anyone want to shingle a roof backwards?” While it may seem counterintuitive, top-down roofing makes sense in a number of situations. In the last couple of years, I’ve found myself using it more frequently than shingling from the bottom up. When I say top-down, I don’t actually mean applying each course of asphalt shingles in reverse direction starting at the ridge. I do top-down roofing in lifts, or groups of courses, from 4 to 7 feet high, starting near the ridge.
Why Bother?
In new construction, I choose top-down roofing in two instances: when I’m concerned about scuffing up the shingles, and on steep roofs when it’s necessary to work from roof staging. The technique also works well for reroofs (see “Top-Down Great for Reroofs,” below).
Top-Down Great for ReroofsMy favorite time to use top-down shingling is on strip and reroof jobs. I usually work with just my brother, so there’s no way we can strip and reshingle even a ten-square section of roof in one day. And with the local New England weather forecasts averaging only 40% accuracy two days out, I don’t like the odds. I could strip and dry-in the roof with tarpaper or cover it with a tarp, but I’ve seen too many disasters. Rather than strip the whole roof at once, I strip horizontal sections, usually 8 to 12 feet wide, starting at the ridge. I take a guess as to how much we can accomplish in a day stripping and reshingling and still have enough time to do a good pickup of the debris before leaving. We then roll out new underlayment and snap control lines. I start the first course of new shingles so they overlap the old shingles and work up from there. I cap the ridge if the opposite roof is already complete or just fold the top lap of the final course over the ridge if it’s not. When I’m concerned about wind overnight, I lay a horizontal 1×3 furring strip halfway across the butt edge of the bottom course of shingles that are only nailed up high. I drive screws every 3 feet along the bottom of the furring so the screws penetrate the old shingles, not the new ones. The strip prevents wind uplift damage to this vulnerable course. |
No scuffing. Asphalt shingles soften in the heat of summer and even on cool, sunny days. Light traffic on softened shingles can scuff and bruise the surface granules. While the damage may seem to be only cosmetic, in fact the missing granules mean the shingles have less protection and may wear out prematurely. With the top-down approach, I don’t have to walk on the new shingles, so scuffing is not a problem.
Faster on steep pitches. Top-down roofing actually saves me time on roofs with pitches greater than 8, where I typically use roof jacks. All the jacks and planks can be installed during the roof sheathing operation. This makes handling and nailing off the sheathing go faster. Plus, bundles of shingles can be spread out on the staging planks — no need to attach cleats to hold the shingles in place. I spread one bundle per sheathing panel for three bundle-to-the-square shingles. A boom truck or shingle conveyor makes short work of this task.
When shingling from the top down, the staging is removed as you make your way down. This eliminates the need to scramble up the roof over the freshly installed shingles to dismantle the roof jack setups.
Prepping the Roof
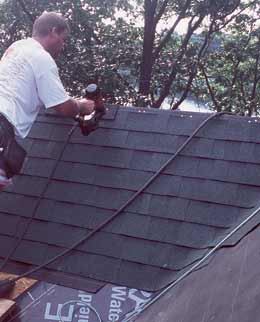
The top-down process is pretty simple; you use the same layout and installation techniques you would on a bottom-up job. In the photos in this article, I’m using laminated (dimensional, or architectural) shingles. Three-tab shingles require additional vertical control lines (see “Layout for Three-Tab Shingles,” below).
Layout for Three-Tab ShinglesWhen installing three-tab shingles, I use vertical control lines to keep the cutout slots lined up. That also helps prevent the slots from lining up in two successive courses where a lower-shingle lift mates with the completed section above. I mark the vertical layout at the ridge and eaves, measuring in the proper distance from a piece of drip-edge tacked along the rake. The number of vertical control lines you snap depends on the shingle layout. For example, you’ll need two lines for the “racking” method and five or six lines for the “pyramid,” or “diagonal,” method. I snap the vertical lines between the ridge and eaves marks in alternating colors. I use the same alternating colors for the horizontal control lines. Though it may seem excessive, you may want to consider snapping out every course the first time you try top-down shingling. If you do, you get a grid of intersecting red and blue lines that makes keeping track of the cutout slots automatic. Then you just orient the upper corner of the first shingle in each row with matching colored lines — blue vertical and blue horizontal or red and red. Match the top corner of the first shingle in the next course with the opposite color, and you’ll see as you roof up the section that the top corner of each starter shingle naturally matches the cross of matching colored lines. Once you get a feel for the alternating pattern of horizontal and vertical control lines, you can reduce the number of horizontal control lines on the lower lifts of shingles. I usually snap the same color horizontal lines every fourth course, or 20 inches. You could increase that to every sixth course, or 30 inches. The key is to use one chalk line color for every even numbered course and another color for every odd line. |
I begin by installing the eaves drip-edge and any self-sticking eaves membrane needed at critical areas like the eaves edge, wall-roof intersections, and valleys. I then set up roof jack staging at comfortable levels up the face of the roof, usually about 6 feet apart, with the top plank no more than 5 feet from the ridge so I can comfortably cap the ridge.
Working off the top staging level, I roll out two courses of tarpaper underlayment. I overlap the roof leg of the staging jack with the first course of paper but keep the nails along the bottom edge up 8 inches so I can slip the next lower course of underlayment beneath it later. The second course overlaps the first, as you’d expect, and can be nailed off completely right up to the ridge. I then tack on the rake drip-edge over the underlayment.
Shingle Layout
With top-down roofing, it’s especially important to mark horizontal control lines so you end up with a standard 5-inch exposure at the bottom. I determine the horizontal layout by tacking a full shingle along the eaves, letting it overhang the drip-edge the standard 1/2 to 3/4 inch. (You could just measure from the drip-edge and make the adjustment for the shingle height and overhang, but I tend to make math errors, so I like laying out with an actual shingle.) Then, working from the top plank and holding my tape measure against the top of the tacked shingle, I mark down the roof along the rake in 5-inch increments (5 3/8 inches for metric shingles), starting at the ridge. I do the same at the opposite end of the roof, then snap chalk lines between the marks. I don’t snap every course; lines at four- to six-course intervals (20 to 30 inches) are frequent enough to keep course drift in check.
Starting a Lift
I pick one of the course lines to start shingling from, one that leaves the shingle bottoms at least 6 inches above the staging plank. Locating the nails on the first course of shingles in each lift is critical. I drive two nails into the top corners of each shingle to hold it in place. Nailing high permits me to slide the top course of the next lift underneath. At that point, I’ll nail off the course properly.
I like to install all the shingles in the first course of each lift before working up the roof. I find it easier to keep straight where the nails of the first row go than to switch nailing patterns and work multiple courses across at the same time.
Once the first course is installed, I apply the rest as you would field shingles in a regular bottom-up application. If the other side of the roof has been shingled, I install the ridge cap shingles. Otherwise, I wait to do it from the other side.
At this point, I break down the top level of roof jack staging.
Installing Additional Lifts
I install the next two courses of underlayment, then mark and snap the next few horizontal control lines.
I repeat the procedure, temporarily fastening the first row of the lift, then nailing off the successive courses until I reach the bottom row of the shingles above.
Mating the last row of shingles to the lift above is the only part of top-down roofing that’s slower than bottom-up. I slide each shingle of the last row beneath the bottom row of the upper lift and nail it off while lifting up the shingles of the row above — the ones that had been temporarily nailed. I then lift the bottom edges of the next course of shingles above that and properly nail off the temporarily nailed shingles.
I usually nail each row separately, rather than moving across the roof and working both rows together. That way, I’m sure I haven’t missed any shingles.
In cold weather, it can be difficult to lift the shingles without overbending and cracking them. A roofing nailer helps, since you don’t have to lift the shingle very high in order to sneak the nailer nose in place. Hand nailing is awkward.
In hot weather, the bottom of the first two courses of shingles in each lift may seal to one another. One trick I’ve used is to isolate the self-seal strip using a piece of the release sheet from the eaves membrane, putting the siliconed face in contact with the self-seal strip.
Top-Down Valleys
I haven’t found a way to weave a valley using the top-down shingle method. It’s a bear to weave the last two courses when a lower lift reaches the one above it. Instead, I first weave the entire valley from the bottom up, installing just one shingle to each side of the valley. The body of the roof can then be shingled from the top down, working out from the valley shingles.
Cut valleys, on the other hand, are easy from the top down. The shingles of the first roof plane you shingle will wrap through the center of the valley and onto the opposite roof plane. Before placing the shingle of the first row of each lift through the valley, I lay a couple of loose shingles in the valley beneath it. I press the shingle against the loose shingles at the valley center and nail the top corners. The loose shingles simulate the shingles I’ll install later, spacing the first shingle row off the roof surface just a little. Without using the loose shingles as spacers, you’re likely to press the first row shingle too tight into the valley crease, making it difficult to slip shingles beneath it later.
When I reach the valley shingle with the next lift, I sneak the last shingle underneath, carefully lift the bottom, then nail.
You can either shingle the opposite roof plane at the same time as you work your way down the first plane or wait until you’ve shingled the first plane down to the eaves edge. Either way, it’s easiest to cut and tar the valley edge before breaking down the staging and starting each lower lift. Just remember to nail the first row of shingles high and omit the tar until after you’ve slipped the last shingle of the course beneath into place.
Open metal-flashed valleys are straightforward. The only caution I have is to skip the roof tar beneath the bottom course of each lift until you complete the next lift below.
Mike Guertin is a builder and remodeler from East Greenwich, R.I. He’s the author of Roofing With Asphalt Shingles (Taunton) and a member of the JLC Live construction demonstration team.