
When the owner of a multifamily rental property first approached me about repairing the building’s two-story front porch, my schedule was full, but I agreed to shore up the porch to prevent it from collapsing while the owner looked for another contractor to complete the job. More than a year later, the repair job remained uncompleted, mainly because the porch had scared off every other contractor who had looked at it.

Their hesitation was understandable. The porch structure was compromised by rot and undersized framing members, and neither the pair of stairs that led up to the porch nor the railing met code. Not only that, the house that the porch was attached to was more of a parallelogram than a rectangle, leaning 5 or 6 inches from side to side. Correcting the house’s defects wasn’t practical and was outside the scope of the budget, but with time in my schedule, I eventually agreed to tackle the porch repair.
Meeting Zoning Requirements
Listed on the state historic register, the house is located in an old Burlington, Vt., neighborhood where historic preservation requirements are linked to the local zoning permit process. For example, while either wood or composite decking is allowed in repairs to an existing porch, exposed pressure-treated (PT) framing is not. According to the city’s guidelines, the goal is to maintain the distinctive features, finishes, and craftsmanship that characterize a property. Repair rather than replacement is preferred, but in this case we had no choice: The structure was toast.
Visually, the posts and balustrade would have the biggest impact on the project, but I had repaired or replaced a number of porch railings in that neighborhood and was confident that the design my partner on this project, Sean Laughlin, and I proposed—which would raise the guardrail height to 42 inches, per local code—would satisfy the zoning board. Covering up the new pressure-treated framing with trim per local requirements would also be straightforward.
One of the main wrinkles in the project was replacing the existing two sets of nonconforming stairs leading up to the two entry doors on the porch. Instead of building two separate stairs, we proposed consolidating them into a single set of stairs that would lead up to a central dropped landing. This would allow us to stay within current rise and run requirements for exterior stairs without encroaching on the sidewalk, which was adjacent to the front porch.
Reframing the Porch
After the demo company we had hired demolished the existing porch, we dug into the sandy soil to inspect the existing concrete piers and determine whether they could be reused. Two of the four piers were fine, while the third one just needed reinforcement. The final pier needed to be replaced, so we pulled it out and poured a 24-inch-diameter footing 4 feet below grade with an 8-inch-diameter pier on top of it.

Deck ledger installation was complicated by the home’s stone foundation. The red rock used in its construction was too dense for us to drill holes in it for epoxy anchors, and irregular enough that we considered a free-standing porch foundation. Our solution was to install an extra-wide 2x12 ledger, which could be solidly attached to the house’s mudsill while allowing us to drop the porch framing so that the tops of the joists would be flush with the top of the foundation (a detail needed to accommodate the geometry of the porch stairs). Still, we needed to block out the ledger away from the house sheathing, as well as cut away part of the ledger where one of the foundation stones projected out from the house. It also created a kind of a step detail at the house, which we eventually covered with custom-fabricated copper flashing.

Historic porches are typically finished with tongue-and-groove (T&G) porch flooring that’s perpendicular to the house and pitched for drainage. So we framed accordingly, installing double 2x8 flush beams about 6 feet on-center between the ledger and outer rim, and then hanging the joists parallel to the house. Because we planned to use square-edge decking instead of T&G porch flooring, we didn’t pitch the framing; with gaps between the deck boards for drainage, we weren’t concerned about water pooling.

On the second level, we used similar floor framing and installed a new box beam to support the existing porch roof. Then we installed 1-inch-thick blocking around the perimeter of both the ground-level and second-story porch framing.
We like to install blocking prior to trimming out a PT frame for several reasons. One is that the blocking creates a gap behind the wood trim, allowing for ventilation and preventing moisture from being trapped. The blocking also helps to flatten out the PT framing, which is sometimes cupped or twisted (sometimes shims between the framing and blocking are needed to correct the worst problems). The gap is also handy when we use structural screws with heads that sit proud of the framing. And on this project, the blocking created space behind the fascia trim for the skirt detail that would enclose the area underneath the porch.
Decking
On a single-family home that gets regular maintenance, fir or mahogany flooring with a paint or penetrating oil finish are reasonable options, but on this rental property, reducing maintenance was a priority. We were able to source a dense, ipe-like tropical hardwood 1x6 decking for a reasonable cost that wouldn’t require any finish prior to installation, and virtually no maintenance afterward (we did treat the end grain with Anchorseal, a wax-emulsion end sealer).

I’m not a big fan of hidden fasteners with hardwood decking, especially in high-traffic areas, in our northern New England climate. In my experience, the decking looks great for a year or two, but then loosens up and moves around as the wood shrinks and swells. So on this project, we face-screwed the decking to the framing with stainless steel screws, predrilling holes through the dense wood.

We used 5/4 x 6 Angelique decking for the 11-inch-deep treads on the three 60-inch-wide steps leading up to the dropped landing. While the first tread projects a few inches out from the front of the porch, we set it back far enough from the sidewalk to avoid contact with the city’s sidewalk snowplow.
Turned Posts and Ceiling
We had a local wood turner fabricate 10 turned posts out of Douglas fir. While the post profile suggests the original posts, the design is new, with five slightly shorter 90-inch-long posts for the upper level and 108-inch-long posts for the lower level, and all 10 posts turned to accommodate 42-inch-high rails. At my shop, we primed them with an oil-based primer and gave them two finish coats of acrylic latex paint using both a 4-inch microfiber roller and a brush.

We cut 6x6 plinths from 2-by PVC stock, giving them a 3/8‑inch bead profile. Then we spread plenty of OSI Quad Max sealant between the plinths and post bases before screwing them in place. We repeated this process for each post as we installed it, allowing the porch’s weight to settle on each one and squeeze out excess sealant, which was still pliable. We spaced the posts as equally as possible and used a string line to make sure the post faces were exactly parallel to the house (to simplify railing installation).

Meanwhile, we trimmed out the porch with 4/4 P5 trim, a treated plantation-grown product that we prefer over PVC. It comes primed, and we painted it prior to installation. We first tacked the trim up with trim-head stainless steel screws, then nailed the trim off with galvanized siding nails.
On the ceiling above the first-floor porch, we left the joists exposed to match the appearance of the old porch. After the PT framing dries out, we’ll return and paint it. On the ceiling above the second-floor deck, we installed T&G beadboard fir, first brushing a clear Sikkens oil finish on the 1x6 boards. On the exterior, we patched and repainted any missing siding and trimmed out the new box beam.
Shop-Built Custom Balustrade
With the posts installed, we made a couple of story poles to help build the balustrade in my shop: one for the spans between posts across the front of the porch, and one for the returns on either side of the porch. I use a smartphone app called BuildCalc to lay out the balusters, aiming for a consistent spacing in all of the sections. To reference the original porch railing while meeting up-to-date code, we designed the 42-inch-high balustrade to have an intermediate rail representing the original 28-inch baluster height. In addition to the historic preservation issue, “squashing” the balustrade with intermediate rails creates a less generic look.

In the shop, we started by milling the stock for the 2 5/8-inch-by-2 5/8-inch handrails out of sapele, a tropical rot-resistant wood that is harder and heavier than African mahogany. After shaping the handrail profiles on the sapele blanks, I used a groove-cutter head on a shaper to precisely cut dadoes in the bases of the upper rails to snugly capture the 1 1/2‑inch square clear-red-cedar balusters. Because the balusters would have three coats of paint, the dadoes are slightly oversized to accommodate the finish.

Next, we milled and shaped the bottom and middle rails, each with a slightly different profile. Formed with the aid of a sled for the planer that tilted the rail stock 9 degrees, the inverted-V-shaped top edge of the bottom rail is designed to shed water and to help lock the bottom of the balusters in place. The middle rail has basically the same profile, but we also cut dadoes in the base of the rails identical to the dadoes in the top rails. Finally, we cut all the balusters to length, first making the V-shaped profile at one end to match the inverted V on the rails using a crosscut sled and a table saw tilted 9 degrees. Finally, after a light sanding to clean up the cuts, we primed and painted all of the parts, including the ends of the balusters.
Assembly. When building a balustrade for a two-story porch, I want everything to align vertically. So I use a consistent baluster layout, which I mark on story poles and transfer to the rails. To allow for adjustment, I start from the same side on each rail, leaving a couple of inches of extra material at the other end that can be trimmed to fit in the field. On this project, the balusters were laid out 5 1/8 inches on-center, leaving about a 3 11/16‑inch gap between balusters.

We pinned the balusters to the dado in the underside of the middle rail with 1 1/2-inch-long stainless steel brads. Then, with the assembly laid on its side, we fastened the balusters to the bottom rail, using long clamps to draw the rail section tightly together. To complete the assembly of a rail section, we pinned the short balusters to the dado in the underside of the top rail.
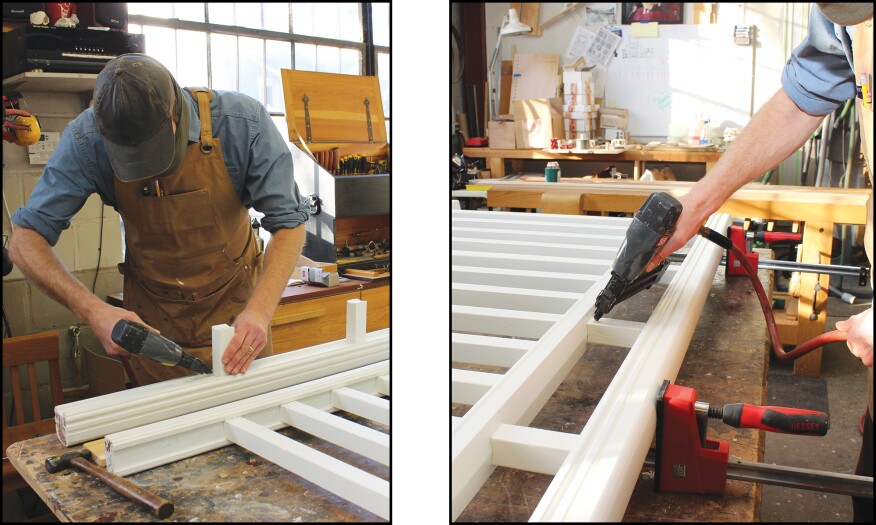
With the top rail clamped to the lower assembly, we checked to make sure the short balusters were centered over the V in the rail and aligned with every fourth lower baluster. Then we pinned everything together with stainless steel brads.
Installation
On site, we began installing the rail sections, temporarily propping the sections up on pairs of 2-by blocks to provide 3 inches of clearance underneath the bottom rail for snow removal. We butted the “factory” end of each section to a post, scribed the “long” end of the section to the opposite post, then trimmed the rails to length with a Festool TS 75 track saw. During installation, our goal was to make sure the negative space between the last baluster and post on both ends of each rail section would be equal.

We primed the cut ends prior to installation, and fastened the rails to the posts with 4-inch-long GRK coated structural screws. At the house, we notched and scribed the rail ends around the trim and siding as necessary to make a solid connection to the house framing.
When installing the upper porch railing, we made sure that the vertical elements were aligned with the lower sections before we cut the rails to length.

Final Details
We had bolted a pair of 4x4 PT posts to the framing at the landing to create mounting points for short handrails on either side of the front steps. To cover these posts, we fabricated sleeves out of 1x6 P5 stock, using T&G box joints and urethane glue at the corners. We wanted to add a chamfer detail to the post corners, so we avoided using metal fasteners when assembling the post sleeves. We slipped the sleeves over the posts and used wedges to plumb them before screwing them on. The posts are topped with caps that we fabricated from 2-by PVC, which are rabbeted to fit inside the sleeves. Short handrails fastened to metal brackets mounted to the posts completed the assembly.


Photos by Tim Healey and Nate Plasha


