
While I spend much of my time traveling around the country teaching carpenters and contractors the ins and outs of trim carpentry, I don’t often have the opportunity to work for myself—until recently. I bought a home in the Pacific Northwest and during the remodel, I decided to trim all the windows and doors in a Craftsman style, which I’ve always admired because it’s a perfect blend of classical architecture and gothic ornamentation.
If the terms Craftsman, classical, and gothic have you scratching your head, I’m hoping this article will give you some insight into the history and design of the trim that we install in clients’ homes every day.

Classical Design: All About Proportion
Classical trim designs date back several thousand years to the Classical Orders derived from Greek and Roman architecture. These orders are really just general rules of proportion and ornamentation for posts and beams—the columns are the posts, and entablatures are the beams or lintels. In this case, an “order” is the relationship of a horizontal element to a vertical element. Even a simple doorway with its vertical jambs and horizontal header represents an order. So it follows that all of the trim that we install in homes - both inside and outside - originates from those orders.

Most of the carpenters I meet in my travels have an intuitive understanding of proportion when it comes to building and trim. But often they miss the nuances that make a structure or trim look or “feel” right to the observer. For instance, if you’re building a patio cover, and you’re using a 6x12 beam spanning 12 feet, you don’t want to support that beam on 4x4s. That size post might handle the load just fine, but it would look terrible—like my skinny legs. A better look would be 6x6 posts, and an even better look for that span would be an 8x12 beam.
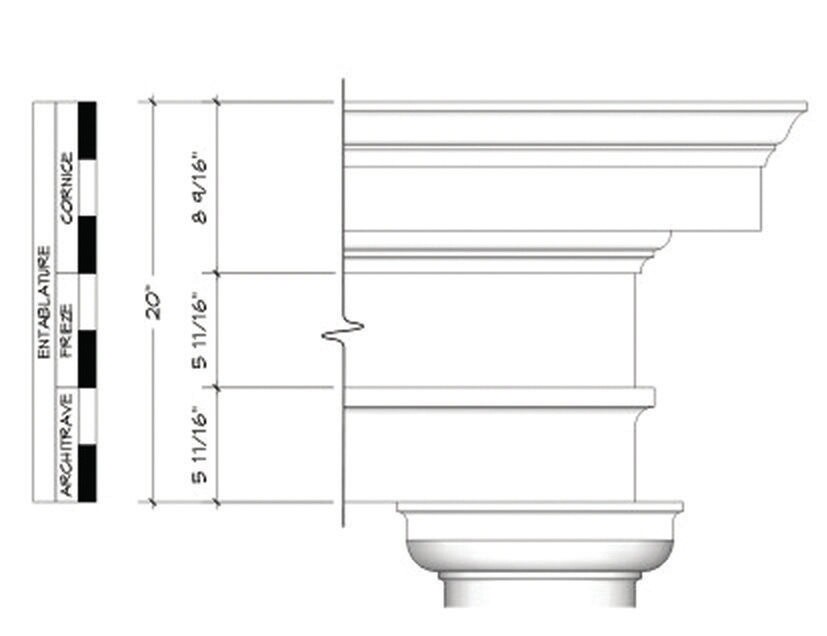
Entablature Proportions

Classical rules for proportion help to solve those and other kinds of design problems. They provide the exact size of the column, and the proportional sizes of the column’s plinth (or base), the capital (or top of the column), and the entablature details, including the architrave. Proportional rules are really nothing more than a method of dividing an entire column, including the entablature, into a system of parts (see Entablature Proportions, right).
The illustration at right uses the Tuscan order as an example. Notice that the entire entablature is divided into seven parts: The architrave is two parts, the frieze is two parts, and the cornice is three parts, including the crown molding, which is one part.
But this article isn’t about classical design, it’s about trim carpentry. So let’s take a closer look at how the classical orders of the Greeks and Romans translate into the trim details of Minneapolis and Boston.
Architrave Equals Casing

The Essential Architrave
In the illustrations we’ve seen so far, one of the basic components is the architrave. A few thousand years ago, window and door openings were “framed” by columns and entablatures, and the architrave detail trimmed the top edge of those openings.
Today we don’t build homes in the meticulous detail rendered in pattern books, but we do use architrave molding. As the pattern-book authors drew the classical orders, they took the architrave detail and modified it as the finish trim around window and door openings. And they referred to this trim element as architrave molding.
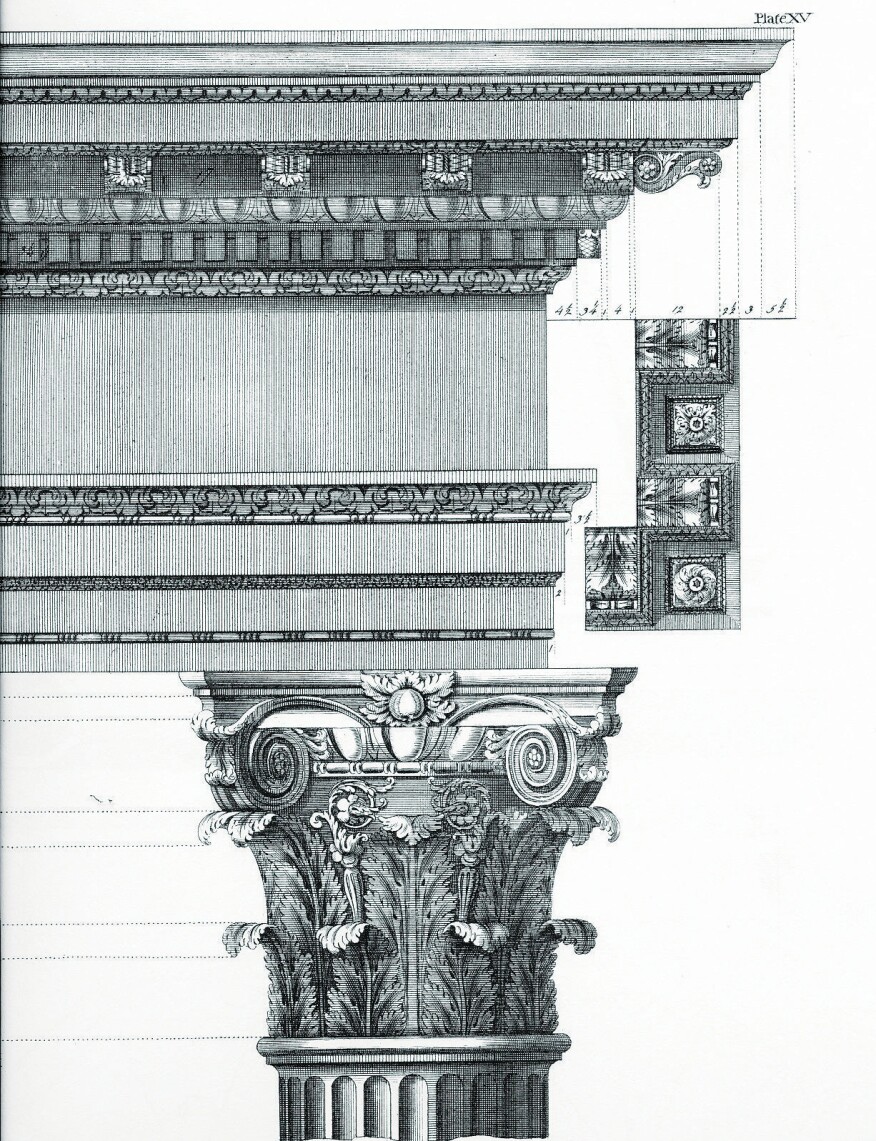
A great example of this is from Abraham Swan’s “The British Architect,” originally published in 1758. In this plate (left), the top of the architrave is defined by an ogee profile—just like a back band—followed by three descending fillets. Notice the similarity between this architrave design and many casing profiles—such as the Craftsman-style casing discussed later—we use today. Of course, window and door casings are considerably reduced in size and proportion, but the progression of shapes is still basically the same.
In Great Britain, casing is still referred to as architrave molding, and in some molding catalogues, you’ll find that same designation. In this country, we refer to this molding as casing. But because casing isn’t used only across the top of a door or window—it often miters at the head jamb and runs vertically down the legs—the terms architrave molding and casing refer generally to all the moldings that case or frame an opening such as a window or door.
Pattern Books Pave the Way
In the 18th and 19th centuries, pattern books were the only real “academic” instruction for carpenters and craftsmen. In addition to some pretty elaborate renderings of the classical orders, these books had detailed drawings and plans for features such as doorways, windows, and stairs, and sometimes even complete floor plans.
William Pain Breaks Down Classical Proportions

In many ways, pattern books were the equivalent of the building magazines and “how-to” books of today. In William Pain’s book, “The Practical Builder,” published in 1774, he sizes (and positions) all his moldings based on a classical column. In the illustration above, he first breaks down a Doric column (one of the simplest of the orders) into 13 parts, with the diameter of the column equaling one part. (In our example, we use a 10-foot column, with a diameter of 9 1/4 inches). Then Pain divides the column diameter into 12 parts (or 3/4 inch), and each of those parts into five parts (around 1/8 inch in our example). Note that he positions the chair rail (the top of the pedestal) at 2.67 diameters, or 24 3/4 inches, from the floor.
These measurements are not exact, and they don’t need to be. What is most important is that he has established a system for sizing and placing all the molding parts that you need to make and install. Using baseboard as our example, it’s no accident that the baseboard in a room with 10-foot ceilings works out to be 5 1/2 inches tall—sound familiar?

Historic Styles
The design of casings (architrave molding) has changed and evolved into a broad variety of architectural styles throughout our history, but these styles aren’t difficult to identify or differentiate from each other. The slideshow at left provides a brief overview of how casing styles developed in this country over the last few centuries, along with a photo example of each style. You can look around historic homes and see countless variants on these styles, as well as examples where elements from multiple styles were used in the same home.
Stool and Apron Installation
Most carpenters know that rules are made to be broken. Many of us count on bending or breaking the rules to make details work out for specific projects. While there aren’t many contemporary resources available that provide details for common interior trim designs, there are some examples taken straight from classical architecture that can help guide traditional trim installation.

When you install a window stool, the length of the stool is determined by the length of the apron, and the length of the apron is determined by the outside dimension (O.D.) of the casing. Simply put, the apron should be cut so that it’s plumb with the casing (see illustration, above, and photo, below left).
But when you install bullnose stool with a cove molding under the stool, you are forced to extend the stool projection. Stool is meant to replicate the cap or chair rail on a classical column pedestal, and the cove molding beneath the stool is a collar molding that wraps around the column or in this case, the window casing.


Even without a bullnose stool profile, cove molding can push the stool extension considerably past the casing. This explains why I’ve seen the “plumb-cut apron” rule broken in several historic homes (see photo, above right). Again, in this situation the carpenter decided what would look the best.
Classical Door Trim
It’s always nice to have one rule that applies to different situations. The “plumb-cut” rule can be applied to classical heads, too. In the Doric Order, a plumb line can be drawn from the end of the frieze right through the Doric capital, ending flush with the top of the column.
Classical head trim is very much like classical entablature. The head is assembled with an architrave bead or molding at the bottom, a frieze, and then a cap or crown molding at the top. Like the stool and apron, the length of the frieze is usually the O.D. width of the casing, so the end of the frieze is usually plumb with the outside of the casing.

The length of the crown and architrave bead moldings is determined by the bottom reveal of the crown, which should be the same along the face of the frieze and at both ends. If the exposed reveal or fillet is 1/4 inch, then the length of the crown (which is measured from the long point of the bottom fillet) would be 1/2 inch longer than the length of the frieze, or 1/2 inch longer than the O.D. of the casing. The reveal of the architrave bead is identical to the crown, so the lengths should also be identical.


While projecting the head casing slightly (1/2 inch to 3/4 inch) can look appealing in some cases (see photo, above left), a dramatically emphasized projection isn’t something all customers would appreciate (see photo, above right).


