
Our company is celebrating its 30th year in business, and we’ve had plenty of opportunities to see what works and what fails on roofs in our climate.
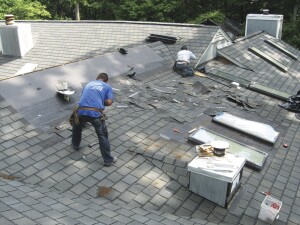
In the next few pages, I’ll show a few examples of our tradecraft standard for steep-slope roofs, as we teach it to our people. The photos on these pages show some mistakes, and some things done right. The drawings show how we would prefer to see things done. In particular, I’m showing our recommended details for ice dam protection, step flashing, underlayment and drip edge, and crickets and valleys.
These methods we teach aren’t the only way to do any of this work, but they’re the techniques we’ve developed over many years of trial and error on hundreds of jobs.
These details are guided in part by code, but more importantly, we’re guided by the goal of making sure we don’t have to come back and fix something after it’s built and has to face the weather. In our Maryland and Virginia climate, we have high confidence that these roofing details will work.
Roofing is back-breaking labor. That’s probably why in our market, and most likely in yours, there’s a lot of turnover among the roofing contractor labor pool. And so while many of the details here are fairly simple, we find that we have to teach them over and over again to roofers in our market. If you’re in that situation too, I hope the drawings here will be helpful to you.
Ice Dam Protection
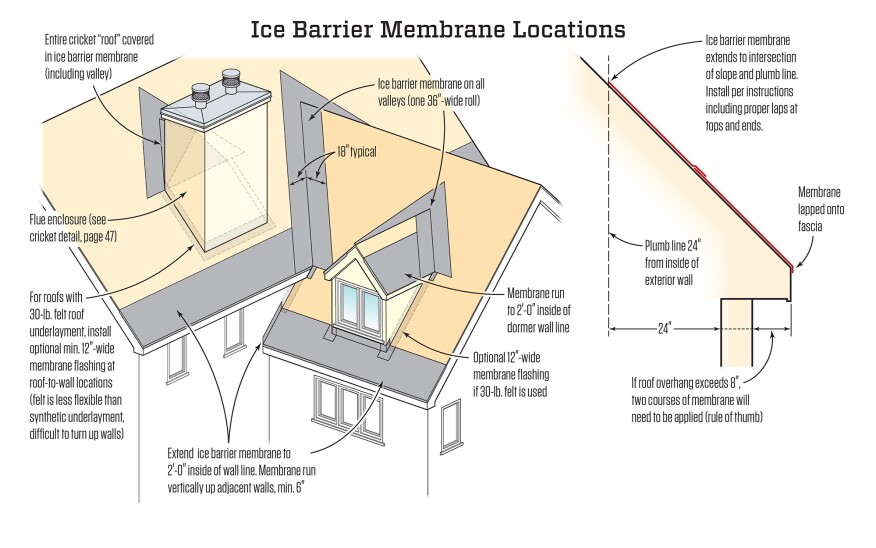
We use an ice barrier membrane at all eaves and in all valleys. At the edge of the roof, we call for the membrane to be folded over and adhered to the fascia board, lapping down onto the fascia about an inch. Depending on the manufacturer’s spec, some roofing materials may require an ice barrier membrane on the entire roof.
By code, the membrane has to extend inboard of the exterior wall by 2 feet. As a rule of thumb, we expect to use two courses of membrane if the roof overhang exceeds 8 inches.
Some ice barrier membranes have a granular or sand surface to make them more slip-resistant for trade workers who are stepping on the roof. That type of membrane can bleed soft asphalt in the hot sun, and it’s subject to damage during construction.
Also, the asphalt in that membrane can cause shingles to stick down in service. So as an option, we suggest covering the membrane with felt paper or synthetic underlayment as a bond break for the shingles.


Underlayment and Drip Edge
Ideally, fascia board will be installed before the ice barrier membrane to facilitate adhering the membrane to the fascia. Our practice is to install the membrane next, then install the drip edge over the top of that. As an option, we may specify a strip of peel-and-stick flashing tape over the top edge of the drip edge.

Our standard gutter install is to tuck the gutter under the drip edge, and place the fasteners straight through both on the back edge. But on our larger houses, long runs of gutter sloped at 1/8 inch per foot may run out from behind the drip edge. In that case, we call for an additional strip of metal to bridge the gap between the drip edge and the gutter.
Step Flashing
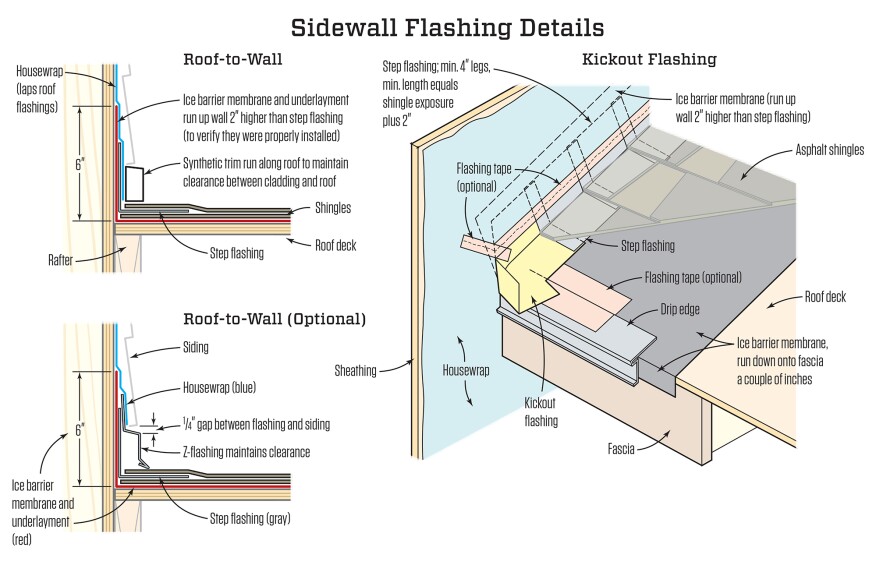
Wind-driven rain and snow can penetrate between step-flashing pieces and wet the sidewalls and the roof. So we instruct our roofers to run the ice barrier membrane and the roof underlayment up the sidewalls. We ask for 6 inches up the wall. Four is adequate, but asking for 6 allows for a bit of imperfect utility-knife work, and it’s easy to check if it’s been done even with the code-required 4-inch-tall step flashings.
To keep the roof and the wall dry, drainage-plane fabric (housewrap) on the wall needs to lap down over this roof underlayment, not run behind it. If the wall housewrap is already in place when the underlayment is installed, we instruct the roofers to slit the housewrap and pull it back, then reattach it over the roof underlayment.

Synthetic underlayment and ice barrier membrane readily fold at this wall-to-roof joint. But the heavier asphalt felts have a tendency to crack if you try to fold them like this. So if we’re installing felt paper, we back it up with a peel-and-stick membrane at the corner.


Crickets and Valleys
Architect plans for crickets behind vertical elements such as chimneys often show the cricket terminating right at the corner of the wall. It looks good on paper, but in practice, this creates a trap for leaves and debris, blocking the flow of rainwater coming down the valley downslope of the cricket. So we coordinate with the framers to construct the cricket so the valley misses the wall intersection by a couple of inches, allowing a freer flow of water. This also makes it easier for the roofers and siding contractors to keep the valley flashing and the sidewall step flashing disentangled.


