
No other building material has changed more in the past few decades than insulation. From fibers made from stone and recycled slag to spray foam insulation, new materials (each with its own pros and cons) seem to arrive almost daily. But despite all the changes and advances, fiberglass-batt insulation is still one of the most common types of insulation being used today. Readily available and easy to install, fiberglass can provide effective insulation in walls and ceilings if installed correctly.
General guidelines. Before discussing installation, we need to understand some broad concepts about fiberglass insulation. First, it comes in either rolls or batts. With rolls, each individual length has to be cut. Batts (which we will be talking about here) are available in precut lengths that commonly fit stud bays for 8- and 9-foot walls.
Fiberglass insulation also comes in precut widths to fit typical stud wall spacing—either 16 or 24 inches on-center—and in thicknesses that fit typical wall framing, such as 3 1/2 inches thick for 2x4 walls and 5 1/2 inches for 2x6 walls.
The most important thing to realize about installing fiberglass-batt insulation is that its effectiveness depends on six-surface contact: top and bottom plates, studs on both sides, wall sheathing to the outside, and wallboard to the inside. The insulation should fit snugly in the stud bay without being compressed; compressing the batts reduces the insulation’s overall R-value. Also, do not leave any empty air spaces in the stud cavity—voids around insulation allow air to move, which again undermines the R-value of the insulation.
Fiberglass batts are available faced or unfaced. The facing on the batts acts as a vapor barrier. There is some disagreement as to whether to staple the facing to the edges of the studs or along the sides of the studs. Face stapling does not compress the batt along the edges, allowing the insulation to loft fully into the entire space between studs. Side stapling creates small pockets of air and compresses the edges of the batts, both of which can reduce the effectiveness of the insulation. However, if the drywall installer intends to glue the sheets to the studs, side stapling will leave the edge of the stud exposed for the adhesive.
Protecting yourself. Exposing bare skin to fiberglass can cause itching and irritation. When working with fiberglass insulation, protect your hands with disposable gloves. A long-sleeve shirt and long pants or a disposable paper suit can help protect arms and legs.
Fiberglass insulation also tends to produce fine dust that can be very irritating to the lungs and breathing passages, so always wear a good dust mask (3M 8210, N95 or equivalent) when working with fiberglass insulation. That dust can irritate eyes as well, so safety goggles are advisable.
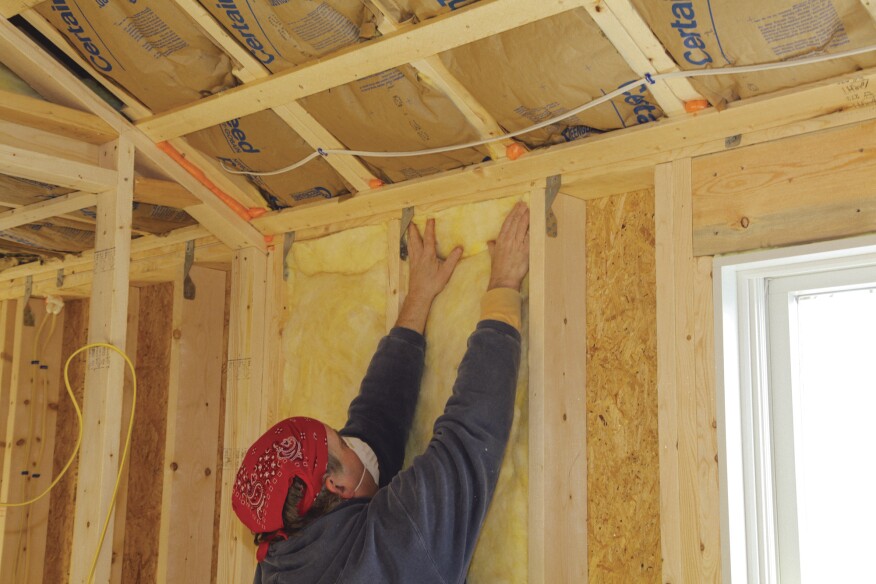
Cutting and installing batts. When insulating a room, first fill the full-width, completely open stud bays (with no plumbing, electrical, or HVAC in the way). Working from the top of the stud bay down, gently insert the batt into the bay with the top edge snug against the top plate. Then work your way down the bay, pressing the batt into place. If the sides of the studs are rough, they may snag the insulation as it slides into the stud bay, preventing it from expanding to fill the cavity. Run a putty knife along the edge of the stud to release any places where the insulation might be hung up.
Depending on the brand, precut batt lengths will be slightly long for the stud bay, but at this point, just let the excess stick out at the bottom of each bay. It’s usually much easier to cut them off all at once rather than getting up and down for each batt.


Next, fill the full-height empty bays that are narrower than a full width. Hold a batt up against one side of the narrow bay and pinch the top of the batt at the desired width. While still pinching the width, hold the batt up against a double stud (such as the side of a window opening). Fiberglass batts cut easily with a sharp blade in a utility knife, so starting at the pinched point, cut down the length of the batt, keeping the cut as close to parallel with the edge as possible. When you’ve cut as far down as you comfortably can, stop, flip the batt lengthwise, and finish the cut from the other end. Now the narrow batt can slip into its bay.


When you’ve completed a large wall section, go back and trim the bottoms of the batts. Simply cut the excess off each batt using the edge of the bottom plate as a cutting guide. After cutting a batt to length, push the bottom edge into the bay to allow it to loft or expand properly in the space. Keep track of all the cut-off scraps. They come in handy for small or odd-shaped wall cavities that need to be filled with partial pieces.

Finally, cut the pieces that fill in the bays under window openings. Hold a batt up to one of the bays, and this time, pinch the side of the batt at the proper height. Count the number of short pieces you’ll need and cut them all at once.
Insulating around wires and pipes in walls. Now we can turn our attention to the stud bays that have electrical or plumbing in them. Where wires run horizontally across the bay, there are two strategies. With the first approach, begin by holding the batt against the bay and pinching the location of the wires. Then cut partway through the batt at that height. The slit then wraps around the wires as the batt is pressed into the bay.


This method is fine if the wire is pretty close to horizontal and if there are no switches or feeds that have vertical runs. Otherwise, it makes more sense to split the thickness of the batt up as far as the wire. Because of the way fiberglass insulation is manufactured, you can separate the batt naturally without cutting the fibers. Then when the two sides are pressed back together, their fibers marry naturally to create a complete and effective blanket.
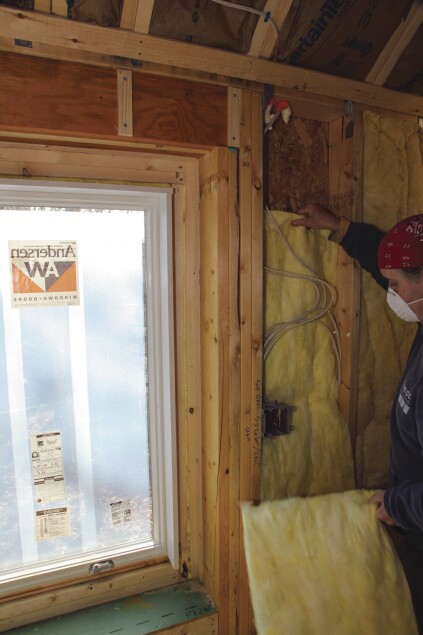

After splitting the batt, feed the outside section behind the wires and switches, sliding it up to the wall plate. Then push the inside part of the batt into the bay. If there is a switch box, run the utility knife around the box, cutting out just the inside layer of insulation. Make the cutout slightly smaller than the box so the insulation fits tightly around it. When the cutting is done, go around the bay and make sure that both layers are in full contact with the top, bottom, and sides of the bay, and that the fibers of the two layers have joined back together.
All photos by Roe Osborn.


