I hope that last month I got you fired up about installing a file server on your home or office network. To recap, I suggested that you centralize your data in one place — on a “black box” network attached storage (NAS) appliance, or an inexpensive dedicated PC server, or even an underutilized desktop computer. The goal is to have only one place that everyone in your company can go to open and save your project files, and only one place that needs to be backed up.
All that sounds great on paper, but having a file server addresses only one part of document management. A file server provides a central place to store and retrieve files, but by itself, it doesn’t do anything to stop you or your users from “losing” files by saving them in the wrong place, and it won’t prevent you from wiping out each other’s work by accidentally deleting files or overwriting files with the same name. And you still have to accommodate your lead carpenters, salespeople, and home office users who can’t always be plugged into the office network. You’re going to need a two-pronged approach: good housekeeping on the server, as well as some additional software to keep everything on track.
Establish File and Folder Naming Conventions
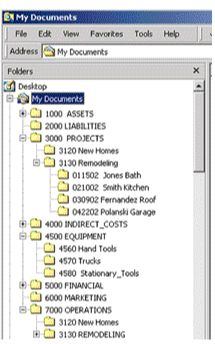
Left on its own, Windows will sort everything alphabetically, which means a seldom-used folder named “Archives” will always appear ahead of “Really Important Projects” in the list. That’s why I prefer a numeric system, which can be an extension of your familiar accounting cost codes, such as NAHB’s chart of accounts (see Figure 1).
Figure 1.A uniform file and folder naming convention is a must when setting up a network file server. A numeric system that follows your existing job or cost codes is ideal. The 2001 version of NAHB’s chart of accounts can be downloaded from www.mountainconsulting.com/library/.
Set Up File and Folder “Shares”
Nothing on your file server will be accessible to your users until it’s “shared.” To share a drive or folder on a Windows-based server, simply right-click it, select “Sharing,” then name the newly shared resource and assign permissions so your users can access it (Figure 2). If you’re using a NAS server, the procedure will be similar but will probably be done via a web browser interface.
Figure 2.Once your files and folders are properly named, you can set up the “shares” your users will see on the network. Depending on your network setup, you may be able to restrict access to certain groups of users or individuals using “file permissions.”
Map Network Drives
While it’s possible for your users to find what they need on the file server by clicking endlessly on Network Neighborhood or My Network Places on their desktops, a much better way is to “map” a network drive for them. A mapped drive will appear to be a local drive in their My Computer and Windows Explorer, so there’s nothing new for them to learn except that drive P (or whatever letter you assign it) stands for “Project Files.”
To map a network drive, right-click on the users’ Network Neighborhood (Windows 98) or My Network Places (Windows 2000 and XP) and select “Map Network Drive.” If you know the path to your file server and the “share” name, you can simply type it in the box in the form of \servershare. If you don’t know the path, just click “Browse” and drill down to the shared resource you want to map to a drive letter.
Be sure to click the “reconnect at log on” box so users will see the new drive letter every time they’re connected to the network (Figure 3).
Figure 3.Mapping a drive letter makes it much easier for your users to find files and folders on your file server. In this example, the user will see drive “P” (for “projects”), which is actually pointing to resources on the C drive of the file server. Once the drive is mapped, it will appear to your users as just another drive letter in My Computer and Windows Explorer.
Helping the Help
Just because you get your file server all set up and configured doesn’t mean anyone will know what to do with it. Whenever I hold training sessions, I encounter people who say they’ve used computers for years but don’t understand the fundamentals of how files and folders are organized, let alone how to use a network. It’s not that it’s tough, it’s just that nobody had ever shown them. An hour or two spent teaching them the components of the “open” and “save as” dialog boxes and explaining the difference between a “local” file and a “network” file sometimes clears up years of confusion. You need to stress that company files are valuable assets, and that they need to be organized and protected just like vehicles and tools. Once you demonstrate to your lead carpenter that having her work files on the server where they’re automatically backed up means she never has to worry about losing data again, or to your estimator that he will always have up-to-date pricing at his fingertips, they’ll come on board.
Staying in Sync
If all you need is to keep your own laptop and a desktop computer or simple file server synchronized, Peer Software’s Save-N-Sync lets you synchronize any two drives, folders, or files that you can “map” so they show up in Windows Explorer (Figure 4). Save-N-Sync provides a range of options — for example, making sure the most recent version of a file is always on the file server. Price starts at $29 for a personal version (www.peersoftware.com). A network version, PeerSync, allows scheduling synchronization between multiple users and your file server and works especially well with NAS appliances.
Figure 4.As long as you can make it show up in Windows Explorer by mapping a network drive, Save-N-Sync can keep files and folders synchronized, making it an ideal solution for keeping a laptop computer synchronized with the shared files on your file server or desktop computer.
Check It Out
Let’s say it’s noon on Friday, and you’re headed out to the job site with your laptop. You grab an estimate file from the file server that you want to work on at home over the weekend. Meanwhile, your estimator comes back from lunch and spends the rest of the day working on the same estimate, but you have no way of knowing that, and he has no way of knowing that you had already copied the file. Monday morning, you show up and save your copy (which you never got to) back to the file server, effectively wiping out all the work he did on Friday afternoon.
You don’t even need to be a mobile user for these kinds of problems to rear their ugly heads — even if all your users are in the office at the same time, you can run into file version problems when using a file server. That’s where document control software comes in. If you have multiple users working with critical project files on your server, just synchronizing might not be enough.
If you remember the tool cage in your high school shop class, you’ll understand the idea behind document “check-incheck-out,” which is the best way to make sure nobody can undo someone else’s work. Nemetschek North America, the same company that produces the popular VectorWorks CAD, also makes a reasonably priced document control package called Revision Master — aimed straight at the smaller construction or design company. Revision Master (www.nemetschek.net) works by creating a “library” of project files. When a user checks out a file, it’s locked for editing until they check it back in. Furthermore, a log is created that lets you track who did what when. Revision Master also handles version control automatically. You can access older versions of your files on demand. Revision Master is $179 per user or $449 for a five-user license (Figure 5).
Figure 5.
Revision Master uses secure check-incheck-out to automate document management chores. User logs and automatic version control simplify the problem of multiple users needing access to critical project files.
Joe Stoddard is a technology consultant to the building industry and a contributing editor at The Journal of Light Construction . You can reach him at [email protected].


