- Q. I will be installing a 40-ft. length of wood gutter on a historic house. Can you provide details for joining gutter sections, end capping, and installing the outlets?
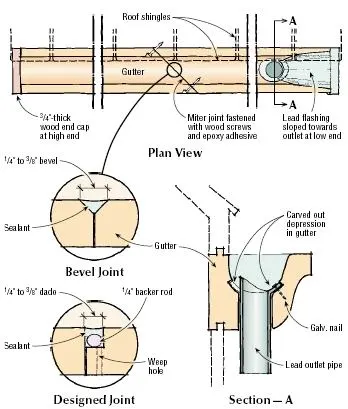
A.John Leeke, a preservation consultant from Portland, Maine, responds: To join straight gutter sections, I usually use a miter joint, fastened with screws and adhered with epoxy adhesive formulated especially for wood.
The most effective way to seal butt and miter joints is to form a groove along the joint, inside the gutter, and to fill the groove with a sealant. The groove provides a space for enough sealant to make the joint flexible, allowing for expansion and contraction.
One way to create the groove is to rasp a 1/4- to 3/8-inch bevel at the edge of the joint. For better performance, make a “designed joint” by routing a rabbet at one side of the joint (see illustration). Apply release tape to the bottom of the rabbet, or insert backer rod, and then install the sealant. This type of joint will let the sealant flex more that the plain bevel joint. Since no sealed joint will last forever, I drill a weep hole at the bottom of the rabbet to let water out of the joint. Once the joint begins to leak, the weep hole helps prevent decay, and acts as a tell-tale sign, indicating it is time to re-seal the joint, as part of ongoing maintenance.
The traditional way to flash these joints is with lead flashing installed in the gutter trough. Thin sheet lead flashing is better than thicker flashing, because it is more flexible in service. I start by forming a 4-inch-wide lead strip to the contour of the gutter trough, so it laps over the joint 2 inches on each side. Then I scribe the wood surface along the edge of the lead and chisel out a depression so the lead sits flush with the trough surface. I seal the lead down with flexible sealant along the edges and fasten it in place with galvanized steel or lead-coated copper nails, which I coat myself. If plain copper nails are used, the lead is subject to corrosion due to electrolysis.
A leak-proof outlet can easily be formed with lead pipe. I can usually find thick-walled lead waste pipes right on renovation projects, whenever an old sink is being ripped out. New lead outlets with a flange already formed are available at some building suppliers.
A flush lip on the outlet will allow all the water to drain quickly. First, I drill a hole in the gutter about 1/8 inch larger than the pipe. With a ball peen hammer I gently form a 1/2-inch lip on one end of the pipe. I shape the lip so it lays flat on the trough bottom all around. I scribe the trough to show the outline of the lip. Then I chisel a depression for the lip, so it sits flush with the surface of the trough. Finally, I seal the lip in place with sealant and fasten with 1-inch galvanized steel or lead-coated copper nails.
At the high end of a gutter, I make end caps out of 3/4-inch-thick wood. A simple sheet-metal flashing is not likely to hold up to years of gutter cleaning. At the lower end, I usually install a complex sloping piece of lead flashing, to make sure the short length of gutter from the outlet to the low end drains back into the outlet.
Wherever end-grain has been exposed — at the various cuts, rabbets, and holes — I seal the end-grain with epoxy consolidant before priming, painting, assembling, sealing, and flashing. This prevents one of the leading causes of wood gutter decay, which is end-grain water penetration. I usually use a one-part polyurethane high-performance sealant, like Sonneborn NP 1.
Wood Gutter Details
Q&A: Installing Wood Gutters
3 MIN READ