
Bosch 4100 Specs
Weight: 60 pounds; 99 pounds with stand
Table size: 29 inches by 21 1/2 inches
Cutting depth at 90 degrees: 3 1/8 inches
Cutting depth at 45 degrees: 2 1/4 inches
Maximum rip: 25 inches
Amps: 15
No-load speed: 3,650 rpm
Street price: $500; $600 with stand; $680 with stand and digital rip fence
Bosch Tools
877/267-2499
www.boschtools.com
Late last year Bosch introduced the Worksite Table Saw (model 4100), an improved version of its Benchtop Table Saw (model 4000). I’d tested the earlier model shortly after it came out and found it to be one of the best 10-inch portables on the market (see “10-Inch Portable Table Saws,” 8/03). The new saw is very similar, but with a few added features.
Like its predecessor, the 4100 has a smooth, powerful soft-start motor, an accurate rip gauge, and a fence that’s easy to use. The mechanisms for raising and tilting the blade operate cleanly, as do the slides that extend the right-hand side of the table for wider rips. The only notable differences from the first version are the construction of the base and the guard assembly, and the addition of an optional digital rip gauge.
Stronger Base
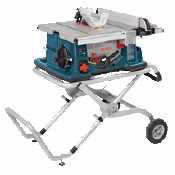
The base of the earlier model had hard edges and no reinforcement, making it vulnerable to damage when not attached to a stand. The new saw’s base is tougher: Its bottom curls under to form a thickened edge. The saw I tested (4100DG-09) came with a Gravity-Rise Stand (see Toolbox, 7/06), which helps with transporting and setting up the saw but takes up a lot of space in the back of a truck.
Thanks to a pair of grips built into its base, the 4100 is relatively easy to carry when not on a stand.
Electronic Rip Gauge
Carpenters who don’t want to use the saw’s built-in rip gauge can buy the electronic version, which Bosch calls a “digital carriage.” It works like this: A thin steel cable in a channel under the rail spools in and out of the carriage as the fence is moved; to gauge the width of the rip, an internal device tracks the spool’s rotation and displays that distance on an LCD screen. Below the screen are three buttons: “on/off,” “units,” and “reset.” Calibrating the scale is simply a matter of sliding the fence against the blade and hitting the reset button; the “units” button sets the scale to read in fractional or decimal modes. In fractional mode the screen displays dimensions to 1/16 or 1/32 inch; in decimal mode, to .01 inch or .5 millimeter.
Accuracy. According to Bosch, the electronic scale is accurate to the nearest 1/32 inch in all modes. That squares with my experience using the tool; it measures to the nearest 1/32 inch and then rounds to the nearest unit. To verify this I calibrated the scale, set it to the 1/16-inch mode, and used a machinist’s rule to measure between blade tip and fence. With the tip set at the 6-inch mark on the rule, the screen displayed “60/16” inches. I moved the fence away but the display continued to read “60/16” inches until the measurement on the rule was just beyond 6 1/32 inches; at that point it changed to “6 1/16” inches. The reverse was also true: The screen displayed “51 5/16” inches as soon as the measurement on the rule dropped below 53 1/32 inches.
Pros and cons. My initial feeling about the electronic rip scale was that it was a gimmick. But now, after using it for several months, I’d be willing to spend the $90 it costs to put one on the saw. Reading dimensions from the screen is easier than reading them from the built-in scale, especially in poorly lit work areas. And the accuracy is fine for most carpentry and cabinetmaking tasks.
I do have a couple of minor complaints. The scale is powered by a 9-volt battery and automatically shuts down after about a minute of inactivity; this extends the life of the battery but means you’re constantly turning the unit on.
Also, when you turn on the scale it displays the dimension of the last rip you made. That’s fine if you don’t move the fence — but if the fence moves while the unit is powered down, the wrong dimension will be displayed when it comes back on. Recalibrating the scale is simple enough — but you have to remember to do it.
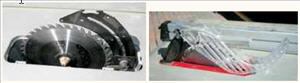
To prevent kickback, the saw has a riving knife (above) that can be raised and lowered without tools. In the photo at right, both the barrier guards and the anti-kickback pawls are in place. Smart Guard System
It’s hard to get excited about blade guards: Every table saw comes with one, but as far as I know nobody’s ever worn one out. That’s no surprise given that most guards make it harder to use the saw. Bosch’s Smart Guard System, however, is different — it’s easy to remove and reinstall and doesn’t seriously interfere with the saw’s operation. The system consists of a riving knife, barrier guards, and anti-kickback pawls. When not in use, the barrier guards and pawls store on a bracket below the table.
Riving knife. The riving knife extends up from the table in line behind the blade. If the kerf closes up, the wood will pinch against the knife instead of the blade — thereby preventing kickback. The riving knife can be used with or without the barrier guards and pawls, and can be raised and lowered without tools.
Barrier guards. The barrier guards clip into a notch on the riving knife by means of a cam-activated lever. A cast metal “fork” at the top of the assembly and plastic guards at the sides protect the operator from the spinning blade.
The barriers move independently: You can lift the right one to bring the fence close to the blade and the left one will remain on the table. If you need to measure or adjust something, you can lift the guards and a retaining clip will hold them up and out of the way. I like being able to see the blade through the gap between the barriers. The downside, though, is that chips and splinters come flying back as if there were no guard, so you still need to wear safety glasses.
Anti-kickback pawls. The anti-kickback pawls are a separate part of the assembly and are attached to the riving knife with a spring-loaded pin. They prevent kickback by digging into the stock if it starts to move backward — which is most likely to happen when a piece is captured between the fence and blade.
The large numbers on the digital display (left) are easy to read. To calibrate the device, you slide the fence against the blade (below) and then press the reset button. The retaining clips hold the plastic side guards up and out of the way. Usability. The ease with which this guard can be removed and installed eliminates the main problem with most guards: If it’s hard to install, no one will put it on. I made a point of using the guard on this saw. It certainly wasn’t a hardship — the difficult part was breaking the habit of thinking that guards greatly reduce productivity.
My one concern about the guard assembly regards its durability. The retaining clips that hold up the guards seem delicate, and on the saw I tested the pressed-in pin that secures the riving knife’s release lever fell out for no particular reason. I found it and glued it back in with epoxy. If it had been lost, I’d have retained the lever with a split pin — which is how Bosch should have connected it in the first place.


