by Gerret Wikoff, Jesper Cook, and Steve Kuhl
Gerret Wikoff
Owner, Gerret Wikoff Custom Carpentry & Construction
Los Angeles
I’ve been a licensed GC doing new construction and remodeling in the LA area since 1980. My company is on the small side, so I have to be fairly hands-on in working with my crew and subs. When I first heard about computer drawing, I thought it would be easy, intuitive, and quick. My first few forays into using CAD didn’t live up to my expectations, but after seeing another contractor make rapid changes to a job plan on the fly using a program called SketchUp, I decided to give it a try. I’m glad I did.
On-the-job training. One of the best things about SketchUp is the availability of free online video tutorials. Three years ago, when I started using the software, I’d begin work on a drawing, watch one of the tutorials, and then try to finish what I’d started. But working on hypothetical design problems with no tangible deadlines made for slow progress. To help me focus, I decided to try learning the program on an actual project.
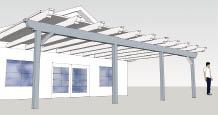
The first real job I used SketchUp on was a straightforward patio overhang. From watching videos on the SketchUp site, I already knew how to do the simple things, like drawing the footprint of the house and creating mass by using the “push/pull” tool. As I moved along, figuring out how to place the columns and beams, something began to click. Within a few hours, I had drawn a covered patio overhang (Figure 1). The finished drawing looked pretty good, and I was able to rotate it around and pick the best view to print. I exported a jpeg of the drawing and emailed it to my client, who soon signed a contract with me.
Figure 1. The decorative beams shown here were created as SketchUp “components” – the author drew the bandsawn end once and then simply copied it as often as necessary; this also allowed him to manipulate the beams independently of the rest of the model. The “glass” in the windows comes from the textures library.
After that confidence-building experience, I used the program to help estimate a series of smaller jobs. To figure out the volume of concrete I needed for an irregular pool deck, I scanned the plot plan and imported the jpeg into SketchUp. After adding the dimensions of the proposed pool deck, I made it 4 inches thick and the program gave me the volume. I added for waste, and – voila! – I had my concrete budget to fit into my estimate. I went through the same process for a proposed curved concrete barrier at a nursing home (Figure 2). I even used the program to design a couple of custom-shaped duct plenums for a small remodel job (Figure 3).
Figure 2. To generate a project’s concrete takeoff, first the author “exploded” a site plan he’d scanned and imported into SketchUp, then he scaled it with the tape-measure tool. The curb was defined with the arc and pencil tools and “pushed” and “pulled” the required distance above and below grade. Finally, the 3D shape was converted into a “group,” making it possible to calculate its volume with a click of the mouse.
Figure 3. As part of a basement project, a bulky Y fitting in a 10-inch hvac duct had to be replaced with a more compact sheet-metal plenum that could be concealed in a soffit. This SketchUp model – shown in “X-ray” mode, which allows the viewer to see faces and edges that would otherwise be hidden – helped the sheet-metal contractor build exactly what was needed.
Quick presentations. I’m still not an especially expert user, but I’ve found that my minimalist sketches are good enough to convey my ideas to clients. SketchUp’s ability to import existing drawings from any source really streamlines the design process, making it possible to prepare 3-D representations with little effort.
The drawings in Figure 4, for example, show two possible approaches to a kitchen remodel I prepared for an interior designer. The bay-window options were drawn up directly from her plan – a relatively quick process that involved tracing over selected walls, making sure there were no gaps in the lines, and “pulling” them to the desired height. She showed both versions to the client and closed the deal.
Figure 4. To present a client with two design options, the author scanned and imported the designer’s plan into SketchUp as a jpeg, exploded the image, and pulled up the walls to convert it into 3-D. After deleting walls slated for removal and adding new beams and cabinets, he drew two versions of the bay window – one with a manufactured unit from Andersen (A) and a larger one with its own foundation (B).
Even when things don’t work out so well, this approach can pay off in time saved. When preparing a recent bid for a small bath remodel, for instance, I copied part of the existing floor plans and hand-drew a design for the bathroom, which I scanned and then imported as a jpeg. I exploded it, raised the walls, imported a toilet and sink, and added some color and material finish (Figure 5). Although the homeowners were pleased with the results, budget problems put the future of the project in doubt – so I was happy I’d invested only a couple of hours in the drawings, rather than a day or more. (Fortunately the job came through later.)
Figure 5. Created from an exploded floor plan, the quick view of a possible bathroom remodel offers only a partial view of the tight space (A). Rotating the drawing and selecting the “X-ray” and “monochrome” toolbars provides a cleaner-looking model with fewer obstructions (B).
Getting technical help. Given the downturn in housing, I’ve been working on more commercial projects lately. Public funding recently became available for facade improvements to light-commercial buildings in my area, and one client asked me to do some color 3-D drawings to take to the city with a funding request.
This was a challenge, because it was the first project I’d done that required careful matching of colors and materials. The architect and the building owner had selected a custom burnished concrete block for the facade, and I discovered that even though the free version of SketchUp offers several brick textures, nothing similar is available for concrete block (Figure 6). After applying a brick pattern as a placeholder, I turned to a block design program on the Web that allowed me to create a stacked block wall, save it as a jpeg, and import it into SketchUp as a texture. But I couldn’t get it to scale correctly in the model. Frustrated, I posted a question on SketchUp’s online help forum.
Figure 6. Because there was no suitable concrete-block pattern in the SketchUp textures library, the author temporarily used a brick texture for a commercial building’s support wall (A). After consulting an online forum, he rescaled a block design he found on the Web, imported it into the program, and saved the result (B). The completed drawing (C) was sent to the city’s design department for approval. To evaluate trim options after construction was under way, he imported a photo and scaled it in the model, outlined the selected areas, then “painted” them the desired color (D,E).
Within a day, a couple of SketchUp gurus had responded with some useful and specific pointers that got me back on track. I printed out color renditions of the building – shown from several angles – on 11×17 paper and sent them to the city design review department, which approved the project.
A design tool for the rest of us. I once worked with a designer who would walk into a room, borrow a carpenter’s pencil, and sketch – on the wall, in just a few minutes – a beautiful, correctly proportioned 3-D rendering of how the room was to look. These drawings were works of art. We hated to paint over them.
SketchUp won’t give you that kind of talent, but it will help you, your clients, and your subs visualize how a design will ultimately look. It’s a great tool for troubleshooting problems that aren’t easily understood from the plans, designing and selling jobs, and doing material takeoffs. If you’re like me, you can expect to tear out at least a little hair as you learn the program. But stick with it – the results are worth the effort.
Jesper Cook
Project Manager, Millworks By Design
Los Angeles
Three years ago, I worked for a residential remodeling company as a project manager. That’s where I got serious about using SketchUp. The first time I tried the program I didn’t get very far, but a little later I made rapid progress when I used it to draw a remodeling project that featured a new kitchen, great room, and master suite (Figure 1).
Figure 1. An overall view of the proposed kitchen, great room, and master suite was sent to the tile and cabinet subs for use in bid preparation (A). The cabinets were “built” from scratch in SketchUp, but appliances and fixtures were imported from the program’s 3-D Warehouse (B). Modeling the washer-dryer cabinet helped avoid potential conflicts with adjacent doorways (C).
Once I decided to use SketchUp on that job, I jumped in with both feet and made a preconstruction 3-D model of the whole project, taking pains to get the finishes and cabinetry as accurate as possible. I even drew in the outlets and switches to make sure they were where the clients wanted them and to prevent possible conflicts with the cabinet doors.
I had no previous drafting or modeling experience, so I can’t compare the learning curve with that of other programs. There were a few stumbling blocks, though. I learned the hard way that it’s critical to organize a model into groups and components as you go or it will be very difficult to make corrections later. I didn’t take that step, and when I wanted to make what should have been a simple revision, I was stuck. I found that it was easier to start over from scratch than to fix the mess I’d created.
Initially, I took all the finishes from SketchUp’s standard texture palettes, using them as placeholders for the clients’ final selections. Most were easy to apply to the surfaces, using the “paint bucket” tool. The one exception was the floor tile texture; it had to be scaled up from a 4×4 tile to the desired 18×18 size, so the model accurately represented the selected materials.
I imported the appliances from SketchUp’s 3-D Warehouse, which contains a vast assortment. Using the scale tool, I changed the size of the appliances as needed, added some dimensions to the model, and exported it as a jpeg in order to share it with other project team members.
Importing textures. The next time I used SketchUp was for a midrange kitchen remodel. The job was slightly unusual in that I’d been asked to create a design around materials the owners had already selected or purchased, including some custom handmade wall tiles, a cork flooring pattern, and a countertop made from recycled materials. This allowed me to use SketchUp to produce a fairly accurate model of what their kitchen would look like, from the beginning of the design process (Figure 2).
Figure 2. Because the clients had chosen finish materials that weren’t available in SketchUp’s textures library, the author imported sample finishes from the Web or used on-site photos of the materials themselves. The yellow circles represent the locations of recessed light fixtures in the ceiling plane (A). To create the countertop edge profile, he used the “follow me” tool to pull a half-round profile around the outside edge, then applied the countertop texture (B).
I started with the custom tile mosaic behind the cooktop, copying an image of the design from the manufacturer’s website and applying it as a texture. I also found an image of the countertop material the client had selected, but in this case I had to work on the image a little to make it “tile” correctly; an image that’s applied as a texture is automatically repeated across the entire surface, so I had to do some editing to make the seams less noticeable.
When I was finished, I presented the result to the clients by emailing them the model, along with a link to a stripped-down version of the program, called SketchUp Viewer. Once they’d downloaded the model, they were able to rotate it and view a series of scenes I had selected and saved. This proved its worth right away: They decided they didn’t like the location of the pot-filler faucet positioned near the cooktop, and I was able to make a quick revision and give them several alternative placements to choose from.
Laying out repetitive elements. SketchUp is a fast and efficient tool for spacing repetitive elements in a drawing. I recently worked on a design that involved converting an unused attic into living space accessed by a new staircase. The clients had already chosen a baluster style they liked, and after searching around in the program’s 3-D Warehouse, I came up with a close match for it. (I also could have created a SketchUp version from scratch.)
To array the balusters evenly along the stairs, I imported the selected baluster and placed it at the bottom of the flight (Figure 3). I then copied it and placed a duplicate baluster at the top of the flight. Next, I guessed at the number of balusters required to fill the space in between those two points and entered that number into the program’s “value control box,” followed by a backslash symbol. That told the program to add the specified number of balusters, evenly spaced between the original two.
Figure 3. Once the first and last balusters of this stair rail were positioned, SketchUp could be instructed to add a selected number of evenly spaced balusters between them. A couple of tries were needed to come up with a spacing that complied with the stair code (A). The final version also reflects a change to the handrail-to-newel post connection, made when the client rejected the gooseneck connection in an earlier drawing (B).
Better all the time. At first I worked exclusively with the free version of SketchUp. But last year I made the transition to the paid version, SketchUp Pro, mostly so I’d have access to LayOut, which comes bundled with it. LayOut is very useful in combination with SketchUp, because it lets you take different views or sections from the 3-D model and use them to create 2-D presentation documents (Figure 4).
Figure 4. Perspective views of this window seat helped convey both the design concept and construction details. Once approved by the project’s architect, they were passed along to the carpenters. Separate scenes of each view were created in SketchUp and transferred to LayOut, where an option called “update reference” automatically changes the LayOut file in response to changes in the SketchUp model.
Drawing basic shapes is fairly easy with SketchUp, but getting really proficient takes some commitment. Although I climbed the steepest part of the learning curve during my first project, I’ve continued to refine my skills in the years since, using a variety of different resources – tutorials from Go-2-School, for instance, and the book SketchUp for Dummies. The SketchUcation site also contains a lot of information and lets you post specific questions about problems you may be having (see “Online Resources”).
SketchUp Free or SketchUp Pro?The most obvious difference between Google SketchUp and Google SketchUp Pro is cost: SketchUp can be downloaded, installed, and used indefinitely for a cost of zero dollars. A single-user license of SketchUp Pro, on the other hand, costs about $500. (If you want to give Pro a test run before you buy, you can download a free trial that will last for eight hours.) Version 8.0 is currently the most up-to-date for both programs, and you can download installer files for Windows and Mac OS from the SketchUp website (see “Online Resources” ). What You Get For FreeGoogle SketchUp allows you to design and communicate ideas three-dimensionally. It lets you create, save, share, and print an unlimited number of files. There are no barriers to sharing or exchanging files with users of SketchUp Pro, or vice-versa. If you’re using the newest version of SketchUp, you can open files that were saved in previous versions, and back-save new files as older versions in case you need to send them to folks working in SketchUp V7 or V6. In addition to its set of 3-D modeling tools – with which you can create practically anything from scratch – Google SketchUp allows you to download SketchUp components from the Google 3-D Warehouse, import satellite imagery from Google Maps, and add photo textures from Google’s database of Street View imagery or from your own digital photos. You can also import hand sketches that have been scanned, or floor plans saved as jpegs. You can export raster images (such as jpegs) of your model and create rendered animations of your projects as avi (PC) or mov (Mac) files. A lot of extensions (plug-ins and Ruby scripts) are compatible with the free version of SketchUp and can dramatically expand its out-of-the-box capabilities. What You Get for $500Upgrading to Google SketchUp Pro supplements all of the above with a number of workflow enhancements and modeling tools, including: • Import and export capability for DXF/DWG format CAD files. This feature is especially useful for users who work with other architects, designers, and subs who send CAD files, or want CAD files sent to them. • “Solids” tools. These Boolean functions (like union, subtract, intersection) are very useful for modeling complex joinery and construction details. • Ability to create Dynamic Components (as opposed to just download them, as with free SketchUp). This feature lets you add information about an object’s properties. For example, you can attach manufacturer-specific data to building products within your model, or create intelligent objects that scale proportionally or replicate according to real-world criteria (think framed studwalls, floor joists, and stairs). • Ability to generate CSV (comma separated value) reports about a project’s component data. This function, when combined with Dynamic Components, provides an information-in/information-out data stream for creating cut lists, project schedules, and the like. • Style Builder, a program that allows you to import your own unique hand-drawn line types and use them to create a custom rendering style. • Tech support via email. Perhaps the biggest benefit of SketchUp Pro is that it comes bundled with a program called Google LayOut, which is extremely useful for preparing professional-quality presentations. LayOut allows you to set one or more views of your model on each page, making it a great tool for creating multipage design docs, shop drawings, construction documents, and permit sets. It also lets you save perspective and orthographic views of your SketchUp models, and specify drawing scales and line weights. LayOut comes with a series of preformatted templates with editable title blocks, and a library of architectural drafting symbols – drawing labels, north arrows, section/elevation symbols, and so on. When you’re satisfied with your work, you can give full-screen presentations and export your LayOut docs as pdf or dxf/dwg files. Making a DecisionHow do you decide whether to get started with Free or Pro? The best choice is the one that gets you going sooner rather than later. If you’ve got $500 burning a hole in your pocket and you’re dead set on using SketchUp in a big way, go for the Pro version. But if that amount is a stretch right now – or you’re unsure how much you’re going to use the Pro features at first – take a look at the free version. That’s what it’s there for. Mike Tadros is the lead instructor for the website Go-2-School, which provides training services for Google SketchUp and Google Earth. |
Steve Kuhl
Owner, Kuhl Design+Build
Hopkins, Minn.
I run a company in Minnesota that encompasses four separate businesses with a total of 25 employees. Besides me, five people in the office use SketchUp – a project manager, an interior designer, and three architectural designers. I began using it seven years ago, when it first became available. I use the Mac version of SketchUp Pro.
In addition to teaching myself to use the program on actual jobs, I practiced for several months by using it to re-create cabinets and other architectural features that appealed to me. The many online tutorials and other learning aids available now – virtually none of which existed back then – certainly make things easier for those just starting out, but I don’t think there’s any substitute for practice and repetition. Sometimes I have to repeat a given step dozens of times to fully master it.
Project preliminaries. I use SketchUp in a variety of ways in my businesses, but I find it most useful for guiding clients through the planning process, from the early discussion phase to the development of a solid design. On certain projects I use LayOut – the 2-D software that comes bundled with SketchUp Pro – for making working drawings and client presentations. On other projects we convert our SketchUp files to ArchiCAD to create working drawings.
At my initial meetings with clients, I’m interviewing them as much as they are me. We don’t have time for people who’ve already decided they’re not going to use our company and are merely following someone’s advice to get three estimates. In other words, we try not to give away free design work. Whenever possible, I’ll schedule the initial meeting at the clients’ home so I can take photos then, rather than having to make a special trip later. Good photos are essential to the design process, so I take a bunch.
Refining the design. Back in my office, I import some of the photos into SketchUp and use them to create a rough model of what the project might look like (Figure 1). I haven’t taken any measurements at this point, so I’m working directly from the photos. I estimate lengths and heights from the typical dimensions of doorways and other standard features, and finish up with a rendering that looks quite realistic, though it’s not drawn to a specific scale.
Figure 1. A “cocktail napkin” sketch is created immediately after the initial meeting with potential clients, based on “before” photos of the site imported into SketchUp. A sketchy appearance, selected from the program’s styles palette, helps makes it clear that the design is preliminary and still under development (A). Once a contract is signed, several alternative floor plans are composed and presented for the clients’ consideration (B). Next, an overall model of the final design is drawn up; areas with a high level of detail – like the section of the kitchen shown here – are created as individual groups for clarity, then cut-and-pasted into the main model (C). Traditional working drawings are created in LayOut (D,E). The completed SketchUp model can later be pared down and modified for use as a tool for marketing similar projects to future clients (F).
Instead of presenting this in a finished-looking style, I want the look somewhat rough so the clients see it as an idea that’s still under development. I convey this by using one of the sketchy modes available in the program’s styles palette. In many cases, I produce a quick SketchUp model of what the clients and I have discussed at the initial meeting and email it back to them the same night or the next morning. The idea is to wow them with our responsiveness and design expertise.
If that drawing has the desired effect and the clients sign a design retainer, I go back to the site and take careful measurements of the existing structure. With the measurements in hand, I draw up several possible design options. Unlike the original model, these are 2-D floor plans (still done in SketchUp, but with the perspective function turned off) and are drawn to scale, though without dimensions. I use the same sketchy style to signify that we’re still at a conceptual phase. The goal at this point is to get the clients to select one of the proposed designs, even if modifications are still needed.
Once we’ve agreed on a specific design, I move to schematic drawings, where I turn the 2-D floor plan into a detailed 3-D design. Then I meet with the clients – either at their house or in my office – and “fly” them through the project by projecting the images on a large screen. Sometimes I’ll make client-suggested changes at this meeting, though I make most of them afterward.
When I navigate around a model – or make changes to it – while the clients are present, I like to work with keyboard commands using programmable “hot keys.” That keeps the menus and tools from appearing on the screen and distracting computer-savvy clients, who may end up focusing more on the workings of the software than the developing plan. Also, hot keys allow me to operate at accelerated speeds.
Once the plan is finalized and approved by the clients, I’m ready to create a fully dimensioned set of construction drawings. Since I already have an accurate model, much of this work is already done. Generating floor plans, sections, elevations, and the like from the dimensioned model is basically a matter of selecting a different view, saving it as a scene within SketchUp, and inserting the image in my LayOut template.
Libraries. Many of these drawings continue to be useful even after the project itself is completed. Often I’ll start a presentation for new clients by pulling up drawings of a similar job we’ve done in the past. SketchUp makes it easy to build up and manage a “library” of past projects for this purpose. Depending on what areas are relevant to the new job, I’ll adapt the existing model to emphasize some elements while simplifying or editing out others.
My remodeling company also maintains a SketchUp library of all the molding profiles we’ve ever used. This includes some standard profiles from outside sources, but most are custom shapes. Whenever we cut a new profile – or encounter one that we like – we add it to the library (Figure 2).
Figure 2. These saved molding profiles can easily be given height with the “push/pull” tool, as seen in the upper right-hand corner of the image (A); the doors themselves are created using the “follow me” tool. The fit-up for this proposed library room (B) was assembled from molding profiles, toekicks, door knobs, drawer pulls, and other components drawn from the author’s “library” of details.
Better communication. We also use SketchUp to generate marketing materials that provide potential clients with useful free information (Figure 3). We consider every aspect of business a form of marketing, from the condition of our company trucks to how employees dress and interact with clients. SketchUp is a key part of this philosophy, because it’s such a good communication tool. It allows us to quickly and clearly show our clients what their projects will look like, while making it easy for them to make their own voices heard. That’s been a winning combination for us.
Figure 3. In addition to using SketchUp models of past projects as marketing tools, the author uses the program to create free informational materials for prospective clients. For instance, he integrated SketchUp with Adobe Suite programs to create images for his ice-dam-mitigation company’s website (A) and for a manual his cabinet company provides (B).
Online Resources• google.com/support/forum/p/sketchup • sites.google.com/site/sketchupsage/resources • aidanchopra.com (SketchUp for Dummies) • youtube.com (SketchUp channel) |


