Favorite Drywall Tools & Accessories
I’m in the drywall business — admittedly not the most glamorous line of work. When I first started out 20 years ago, not only was drywall considered unglamorous, it didn’t even require many tools. And, in the building business, it’s “no tools, no glory.” I always had a decent but dusty truck with some scaffolding and a few planks in the bed. The rest of the tools I needed to hang, tape, and sand, I could pretty much carry in my arms. I’m proud to say that in the last 10 years or so, all that has changed. A lot of new labor-saving tools, as well as tools that improve quality, have become available. I don’t hesitate to buy the tools I need, either. Nowadays, I make four or five trips to the truck to haul my tools, just like the framers and finish carpenters do. For any of you builders who occasionally find yourself doing some drywall work now and then, here’s a rundown of the tools I take to the job. Many of these are standard tools, but you may not have heard of some of them.
Measuring and Marking
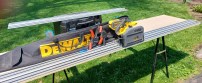
A good-quality tape measure is important. I use a 25-foot tape to figure materials for large rooms and, along with my utility knife, to scribe short, straight measurements along the edge of a sheet of drywall. The wider blade of a 25-foot tape allows you to extend it farther before it sags or buckles. T-square. A 4-foot aluminum T-square is a must for any drywalling job, large or small (see Figure 1). On larger jobs, I have three or four squares on site so I don’t have to go searching as I move from room to room working different stacks of drywall. You can pick up a 4-foot-long square for about $12 at most discount lumber stores, but the tongues are only 1/8 inch thick and their construction is somewhat flimsy. I buy a better-grade square with a 1/4-inch-thick tongue from Warner Tools (see “Sources of Supply,” last page) for about $20. The thicker, stiffer metal gives more accurate cuts and lasts longer.
This pro-duty T-square from Warner has a 1/4-inch-thick tongue (top); most lumberyard varieties have only 1/8-inch-thick tongues. Graduated notches on the Johnson 24-inch ripping square guide make it easy to use a utility knife for long cuts (above). Scribing square. I also use a 24-inch-long Rock-Ripper Scoring Square from Johnson for scribing long, narrow strips of drywall. Graduated notches along the square’s blade guide your utility knife as you slide the square along the edge of the panel. The scribing square provides a more precise alternative to the tape-measure-and-utility-knife approach to scribing.
Specialized Cutting Tools
Accurate, clean cuts are important because they keep the amount of taping and repairs to a minimum. Each type of cut requires a different cutting tool. My cutting tools are laid out in Figure 2.
Figure 2. The author’s cutting tools include (above, left to right) a drywall router, a wide-blade drywall saw, a keyhole saw, a pocket rasp, a utility knife, and a calibrated circle cutter (inset). The most common tool is, of course, the utility knife, which is used to score and snap straight cuts. I always keep a sharp blade in the knife for clean cuts and to prevent tearing the paper. For smoothing rough edges, I use a Procut Rasp-n-Knife from Warner with a serrated handle that works great as a drywall rasp. I have both a keyhole saw and a larger, more rigid drywall saw that makes short work of large cutouts at doors and windows. The RotoZip drywall router is one of my favorite tools. The pilot-tipped spiral cutter follows the outline of an electrical box or window opening when guided in a counter-clockwise direction. A special attachment is available for making circular cuts and is ideal for retrofitting recessed lights. A circle cutting tool scores drywall in a perfect circle by pivoting a sharp blade around a point stuck into the drywall at the hole’s center. Hole diameters are calibrated right on the pivot-arm. The scored drywall is removed by tapping it inward and cutting the paper backing with a utility knife.
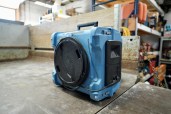
Lifting Tools
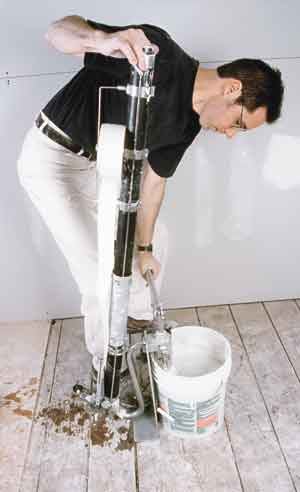
All drywall panels have to be lifted into place, some to the top of a cathedral ceiling, some only 1/2 inch off the floor to butt against the upper panel on an 8-foot-high wall. The drywall lift makes one-man hanging possible and two-man hanging a breeze. Just place the finish-face of the panel against the tool’s cradle, wheel the lift into position, and crank the sheet skyward. The crank locks into place to hold the sheet firmly against the framing. The lift works great on walls and flat or sloped ceilings up to 16 feet high. If you’re not ready to make a $550 to $800 investment, drywall lifts are available at most tool rental shops.
Drywall bench. If you have extra help and you’re working low to average ceiling heights (10 feet or less), a drywallbench is a must — don’t risk your neck on inverted mud-buckets and makeshift rigs. These stable aluminum benches are about 4 feet long and 10 inches wide and can be adjusted in height from 18 to 48 inches. A low siderail acts as a step to assist climbing up with a piece of dry-wall. When the bench is set for higher ceilings, the rail step is a little harder to use. A special attachment, called Mack’s Step, can be ordered to fit the bench you’re using. It hooks onto the side of the bench, adding an extra step and more stability (Figure 3). An adjustable aluminum drywall bench provides enough elevation to hang ceilings up to 10 feet high. At the highest adjustment, a detachable “Mack’s Step” accessory adds an intermediate step and more stability.