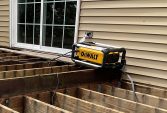
Last Fall Hitachi released three new cordless finish nailers to the market: a 16-gauge straight (NT1865DM), an 18-gauge straight (NT1850DE), and a 15-gauge angled (NT1865DMA)—all running on its 18-Volt battery platform; each of the kits comes with one 3.0 Ah compact battery, a charger, and a bag. In lieu of a flywheel, which requires windup time, an internal brushless motor lifts a piston and the attached driver to the top of a sealed cylinder, compressing the air behind it. When the trigger is activated, the compressed air drives the piston and driver into the nail. The motor immediately raises it back up to prepare for another shot. This design allows for rapid-firing in both sequential and bump fire modes. In sequential mode you can fire as quickly as you can pull the trigger, lift the gun, depress the nosepiece, and pull the trigger again. Over the course of the past six months I’ve been testing the 15-ga. angled model while Mike Triller, a finish carpenter who tested all of the other 18-ga. brad nailers last fall, tested the 18-ga. brad nailer.
Features
As with most battery-powered finish nailers, the Hitachi line has an on/off button and, in addition, a trigger lock. The nailers stay on for up to 30 minutes when not in use, so the trigger lock is a good safety feature to have. In order to turn the nailer on you have to hold down the power button for a second—and the same if you want to turn it off. The on/off functionality here is much more intuitive compared to other guns on the market which require the button be depressed for an extended length of time. Because it is so easy to turn on/off, and because it stays on for 30 minutes, neither of us was put off by not being able to just pick up the gun and go.
Chris Ermides
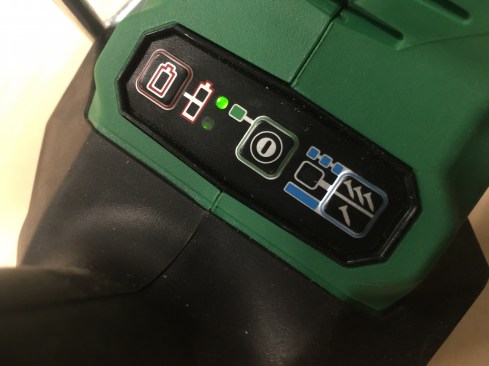
Control buttons at your fingertips. Pressing the on/off button in the center of the dashboard sets the nailer to sequential mode and turns on the tool's LED worklight. The sequential and bump-fire modes can be toggled through quickly by pressing the button on the far right. Pressing and holing the battery button shows the battery status, which is vague and fairly useless; having the battery status on the battery would be a far better solution.
Turning the nailer on turns on the LED worklight, which stays on the entire time, and shines down from below the housing and to the right of the magazine; a green LED light illuminates on the power dashboard to show the nailer is on as well. The LED is plenty bright and we both felt like it did a good job illuminating the work surface. Because of its location, it actually gets cut off by the magazine so by the time you get the nose piece on the work surface the nailer’s nose is in shadow; not a big deal when you’re running trim because if it’s so dark you’re relying on the on-board light, your trim job is probably in trouble. But in closets and areas of dim lighting, it may be annoying to some.
These nailers also feature sequential or bump-fire modes, which are controlled by a button to the right of the power control, and indicated by a solid or blinking light respectively. Both nailers default to sequential mode when turned on. The nailers stand on either the battery or the barrel, and there are ample rubber bumpers around the housing so it won’t damage most surfaces should it be laid down on its side. The 15-gauge nailer has dry-fire lockout at about eight fasteners, and takes two full clips even with the remaining eight—which is nice. The 18-gauge nailer doesn’t have dry-fire lockout, which Triller found annoying, but he got used to eventually. The brad nailer takes two full clips of nails as well.
We both found the battery status light on the power dashboard to be vague at best. According to the instruction manual, the status light indicators go as follows: two red lights indicate “remaining power is enough” (whatever ‘enough’ means); one red light indicates “remaining power is about half”; one blinking light indicates “remaining power is nearly empty”. I didn’t notice the indicator light go from two to one solid light—but when I did notice it, I still shot about 300 nails before the status went to a blinking light. On the blinking light I got about 150-200 shots before the gun just turned off. Neither one of us noticed any significant drop in the gun’s power on the last clip of nails. The last nail that I shot before the battery died still sank to the appropriate depth. You have to press and hold the battery indicator to check it – and there’s really no telling when the lights change from two to one, or to blinking, so it’s sort of arbitrary. Hitachi probably means for you to just change the battery when the light is blinking. As for the batteries, we would have liked for the kits to come with two batteries, but they only come with one 3.0Ah slimpack. We were both kind of blown away at how quickly the battery charged, though—even when fully depleted. I didn’t time it exactly but I swear it felt like less than 30 minutes; the manual says charge time is 45 minutes depending upon temperature.
Plenty of Power
The specs on the 15-gauge NT1865DMA say that it will fire up to 1,100 nails on a single charge, depending upon fastener length and material. I shot a total of about 2000 nails during testing and had mixed results. I used the nailer to install poplar 1×6 door and window casing on a historic house. I chose this size nailer in lieu of my 16-gauge because I was firing through drywall or plaster and into studs that are 167 years old; I wanted the additional holding power of the larger nail head, and wasn’t worried about the nail hole size because they were getting covered by a 2” wide band trim that I attached with 18-gauge brads. On the casing, I got through close to 1000 2” nails on a fully-charged battery. I then went into my shop where I shot 2” nails through poplar into framing lumber in bump-fire mode. In this mode I got about 850 nails set before the gun turned off completely (I never turned the gun off during firing).
Interestingly, when I went to pull the board off of my work bench I couldn’t lift it. I knew I hadn’t shot a nail long enough to burry into the plywood top; I was using 2” nails. Well, I discovered that in several places I had shot a previously set nail all the way through with a new nail. I had done this several times. I was keeping the shots close to one another in an attempt to purposefully jam the gun because it hadn’t jammed once during normal operation (nor did the brad nailer for Triller)—which I did only on two occasions. Both times the jams were easy to clear and the driver pin had retracted on its own each time, so I didn’t need to reset it. Triller found that when installing pine and poplar, as well as some oak, the run-time suggested by Hitachi (1500 nails per charge) seemed about accurate – though he didn’t keep careful track. Battery power was sufficient for him to remain working at an efficient pace.
Some recoil, but not a lot
There’s some recoil in the 15-gauge nailer—but it isn’t significant or difficult to manage. When firing in either sequential or bump-fire mode, you have to maintain pressure against the work surface throughout the full firing cycle. If you move too quickly in bump-fire mode, it’s easy to get caught in a rhythm where you’re pulling the nailer up before the drivepin fully sets the nail, so you end up with a slightly-proud nailhead. I was firing in sequential mode through poplar and plaster or drywall into some old, hard lumber—and I had no issue with the nailer’s power. In fact, I was pretty impressed with it. In terms of functionality, the only thing I didn’t like is the nailer’s weight (7.5lbs.). It’s well-balanced, but it’s not a gun I want to use day-in and day-out. I didn’t do any toe-nailing with this gun, so I can’t speak to that.
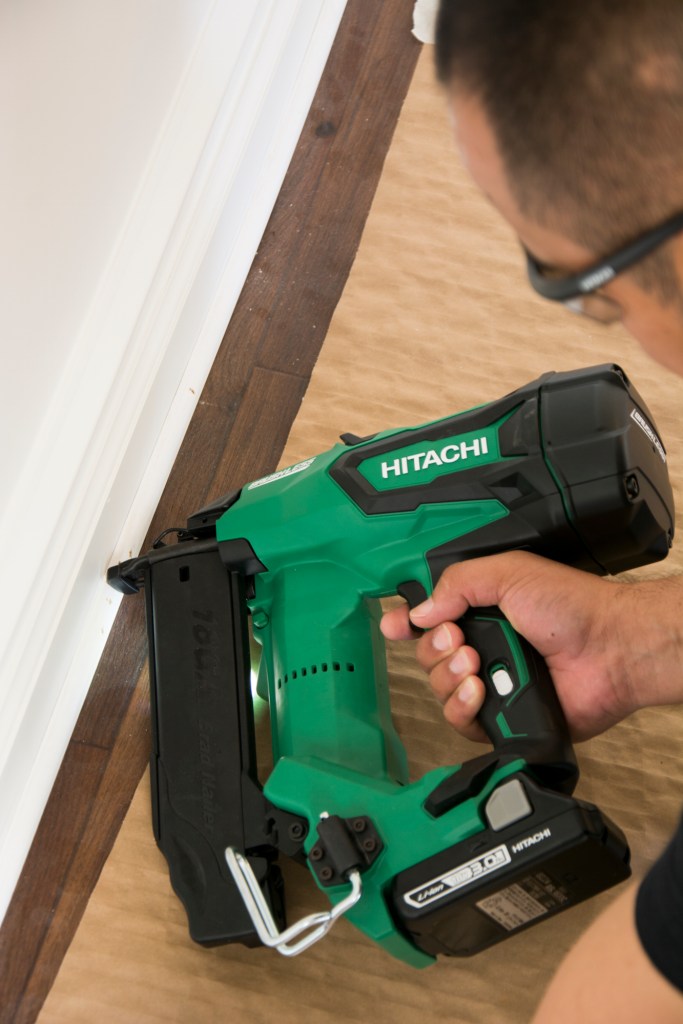
Weighing in at 7.3 lbs., the brad nailer isn’t the heaviest on the market (Makita takes that prize), but it’s close. Despite the weight, however, Triller found the same that I did with the heavier gauge gun: its grip and balance make it feel lighter than it actually is. His take was that it is nimble and easy to use in tight conditions. The body design offers an excellent line of site, thanks to a smallish nose piece that sits behind the point at which the nail exits the gun – so you can see right where you’re placing a nail. He liked the ease at which the nailer engaged, also – it doesn’t require pushing firmly or at a certain specific angle to engage properly. It fires and sets sufficiently when toe-nailing, and even has angles cut into the nose-piece for that purpose.
One bone I have to pick has to do with the rafter hook, which is variable so you can swing it in multiple positions. Yes, I said “rafter hook” in the context of a finish nailer. You’re probably asking the same thing I did: Why have a hook on the side of a finish nailer that’s big enough to fit over a rafter or truss? I don’t know the answer to that, but I will say that I don’t like it. I’ve used nailers that have hooks barely wide enough to clip easily to my tool belt/bags, but this one goes way too far in my opinion. I wear an Occidental framing rig most of the time when I work, and I like to hang the nailer off of the belt on my right side, and not from the bags. The design of these hooks kicks the nose into my leg—whether hanging off my tool belt or regular belt. It’s a nit-picky thing, maybe, but still—it made no sense to have such a large hook on a finish nailer.
Chris Ermides
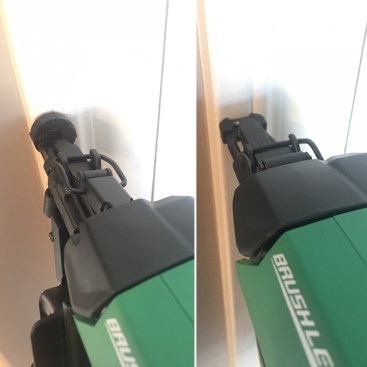
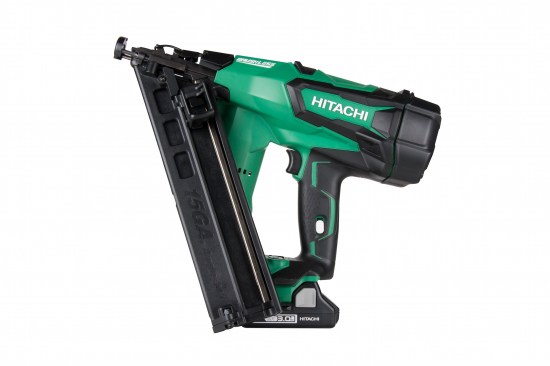
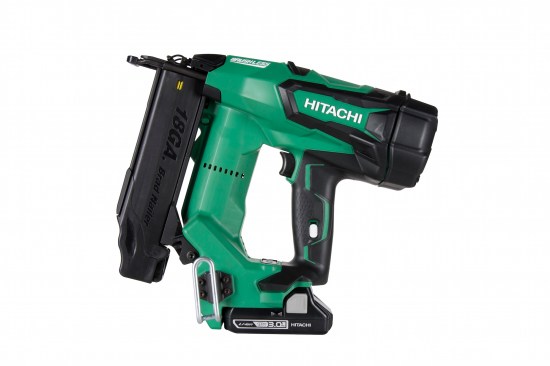
Easy sight-lines. The toolless jamb-release mechanism stays tight to the nose on these nailer, leaving a clear line of sight to the nose. On the angled 15-gauge nailer, left, the whole nose mechanism is canted in relation to the nailer housing and barrel, which takes some getting used to. The no-mar tip and push lever of the 18-guage brad nailer, right, sit behind the firing head making it easy to accurately locate brads.
On the 16-gauge straight and 18-gauge straight, you can move the rafter hook to either side of the gun housing, depending on your handedness. My biggest quibble with the 15-gauge nailer, aside from its weight, is that you can’t put the hook on the left side of the gun. So, if you hold the nailer with your right hand like I do, you’re having to do this weird twisty thing with your wrist and arm when you try to loop it over your belt – unless you hang it in front of you, but I don’t like doing that for obvious reasons mentioned above. Like Milwaukee’s nailers, these Hitachi nailers all use the same body for each of the various gauge guns. So with the angled nailer, the magazine kicks out to the side and runs up the tool, tying in where the rafter hook would typically go. This issue relates to my other problem with this nailer which is its line of sight. Having the magazine kick out to the left of the gun also puts the nose piece at an angle to the work surface. So if you’re looking squarely down the barrel, the nose piece looks crooked – because it is. If you use the tick marks on the nose piece to place your shot, you have to cock the nailer slightly to the right in order to square the nose piece up. Lastly, these tick marks are dead-accurate in the front-to-back alignment; the nail ends up perfectly centered. But if you’re aligning the tick marks left-to-right, the nail fires about an 1/8 high of that line. It wasn’t ever an issue for me because I didn’t have to be that careful with my nail placement. Other than the nosepiece being canted, it is easy to see from different angles thanks to the low-profile toolless jam release.
The depth-of-drive adjustment on both nailers was stiff enough to spin that it takes some effort with both thumb and forefinger; Triller said it best when he called it “cumbersome and vague”. It’s possible to unscrew the depth-of-drive pin so much so that you unwittingly disengage it, which makes no sense. But both nailers have a good depth adjustment range – which is nice for working with various materials. There isn’t a power adjustment dial or lever on these nailers as there are on others, but neither of us missed it. The nailers have plenty of power for even hardwoods (Triller used the brad nailer on oak with no issue). Neither nailer jammed for us in regular use. I jammed the nailer purposefully in my shop, and it was easy to clear; the air spring drive system seemed powerful enough to retract the pin on its own, which was nice.
Bottom Line
If you’re in the market for a battery-powered nailer, this new line from Hitachi is worth serious consideration. They have plenty of power and function similarly to pneumatics in terms of their speed and ease of use. There’s a bit of a learning curve or adjustments make to get used to the minimal recoil, but you’re going to get that to some degree with most battery-powered nailers. The recoil on the 15-gauge is minimal, and nearly non-existent on the brad nailer. After testing all of the other cordless brad nailers on the market, Triller says that this one from Hitachi is his new favorite in the battery-powered category. We both expect the 16-gauge nailer to perform similarly to these two. If the belt-hook size and location limitation (with the 15-gauge only), as well as the weight aren’t deal-breakers, you can’t go wrong with these. Hitachi did a nice job here. hitachipowertools.com
SPECS
Hitachi Power Tools
NT1865DMA 15-Gauge Angle Finish Nailer
Fasteners: 1-1/4” to 2-1/2” (34-degree DA style)
Weight: 7.5 pounds
Runtime: up to 1,100 nails
Kit includes: bag, gun, charger, and one 3.0 Ah compact battery
Cost: $369
Hitachi Power Tools
NT1850DE 18-Gauge Brad Nailer
Fasteners: 5/8” to 2”
Weight: 7.3 pounds
Runtime: up to 1,650 nails per charge
Kit includes: bag, gun, charger, and one 3.0 Ah compact battery
Cost: $339