OK, I know what you’re going to say–building laminate countertops is crazy. And years ago when I was running a big framing and trim crew, I would have agreed. Nowadays, I remodel more and work with smaller crews, so the ability to manage when and how the countertop is built and installed gives me better schedule control and enables me to keep the money I’d have to pay a fabricator. And, I can make a better product on site with fewer mechanical joints and seams. Here’s how I do it.
Good Foundation
The substrate is the most important part. Plywood, particleboard, and MDF work, but I prefer exterior-grade MDF. It costs more, but with all the water action at the sink and steam billowing from the dishwasher vent, a better substrate will keep me from getting called back for moisture problems.
- Cut the sheet the full countertop width (usually 25 inches); add an extra inch for scribing if necessary. Remember–if you’re scribing the countertop to the wall instead of using a backsplash, cutting out the scribe line affects reveals at countertop overhangs, the ends of cabinet runs, and at slide-in appliances (see “Scribing”). Use leftover stock for build-up strips.
- Mount a minimum of 2-1/2-inch-wide build-up strips along the front and rear edges.
- Double-up the substrate for the full depth of overhangs, sink areas, and stove cutouts, and above dishwashers.
- Glue and screw full filler pieces at least 2 feet wide beneath joints in the top sheet.
- Install front-to-back filler strips above the cabinet side panels. These provide extra support in the middle of the countertop.
- Scribe the countertop to the walls. Thick backsplash materials like stone, tile, or brick veneer won’t require scribes, but laminate, wallpaper, and painted backsplashes will.
Sheetwork
| Glue and screw 2-1/2-inch build-up strips along the front and rear edges. Use full-width pieces at least 2 feet wide to span over joints in the surface piece. Add cross strips where cabinets meet. | A laminate slitter makes short work of ripping precise edge band strips. Adjustable cutting wheels leave a crisp edge. | Edge bands go on first. Apply pressure with an edge band or regular laminate roller and trim with a router. |
| Spread glue with an adhesive roller cover, brush, or squeegee with even coverage. When dried to the tack of a Post-it Note, the laminate is ready to place. | Venetian blinds, dowels, or a snaking extension cord space the laminate sheet above the substrate for alignment before bonding. | Run a laminate roller back and forth across the countertop to ensure positive cement contact and to move air bubbles out. |
| A special edge roller adds extra pressure to this critical location without using brute force. | A fresh, clean laminate-trimming bit set to just the thickness of the plastic sheet ensures a nice edge. | A Mica Knife eases the sharp laminate edge in one pass. A file also will break the edge. |
| A piece of wood the width of the scribe on the adjacent wall jogs the divider pencil so the countertop will match the uneven walls on an inside corner countertop. | Tune up rough-cut scribes with a belt sander. |
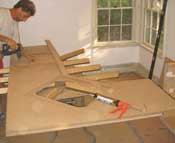
Set up a workspace on a clean subfloor or on sheets of plywood over a garage floor. Unroll laminate sheets to relax them overnight. Lay out laminate for rough cutting. Mark the countertop shape and add 1/4 inch extra around the entire substrate for finish trimming. I locate seams where openings occur–like at sinks, drop-in cooktops, or inset cutting boards–to minimize visual impact.
Rough Cutting. A carbide scribe drawn along a straightedge is a quick, chip-free way to cut sheets. Before cutting inside corners, drill a 3/8-inch-diameter hole with the edges just brushing up to the lines, which reduces the chances a cut will run out. For short cuts or lopping off excess material, I use a Klenk nibbling laminate cutter. Run the cutting jaw into the laminate face to avoid chipping.
Edge Band. The best tool for cutting edge band strips is a laminate slitter. Mine’s a Virutex. Slitters have adjustable throats to rip strips up to 3-1/4 inches. The cutting wheels adjust for laminate thickness and leave finish-quality edges.
Trim and Fit. Laminate seams must be trimmed and fit before starting glue-up because factory edges aren’t precise. I clamp a straightedge to the sheets to guide my laminate trimmer. Back-bevel the bottom of the joint slightly using a file so top edges join tightly. One or two passes does the trick.
Glue-Up
Use waterborne adhesive. It’s slower to work with but nearly vapor free, and rollers, brushes, and squeegees work fine to apply it.
Edge Bands First. Brush two coats of cement onto the substrate edges. The first coat soaks in and seals; the second provides the tack layer. The laminate gets one even coat on the back. Temperature and humidity affect drying times.
Pieces are ready to join when the glue is as tacky as a Post-it Note. Flush the edge band pieces to the substrate top and complete the bond with a laminate roller. For tight curves, heat the laminate with a heat gun.
Top Second. Adhesive roller covers or a squeegee made from laminate can spread adhesive over large surfaces. Pour small puddles on the top of the substrate and spread evenly with the roller or squeegee using sweeping motions. Cut-in the edges with a brush.
Spacers. Use spacers to suspend the laminate above the substrate for positioning. Venetian blinds and dowels are popular, but I like an extension cord snaked across the substrate from front to back in waves about 8 inches apart. Leave loops sticking out 2 inches to remove the cord a little at a time as you lower the laminate onto the glue and roll out.
Roll-Out. Ensure a long-lasting cement bond and remove air bubbles with a hard rubber laminate roller. Roll in a front-to-back pattern, overlapping each pass working left to right, moving bubbles toward edges.
Check for remaining bubbles by rapping your fingernails on the laminate. You’ll hear it if you find one. Heavy roller passes work the air out. Double Edge Squeeze Rollers press laminate edges with greater force to ensure a good bond because they have two rollers, one riding beneath the substrate slab and the other over, using mechanical advantage rather than brute force.
Trimming the Fat
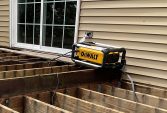
The key to a crisp, trimmed edge is to use a sharp carbide laminate bit in a laminate trimmer with a good bearing. Gummed-up or worn bearings can bind and burn. Set the bit to cut the precise thickness of the laminate. Apply gentle pressure against the edge, keeping the trimmer base flat to the top surface; move at an even pace for a clean cut. The bearing can gum up with glue-encrusted chips, so watch it and clean it off, then take another pass.
Freshly trimmed laminate edges are sharp and need to be eased. Filing is one way; another is to run a Mica knife along the edge. The depth can be set for an even bevel along the entire edge.
Screw Up
The final step is attaching the top to the cabinet bases. Screwing from beneath is a task for a right-angle drill/driver. Select the right length screw and insert spacers between the cabinet corner block and substrate. Without the spacer, the corner block can crack or bend upward and let the screw penetrate the laminate surface.
–Mike Guertin is a builder and remodeler from East Greenwich, R.I., and is a member of the JLCLive! and The Remodeling Show Construction Demonstration teams.
Scribing
Use dividers, a pencil body, or small wood block to transfer the profile for straight-run tops. Tops with inside corners require an adjustment. Hold dividers at an angle to match the offset of the scribe to the adjacent wall. This accounts for how much the countertop will “slide” sideways to engage the adjoining wall.
Rough Cut Scribes. Leave the line and tune with a belt sander. Recheck the scribe to the wall.
Re-mark and belt sand as needed.
After positioning the countertop to the walls, mark and trim overhangs and appliance openings to final dimensions.
–Mike Guertin