For about the same cost as putting a half tank of gas in a small pickup, you can build a leveling device that is as accurate and versatile as the most expensive rotating laser level or optical transit on the market. In fact, this low-cost level can do a few tricks that neither of those top-of-the-line tools can do at any price — “seeing through” or leveling around obstructions, for instance. What’s more, it’s quick to set up, can be made from items at any hardware store, requires no calibration, is nearly indestructible, and is so easy to use that you’ll be able to train every greenhorn carpenter on your crew how to operate it in about 10 minutes.
I’m referring to the water level, of course — an ancient tool that works on the principle that water always seeks its own level. Fill a long, flexible tube with liquid, and the liquid at both ends will be at the same level whether you’re holding them together or spreading them a hundred feet apart (Figure 1). Once you learn to trust that idea, and take some basic precautions to maintain the accuracy of your water level, you’ll be amazed at what you can do with such a simple tool. All you need to do is hold or clamp one end of the tube at the starting elevation and the other end of the tube at the point where you’d like to transfer that elevation.
Figure 1. As long as the rules of physics don’t change, water levels will work. It doesn’t matter if the two ends of the tubing are right next to each other, or a hundred feet away. Water seeking its own level provides level benchmarks for the deck builder’s convenience.
Building a Water Level
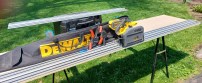
To make a basic water level, you need only four items: a length of clear flexible tubing, a few spring clamps, water or other fluid, and a couple of one-gallon plastic jugs (to help with filling and refilling).
Tubing. This can be almost any length you like; I find 100 to 150 feet is a manageable length that will serve most applications. A variety of diameters will work as well, but I’ve settled on 5/16-inch or 3/8-inch inside diameter for lengths up to 150 feet. (The level shown in this article is 125 feet of 5/16-inch vinyl tubing.) Most “big box” supply stores stock clear vinyl tubing in bulk rolls and will cut you whatever you want. I paid around 15¢ per linear foot for mine (less than $20 total with sales tax).
The longer the length, the larger the diameter should be (to avoid the problems mentioned in the “Pitfalls and Gotchas” section on page 84), but don’t sweat it if you can’t find exactly what you want. I’ve used everything from 1/4-inch ice-maker tubing to 5/8-inch or larger (garden-hose size) with good results.
Clamps. Remember how putting your thumb over the end of a straw will hold the liquid in even if the other end is open? Same with a water level — as long as you can totally shut off one end, you can move the tubing around from place to place without losing any liquid. I like to use spring clamps, which I buy large enough to clip onto a piece of 2-by material. That way, they can serve as a second set of hands if you’re working alone. Buy one pair to cap off your tubing and a couple of extras to help you hang the level as you’re using it.
Fluid. Plain old water will work in a pinch, but I prefer windshield-washer antifreeze. It’s easier to see and less prone to taking on air bubbles; it comes in its own handy gallon jug for filling; and — if you’re unlucky enough to have to work outside in the winter north of the Mason-Dixon line — it won’t freeze in your truck overnight.
Fill ‘Er Up
Before you can use your water level for the first time, you need to fill it with fluid. I do this by siphoning. I set a full jug of windshield-washer antifreeze on the roof of my truck, and using one of the spring clamps, secure the tubing to the gallon jug so it can’t fall out (Figure 2). The rest of the tubing starts out as a coil on the ground.
Figure 2. By placing the source of the liquid up high, you only need to start the siphon. Gravity will take over and fill 150 feet of tubing in short order. Windshield-washer fluid works better than water because its color makes it easier to see, and it doesn’t freeze.
A quick drag on the lower end of the tube will start the filling process. Sucking just enough liquid out of the jug to fill the tube to a little below the level of its upper end is all that’s needed to start the flow. After that, gravity takes over. Never wait to get a mouthful — the antifreeze in windshield-washer fluid is toxic.
Once the tubing starts to fill, secure the other end in your empty gallon jug on the ground. As soon as the tubing is full — with a full stream flowing into the second jug — clamp off the upper end of the tubing to stop the flow.
To refill the level (to eliminate air bubbles or to add more liquid), you can use the same siphoning technique, but there’s no need to risk a mouthful of antifreeze. I use the roof of my truck as before, but this time I start with everything on the roof — instead of having the rest of the tubing on the ground. Then I remove both clamps and toss the coil of liquid-filled tubing from roof level to the ground. Gravity will do its thing and start the new liquid flowing.
With a little practice, you can refill your water level in a couple of minutes every time you roll it out of your truck. As soon as the liquid is flowing, put the lower end of the tubing into your empty overflow jug, and allow the new liquid to completely replace the fluid in the tubing, displacing any air bubbles along the way.
Using the Water Level
For most water-leveling chores, the setup is the same: First, fill your level so you have from a few inches to a foot or so of empty space at each end. You’ll need this for adjustment purposes.
Next, find a way to support both ends of the tubing so they hang vertically but can slide up and down. (This is where extra spring clamps and a little creativity will come in handy.) A couple of nails placed on either side of the tubing — just enough to catch it, but not tight enough to pinch the tubing, will do the trick. You can also tuck the tubing behind a vinyl-siding J-channel, or clip it to a grade stake or concrete form using a couple of spring clips (Figure 3).
Figure 3. There must be 50 ways to hold your level, but nails and clamps will do the trick. The key is to hold the end in a way that permits it to be moved for fine-tuning, but that doesn’t close off the tube.
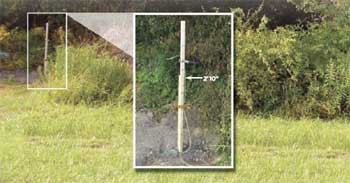
Once both ends are supported at roughly the right level, unclip both ends and let the liquid find its own level. From here, you can measure up or down from a reference mark and transfer that measurement to the other end of whatever you’re leveling. However, I prefer to slide the tubing up or down until the meniscus lines up with whatever I’m trying to level, and then I head over to the other end and make my mark (Figure 4). The latter approach is foolproof and eliminates measuring mistakes: My favorite screw-up is holding my tape on the one-inch mark at one end but forgetting to do that on the other.
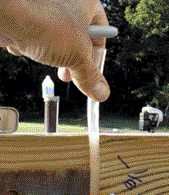
Figure 4. Marking directly from the fluid level is the most accurate approach to using a water level. However, you can also clamp the first end at a convenient height and measure up or down to the target level. Then, on the end whose level you’re setting, just measure the same distance and mark.
Pitfalls and Gotchas
Using a water level is very straightforward, but accuracy requires an uninterrupted column of liquid all more or less at the same temperature — no kinks or flat spots in the tubing, and no air bubbles. Below are some common problems you may encounter.
Uneven expansion. Both water and alcohol-based antifreeze expand dramatically when they warm up, so leaving half of your tubing in the shade and the other half baking in the direct summer sun can throw things off as much as 3/8 inch between readings. The smaller the diameter of tubing you’re using, the worse the effect. If that happens, your best bet is to refill the level from the gallon jug to even out the temperature of the liquid.
Kinks. The liquid needs to be able to flow freely in the tubing while in use. Kinks (or greenhorns stepping or kneeling on the tubing) will completely throw off your results. A little education here goes a long way.
Air bubbles. If all you’re doing is shooting rough grade, a couple of small bubbles won’t make a huge difference (Figure 5). However, if you’re leveling piers or trying to lay out stairs, you need accuracy, and every air bubble in your level is a variable that will throw off your results. No matter how careful I am, bumping around in my truck always seems to introduce air bubbles to the level. For that reason, I refill my water level every time I use it. Siphoning in new liquid gets rid of the air bubbles.
Figure 5. Bubbles in the fluid ruin a level’s accuracy. To get rid of them, simply refill the tube. Kinks are bad, too, so don’t step on the hose. Finally, a temperature differential can affect accuracy, so avoid using a water level half in the sun and half in the shade.
Once you’ve gotten used to the simplicity and economy of a water level, you’ll wonder why anyone would spend more on tools that aren’t any easier to use and are a heck of a lot more delicate in the field. And think — if somebody breaks into your truck, that $400 laser level is a prime target. Why, a thief would step right over a coil of vinyl tubing to grab it.
Joe Stoddard is a technology and process improvement consultant to the building industry. Find him online moderating the Journal of Light Construction’s Computer Solutions expert forum at www.jlconline.com.