Miter-saw set-ups can range from just a couple of sawhorses and a truck bed to something so nitpickingly complicated that I would break it in a week. Instead, I’ve come up with a sturdy and efficient alternative: basically a box notched out to accept the miter saw. Though it’s simple, it delivers continuous infeed and outfeed support, plus a whole lot more. And it serves my inner cheapskate, because it only costs a sheet of 3/4-inch birch plywood and a little of my time.
Cut the Pieces
Accuracy is critical for making this workstation work. I make the pieces for it as shown in the illustration at right, using a circular saw and shooting board to rip the plywood to width (Figure 1) because it’s too awkward to cut it accurately on a job-site table saw without a helper.

Illustration by: Chuck Lockhart

Figure 1. Make a shooting board by screwing one piece of plywood (with a factory edge) atop another that’s wider than the base of your circular saw. The first cut trims the bottom plywood to the exact saw width, making a zero-clearance guide that guarantees straight, splinter-free rips.
Before I can cut the notches in the plywood sides where the miter saw will sit, I need to measure the exact height of the miter saw’s cutting table. To do this, I put the saw on a flat surface, place a straightedge across the table, and measure down from the straightedge with a tape or up to it with a combination square.
Next, I mark the ends of the notches on the two side pieces. Each notch is centered and is 4 inches wider than the miter saw’s table to allow room for my knuckles when I need to adjust the saw. (For the same reason, I also clip an angle off the table top.)
To cut the notches, I set the fence on my tablesaw to the right of the blade, with the distance from the fence to the left side of the blade equal to the height of the miter-saw table, as determined above. With the blade lowered, I place a side piece on the saw. Then I turn it on and slowly raise the blade through the work, cutting as close as I can to each edge of the notch without overcutting (Figure 2). I do the same on the other side piece and finish both notches with a circular saw and a pull saw.

Figure 2. Locate the side piece of the workstation on the tablesaw and crank up the blade to cut the notches.
Assemble the Box
I run 2-inch drywall screws through the side pieces into the end pieces, aligning them with a square as I fasten them together. I screw the rib into the center of the notch, then I install the tops (again, with drywall screws) with an even overhang all the way around, except at the notch, where the top is flush.
The foot-skid assembly is the final part. I first clip the corners of the skids, then use 1 1/4-inch drywall screws to fasten them to the feet, which should overhang the ends of the skids by 1 1/4 inches (Figure 3). The idea is that the foot-skid assembly will be attached to the miter saw’s feet so the saw can be removed from and replaced in the stand, with the skids fitting between the stand’s sides, and the feet sitting atop the notch. When the saw’s in use, the feet are screwed to the notch.

Figure 3. The foot-skid assembly supports the saw at the same height as the table top, as well as making it easy to place the saw in the workstation and remove it again.
Setting the saw in the assembled workstation brings us to the moment of infeed-outfeed truth. Success means the saw is dead flush with or just below the top of the box. You may need to add thin shims or plane down the feet slightly to make the fit perfect.
Using the Stand
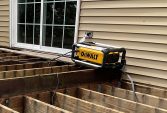
I bridge my workstation across two horses about 27 inches high. It invariably becomes not only the center of operations for cutting, but a storage depot, power nexus, and general command center for the job site.
With the continuous infeed and outfeed, I can blast through rough work like 2-by blocking, or nest crown for cutting by screwing a cleat to the table. The overhanging top is great for clamping items like crown for efficient coping, and it also provides a stable surface for routing material.
On the face of the unit, I set screws to hold everything from chargers to a radio. And if I’m working with someone, we can flip the box over and quickly transport lots of tools at once.
On site, I store my tools underneath the workstation. At night I chain everything up and throw a tarp (which I can clamp to the table top) over the whole shebang. When I get back to the site in the morning, I can get right to work rather than waste time carrying things in from the truck.
Contributing editor Mark Clement is a carpenter in Ambler, Pa.