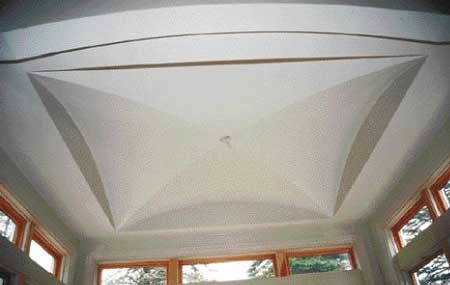
Framing a Cross-Vault Ceiling, continued
Building Barrels
With the recess defined, I concentrated on forming the barrel
arches. Each of the four barrel ends spanned 8 feet, point to
point. The diagonal of an 8-foot square measures 11 feet 3 3/4
inches. The barrel spans and the diagonal hip spans shared a
common height — 12 inches — so I calculated the two
radiuses needed, made a trammel stick, and drew the respective
arches on 3/4-inch plywood (Figure 3).
| |
Figure
3.The plywood diagonal
arches were cut with a circular saw, which can make
faster cuts than a jig saw, down to a 4-foot radius,
before binding. Here, a carpenter adds a block to
support a center light fixture. |
For the record, the two radiuses were 6 feet 8 inches and 7
feet 4 inches. I carefully cut the arches with a circular saw
— I've found that you can effectively cut curves as tight
as a 4-foot radius using that tool. The diagonal arches
exceeded the capacity of a 4x8 plywood sheet, so I cut them in
four separate pieces that met in the center of the ceiling. We
had previously nailed 1x3 furring to all the ceilings in the
house, a standard framing procedure in this region. The furring
provided good general backing to attach the arch components. We
added a piece of 3/4-inch plywood to back up the center arch
junction and provide support for a chandelier. With the
diagonals installed, we nailed the barrel cutouts directly to
the plywood facing on the four soffits. Those two plywood
patterns established all the necessary framing lines to
complete the converging barrel shapes. I used flat 2x4 blocking
to define the contours of the barrels, starting at the top of
each vault. Each of these longest blocks fit at the center
groin with a double 45-degree square end cut. (The opposite
ends were all square, 90-degree cuts.) But as the blocking
carried along down the hip to the spring line, the hip cuts
became progressively compound (Figure 4).
|
Figure 4.At the top of the groin, the
ceiling blocks are square-cut at double 45-degree
angles, but as the hip descends to the spring line, the
cuts become progressively beveled. The author used a
flexible story pole to space the blocking equally and
divided the bevel angles incrementally between the top
and bottom blocks. |
Quick calculation for compound cuts. I took a practical
route to calculating these bevels. First, I found the bevel
angle for the short triangular piece of blocking at the bottom
end using a bevel gauge and a sliding compound miter saw
(Figure 5).
| Figure 5.The bevel for the starter block
— 26 1/2 degrees — was the simplest to
establish, using a bevel gauge and a miter saw. The
rest of the bevels were deduced from that
angle. |
Next, I stepped off six equal blocking intervals on a thin
flexible strip of wood, bent along the underside of one of the
single hips. Then all I had to do was progressively step the
bevels down by a sixth of the total bevel angle, one block at a
time, from 26 1/2 degrees to 0 degrees. The 45-degree hip angle
cuts remained constant. For efficiency, I cut eight of every
piece in mirrored pairs, as each vaulted quadrant was
identically proportioned. With me cutting and a helper nailing
the pieces up, installing the barrels only took us a couple of
hours. The resulting geometric framing pattern looked almost
too good to cover up (Figure 6).
|
Figure 6.Although produced quickly, the
vault framing is accurate, uniform, and almost too nice
to cover up with drywall. The front soffit awaits a
box-beam arch to complete the framing. |
Arched Header
To further distinguish the nook, I added an arched box header
under the front soffit. I laid it out and cut it on sawhorses,
using 2x4s and a 1/2-inch plywood skin, then nailed it up in
two pieces (Figure 7). I had to keep the dropped shoulders, and
hence the arch itself, shallow — only about 4 inches
below the soffit level — because the header had to clear
a transom window above a door in the angled wall. The arch
spanned 8 feet, centered on the vault, and provided a subtle
introduction to the curving ceiling lines.
| Figure 7.Roughed out on sawhorses and
nailed up in two pieces, the box beam's arch had to
remain shallow to clear windows at both ends (top
left). The arch effectively echoes the barrel vault
arches and helps to delineate the open but separate
living spaces. |
|
The plastering contractor, Michel Tanguay, used 3/8-inch
drywall board and skim-coat plaster to finish the barrels, and
did a beautiful job (Figure 8).
|
Figure 8.Thin 3/8-inch drywall flexed
without buckling over the concave barrel framing. To
crisply highlight the lines of the cross-vault, the
plastering contractor used expanded-metal plaster
bead. |
He used metal plaster corners, the type with expanded mesh
flanges, which flexed smoothly along the easy curves and gave
the groin joints sharp definition. The diagonal arcs finish
crisply at the recess corners and meet in the center at the
chandelier's electrical box. Maybe someone will come along,
take a few snapshots, and the process will begin all over again
somewhere else. But you'll be ready for it.
Jeff Davisis a framing contractor in Harwich,
Mass.