Years ago, I began building what I call post-style cabinets — a hybrid design that combines features of traditional and frameless construction. Because there’s no face frame, my cabinets have the extra storage capacity associated with European frameless cabinets, but vertical “posts” make them adaptable to a range of styles, including more traditional American designs with frame-and-panel doors. The joinery is simple and fast and doesn’t require heavy equipment, so the technique is well-suited for building cabinetry on site.
Layout on a Stick
Instead of laboring over detailed shop drawings, I do all of my dimensioning on layout sticks or full-size drawings. In addition to being faster, this cuts down on math mistakes and allows for a high degree of customization. For example, we can tailor drawer sizes to the things our customers want to store inside. Horizontal sticks are ideal for accurately noting window casings, outlets, pipes, and other details that can easily get confused on a drawing. I draw the key cabinet details right on the sticks and refer to them often while building and installing the cabinets.
Building Boxes
We make our cabinet boxes with 3/4-inch PureBond birch plywood (800/637-1609, columbiaforestproducts.com). This plywood has a soy-based adhesive in place of the usual urea-formaldehyde glue, but it costs about the same as any other birch ply, and our customers like the environmentally friendly approach. We buy it from Boulter Plywood (888/958-6237, boulterplywood.com), a vendor who delivers absolutely flat sheet goods — a critical detail when building cabinets.
Our joinery isn’t fancy; the boxes are just rabbeted and screwed together. Since we don’t use glue, we can easily modify cabinets if necessary later on. If there’s any shelving, we drill 1/4-inch-diameter holes for shelf pins.
To cut perfectly square plywood parts, we invested in a Festool TS-75 track-saw system. We fit the track with a custom-fabricated T-square that has an integral DeStaCo clamp. Although we have a designated cutting station for sheet goods in the shop, we can easily get the same results with this setup at the job site.
Posts. The vertical posts can be made from any 8/4 stock. Our standard post — installed where two cabinets join — measures 1 13/16 inches by 1 1/2 inches, but we also use wider posts for scribes and other special situations. A 3/4-inch-by- 3/4-inch rabbet cut into one edge allows each post to fit flush with the inside edge of the cabinet.
Drawers
Instead of doors, our lower cabinets usually feature drawers custom-sized for their contents and mounted on full-extension hardware. These drawers increase storage volume by about 50 percent over typical base cabinets with doors — plus they provide better access.
Most of the time, we build dovetailed drawers with 3/4-inch-thick stock, using a router and Porter-Cable’s Omni Jig to cut the joinery. To speed the process, we leave the template and a properly adjusted router permanently set up. This allows us to cut the dovetails for a single drawer in five to 10 minutes. Our customers appreciate this detail, and I never have to worry about our drawers coming apart.
Rather than cutting dadoes, I simply screw the plywood drawer bottoms in place. This simplifies construction and helps square up the drawers. It also gives each one a little more capacity.
For big drawers, we like to use Accuride’s 4034 full-extension side-mount heavy-duty file-drawer hardware (562/ 903-0200, accuride.com). For smaller drawers, we use the company’s 3832 or 7434 slides. Some customers request concealed undermount hardware, which works okay but requires thinner 1/2-inch or 5/8-inch drawer stock and a dadoed drawer bottom.
Another option we’ve been offering lately is Blum’s Metabox system (800/438-6788, blum.com), which reduces drawer cost by about a third. This is a good choice for site-built cabinetry, because you only have to supply the drawer face and bottom. The metal drawer glides are the drawer sides, and they attach quickly with a couple of screws to a 5/8-inch- or 3/4-inch-thick plywood bottom. The drawer fronts attach with clips that have built-in adjustment cams. Tall drawers use a stabilizer rod at the top to help support the drawer front.
Doors
For customers who want a traditional-looking cabinet, we usually build frame-and-panel doors. We make them on the table saw, cutting a 1/4-inch-wide by 3/4-inch-deep tongue-and-groove profile in 2 1/4-inch-wide by 13/16-inch-thick frame stock. We cut flat panels from 1/4-inch plywood and glue them into the grooves when we assemble the doors.
We use similar joinery to build breadboard doors, which give the cabinets a more contemporary look. When we glue up the panels, we reverse the grain of adjacent boards to offset the inevitable cupping. After squaring up the panels, we cut 1/2-inch-by-1/4-inch tongues at each end. The end cleats are 2 inches wide and have a matching 1/2-inch-by-1/4-inch groove. You can’t glue the end cleats to the panel along their entire length or the door will eventually explode from expansion and contraction. So I glue only the middle 5 or 6 inches of each cleat, then draw the joint together with a pair of countersunk 2-inch drywall screws at each end, relieving the inside of the pilot holes a little so the screws can bend slightly as the wood moves.
Regardless of their style, we hang doors with Blum concealed cup hinges (800/438-6788, blum.com). For most applications, the 107-degree inset-type hinges are fine. Rockler (800/279-4441, rockler.com) sells jigs that make working with these hinges a snap.
Sanding and Finishing
We sand most of the parts as we make them. For plywood panels, 120-grit is adequate, while doors and drawer fronts get sanded again with 180-grit paper. Most of the time, we use random-orbit sanders, saving the belt sanders for heavy-duty work on big panels.
We usually don’t bother to finish the insides of drawer cabinets; exposed carcase parts receive a couple of coats of brushed-on satin poly, plus a sealer coat on the backs to reduce warping. Shelves and drawer boxes also get two coats of poly, while drawer fronts, posts, and doors usually get three coats of Murdoch’s Hard Oil, a tung-oil finish that’s easy to use, good-looking, and relatively tough (800/322-1245, sutherlandwelles.com). We’ve tried clear water-based finishes but haven’t been happy with the results.
When the design calls for paint, we’ve had good luck with Benjamin Moore’s low-VOC Aura paint (800/622-0550, benjaminmoore.com).
Although our shop isn’t equipped with a spray booth, we do have a separate dust-proof finishing room with good ventilation and lighting and lots of drying racks. We finish the parts as we make them, rather than waiting until the cabinets are assembled. To minimize cleanup, we keep a varnish brush immersed in a covered container, so we don’t have to wash it out every time we use it.
Assembly
To help organize cabinet assembly, we’ve borrowed Toyota’s “one-piece flow” idea. Instead of doing the same operation for all cabinets at once — say, installing the posts in all the cabinets, then moving on to the next step — we do as many operations as is convenient on a cabinet at one time. This means that we typically work on a particular cabinet twice.
This approach — which lends itself especially well to small shops and site-built kitchens — offers a couple of advantages. If we’ve made any mistakes, such as in positioning hardware, we’ll catch them early and can make adjustments on the next cabinet. The method also reduces the number of times we have to move cabinets around.
The first time through, we attach the drawer hardware, assemble the box, and screw on the posts. We make simple mounting jigs for the hardware and use the layout sticks to give us the drawer locations, so it usually takes only 10 or 15 minutes to mount the hardware. We usually put in all the screws at this point, knowing we can make adjustments with the other elements later.
The second time through, we hang the drawers and doors and mount the drawer fronts, clamping the cabinets to a rack that holds them perfectly flat and square. This allows us to make adjustments before applying the back and practically eliminates the need for on-site tune-up after the cabinets are installed.
Most of our kitchens — even small, economical ones — now feature a section of stone counter with an undermount sink. Instead of hanging the sink from special fittings drilled into the bottom of the stone after the cabinets are installed, we rabbet the sink opening in the plywood top of the cabinet with a router and straight bit. It’s a fast way to make a strong connection, and it saves a lot of time when installing the countertop.
Cabinet Installation
We build continuous, level kickspace bases on site, referring to the same layout sticks we used to measure and build the rest of the kitchen. Kickspace stock needs to be straight and stable, so we typically use 3/4-inch plywood and joint the pieces in the shop. Sometimes we scribe the base right to the floor as the finish kick, but it’s faster to simply level it and apply a 1/4-inch plywood face after the cabinets are installed.
Getting the bases leveled can be fussy work, but once they’re done, box installation is simple. We just drop the boxes in place and bump them back and forth until they’re in the right position, then screw them together. Since we use flat and square plywood and true up each cabinet as we assemble it, there’s rarely any fine-tuning to do. The cabinets are stable and have a lot of mass, so once they’re screwed together and fastened to the kickspace base, we seldom need to secure them to the wall.
For the most part, we build our upper cabinets the same way we build our lower ones (particularly those with doors), but we usually don’t bother to install cabinet backs on the uppers. Instead, we install hanging cleats and mount the cabinets directly to the wall, often incorporating the wall finish into the cabinet design.
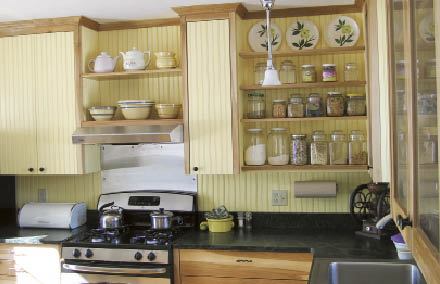
We also use a lot of open shelving in place of upper cabinets. Open shelves cost less than cabinet boxes, of course, and they’re easier to build on site. They also offer greater flexibility. They can be shallower, for instance, which opens up the counter space a bit, and they can be positioned lower on the wall.
Sam Clark designs and builds kitchens in Plainfield, Vt.


