As a partner in a landscaping design-build firm, I work from a broad palette of design elements. The basic forms, like walkways, patios, decks, and fences, serve as a visual and spatial frame for plantings, water features, sculptures, and other enhancements.
Lighting is often treated as just another landscape enhancement, or even as an afterthought. But for me, it’s an essential tool and one of the main keys to success. My high-end clients typically work long hours, and many of them get few chances to see their properties during daylight hours. Lighting makes their outdoor spaces accessible and useful after sundown.
But the best lighting design takes things a few steps further. It does more than simply let people see. A thoughtful design can create a beautiful nighttime world that’s pleasant and relaxing, or dramatic and exciting, to suit each client’s taste and budget.
Nightscaping Concepts
“Nightscaping,” as the industry terms it, can mean a simple enhancement like putting in a few path lights. Or it can mean a complex scheme for the whole property, with extensive illuminated scenes that involve house features, decks, paths, plants, and sculptures. Bare bones or full featured, a well-designed setup can create striking, exciting, or relaxing visual effects, even as it accomplishes the basic outdoor-lighting goals of security, safety, and convenience.
Mood, safety, and security. Three broad purposes typically anchor the design thinking for a landscape lighting plan. There is the creative value of mood lighting, or effect lighting — for example, uplighting a tree to give it a pleasing or dramatic appearance. Then there is the practical value of path lighting: For convenience and to prevent accidents, we light the ground at the entry to walkways, or wherever there’s a change in elevation like a set of steps; and we place lights near bodies of water. Finally, there’s the issue of security: We light dark areas to eliminate places where burglars could hide.
A thoughtful designer can employ individual lights or groups of lights to serve more than one of these goals at the same time. The main reason to create effect lighting is because it looks good; but it can also help to light walkways and dark corners. By the same token, path lighting or security lighting can be done in a way that is visually pleasing, casting interesting shadows or emphasizing a distinctive feature.
Art versus nature? In simple terms, there are two schools of thought when it comes to landscape lighting. One philosophy is to design the lighting to mimic nature. Nature supplies mostly downlighting and backlighting at night. A full moon, for instance, will cast subtle shadows of trees and plants on the ground; that’s the basic idea of downlighting (we even call it “moonlighting”). But imagine a tree on the horizon minutes after sundown, silhouetted against a pale, bright sky: That’s backlighting. To conform to the natural world, says the first school of thought, we should downlight and backlight our landscape.
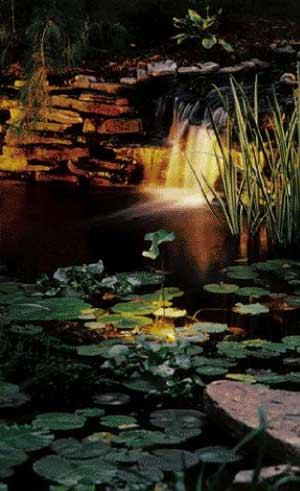
An alternative is to create a whole new landscape at night. That school of thought favors techniques such as uplighting a small shrub next to the house to throw a tree-sized shadow against the high blank wall (called “shadowing”). A designer might hide a piece of sculpture in the plantings and transform it into a focal point at night with a well-placed spotlight. You can highlight interesting trees, or you can shine a spotlight across a waterfall to cast moving shadows onto the stone work.
No law says those two schools of thought can’t be combined. To take either philosophy too literally could stifle your creativity. I prefer to change the night landscape with my lighting design; but I’m also known to climb into trees to hang downlight fixtures, just for the effect of moonlighting the branches onto the ground (this looks especially striking after a snowfall).
Lighting water features. Nothing looks more dramatic in the landscape than illuminated moving water. Special underwater low-voltage lights are available for lighting a waterfall or casting a glow throughout a pond. These are simple. You can also light the surrounding landscape to highlight the water: Use spotlights to cast light across the stone work in a pond or across a waterfall to shadow the moving water on the rocks beyond. If you have a still water surface, you can light a tree behind the pond to create a reflection of it in the water. Or you can shine a spotlight up a creek, or use a sharp beam spotlight to light a night-blooming water lily. Water features are truly an artist’s canvas — the choices go on and on.


