In the ’60s and ’70s, California tract builders were all gang-cutting their rafters. Since then, trusses have taken over in that market, and production cutting has become a dying art. Yet in many areas, carpenters continue to stick-frame roofs, and it’s surprising how many of them cut rafters one piece at a time. Unlike most carpenters who gang-cut rafters, I did not learn this technique on the West Coast. About 20 years ago I got a job working for a builder on Cape Cod and he production-cut all his roofs. I eventually moved back to eastern Pennsylvania and became a framing contractor, where I continue to gang-cut my roofs.
It doesn’t matter whether there are 20 or 200 rafters to cut: It’s always faster to gang them together and cut them all at once. When I frame a roof, the actual cutting time for the rafters is usually less than 15 minutes. This doesn’t include layout or stacking the lumber on racks, but I’d be laying out the cuts and stacking the material on sawhorses anyway. To help with the heavy work, we use an all-terrain forklift. Once the rafters are cut, we lift them to the roof all at once.
Setting Up
The first thing we do is build a set of temporary racks. They don’t have to be elaborate, just sturdy and stable. I take a couple of 2x10s or 2x12s and brace the ends so they won’t roll over. It takes less than a minute to build a set of racks. We build them low because they’re more stable that way and it’s a comfortable height to cut from. It’s easier if you put the racks on a level surface, but they don’t have to be perfectly level. The racks can run slightly up or down hill. The important thing is for the top edges to be in the same plane.
The racks are usually about 14 feet long, but I’ll make them longer if there are a lot of rafters to cut. Long racks can get kind of shaky under a heavy load of lumber, so if there are enough rafters I’ll put a third rack under the middle of the stack.
Racking. Putting the lumber on the racks is called racking. To save time, I rack the entire roof package at once. This includes commons plus hip and valley jacks. It doesn’t matter if the rafters are more than one length; they can still be in the same rack. One rack should be within a foot or so of the head cut and the other should be under the seat cut. If there are enough different lengths, we may build an intermediate rack to support one end of the shorter pieces. We could use a different set of racks for the shorter rafters, but there isn’t always space to do it and it would require us to lay out an extra set of cuts. It’s usually easier to do everything at once.
Since the birdsmouth is on the bottom of the rafter, we rack them with the crown side down. It’s very important to stack the rafters tight; I use a hammer to beat them together. If the rafters are exposed, we’ll use a piece of scrap to protect them from dents. We nail blocks to both ends of the racks to keep the rafters together. The blocks are shorter than the rafters so they won’t interfere with the saw.
Laying Out the Cuts
As with any roof-cutting project, there’s a certain amount of prep work involved. I figure out all the cuts at home the night before I cut the roof. That way I don’t waste time on the job or get distracted and make a mistake that ruins a whole pile of lumber. The last thing I want is to tell a builder to order 100 more 2x10s because I cut all the rafters 9 inches short.
However you figure the lengths, you have to put the cut lines on the bottom of the rafters. It’s like working upside down, so it takes some getting used to. I mark the head cuts, seat cuts, and tail cuts on the two outside rafters and use a chalk line to transfer the marks to the rafters in between. I mark the head first, then determine rafter length and the seat cut from there.
Rafters of more than one length and for more than one roof pitch can be stacked in the same rack. I use 12-inch spacer blocks to separate different groups of rafters on the rack. This speeds the process because it allows us to fill the racks and get more cutting done in each setup. This also allows us to make the same cuts on one end but different cuts on the others.
Production Cutting
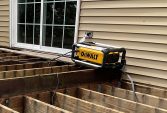
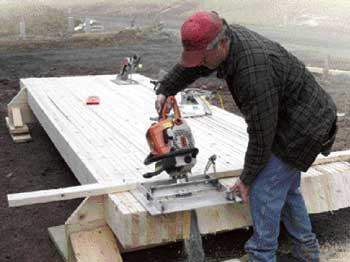
The idea behind this method is to run the saw through all the rafters in a single pass. We do the head cuts first, the tail cuts second, and the birdsmouths third. Circular saws do not have the depth of cut to gang-cut the heads and tails. Instead, we use an adjustable table attachment on a chainsaw to make the long straight cuts.
We always make the head cuts first. That way we can recut them if the angle is a little bit off. A 2×4 nailed to the top of the rafters makes a good fence for the saw. We usually cut the tails before doing the seat and heel cuts because there’s nowhere to nail the fence if the birdsmouths are already made.
We use a slow, smooth cutting action and let the saw do the work. The table should be held tight to the top of the rafters. If one side of the table comes off the work, the pitch will be wrong and there will be gaps where the rafter hits the ridge. A good coating of silicone spray on all chains, blades, and tables reduces friction and keeps blades sharper longer.