
I got my start as a carpenter in the 1990s working for my dad, who was a longtime custom home builder on Maryland’s eastern shore. Back then, he and his crew always built kitchen cabinets in place, ripping the plywood on site to create the boxes, adding face frames and drawers (also built on site), then installing doors and drawer fronts purchased from an outside supplier to complete the cabinets.
When I started my own construction company, we shifted to installing modular stock cabinets because they were faster and less labor-intensive (and therefore less expensive). This remained our standard practice until a couple of years ago. I had always been bothered by the limitations of building up cabinet runs out of modular boxes sized in 3-inch increments and was growing frustrated with the long lead times (up to 20 weeks in some cases) that only became worse as the COVID-19 pandemic spread. Because it was becoming increasingly difficult to get cabinets on site, I decided to return to my roots and start building our own cabinets again.
Our approach is a bit of a hybrid. We build the boxes in our small shop, sizing them to fit the space rather than in standard increments. At the same time, we build the face frames, again sized to fit the space, along with the doors, drawers, and drawer fronts. We then fit the doors and drawer fronts to the face frames, finish them, and even install most of the hardware, but we don’t permanently attach the frames to the boxes until we are on site and the boxes have been installed.
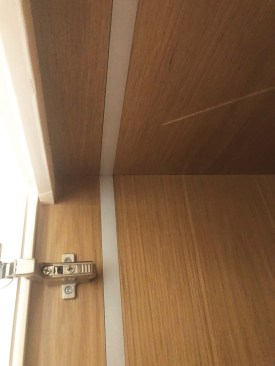
Key to our approach are the mechanical biscuits in the Lamello Zeta P2 system. These biscuits allow us to temporarily install the assembled face frames in our shop to do our fitting, and remove them to easily transport the cabinet components to the site. Once there, we install the cabinet boxes, which are slightly undersized for the openings, and then template the openings for the face frames, which we’ve built to be slightly oversized. After trimming the frames to size, we snap them in place. The resulting cabinetry looks like it was built in place without any seams.
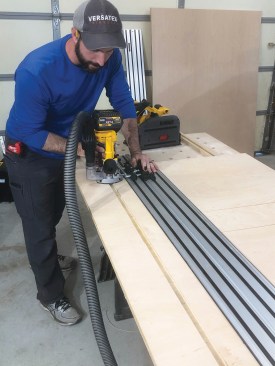
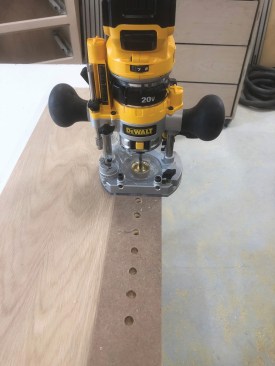
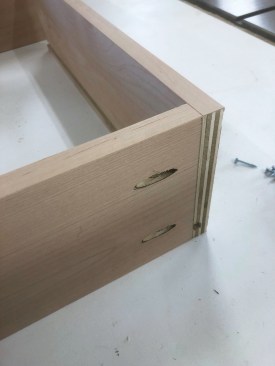
The author typically assembles his cabinet boxes out of 3/4-inch prefinished plywood. Here he's cutting a dado with a track-guided router for fitting the bottom panel to the back to form a box.
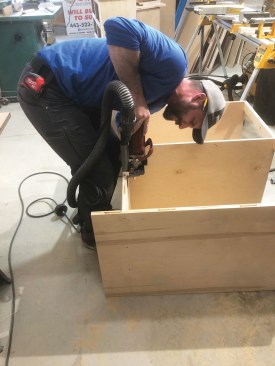
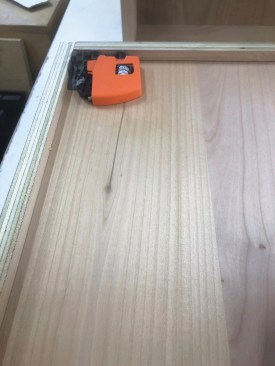
Here he is using a Lamello Zeta P2 biscuit joiner to cut slots for the Tenso P-14 biscuits that will be used to fasten the face frames to the boxes.
Design and Layout
While my company also builds custom homes, probably 80% of our cabinetry work is retrofit into existing construction as part of a remodeling project. When meeting with the homeowners to discuss their project, I take careful measurements of the space with a Bosch GLM165-40 laser distance measurer, which I then use to accurately dimension photographs that I’ve taken of the space with the help of Bosch’s MeasureOn app.
I sketch out the designs on graph paper, and after the clients have settled on a plan, I refer to the dimensioned photos to size the cabinet boxes. My goal is to fit them easily into the opening, while making efficient use of the plywood that we build them with. For example, a 90-inch-long run of cabinets will consist of a single box, with plywood dividers placed as needed to separate the box into individual compartments.
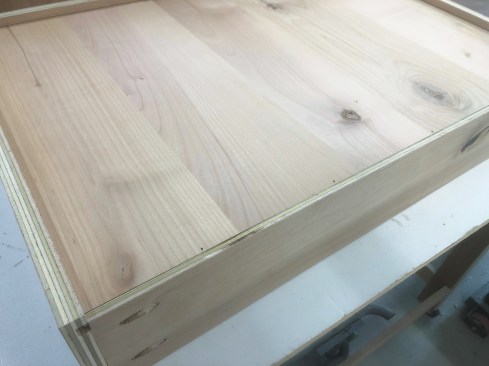
To save time breaking down full sheets of plywood, we special-order prefinished 2-by-8-foot 3/4-inch plywood panels for the cabinet sides and bottoms and full 4-by-8-foot sheets of 1/2-inch plywood for the backs from our local Home Depot. Manufactured by Columbia Forest Products, the formaldehyde-free veneer-core PureBond panels that we most often use come with a maple finish, but white oak and walnut panels are also available.
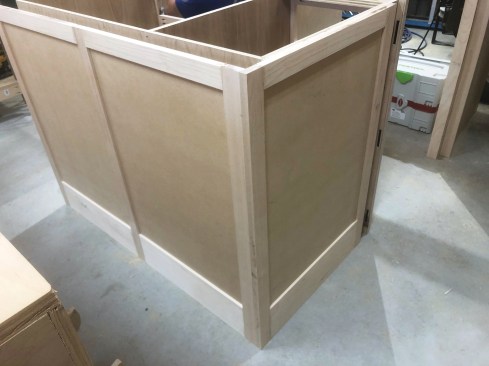
Where the ends and backs of the cabinets will be exposed, such as for kitchen island cabinets (left), the author covers the plywood box with a separate frame-and-panel assembly, attaching it to the face frame with P-14 biscuit connectors (above).

One of the upgrades that the author offers is flush-mounted electrical outlets, which he installs using a Trufig system router template to cut the opening in the side of the island cabinet for the electrical box and trim component.
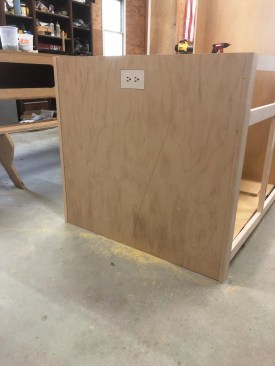
The Trufig system is compatible with outlets and cover plates from different manufacturers, including Decora and Leviton.
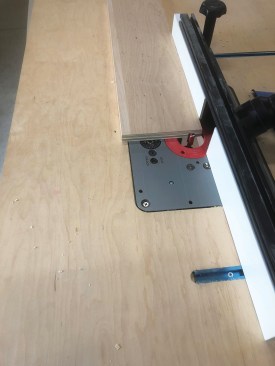
After cutting the panels to size, we use a router guided by a track to cut dadoes and rabbets that we’ll use to fit the panels together when assembling the boxes. Sometimes, clients want in-cabinet lighting, in which case we rout 3/8-inch-deep light-rail tracks with a 3/4-inch-diameter dado bit for Loox flush lighting fixtures from Häfele. Where the cabinets will contain shelving, we drill holes for shelf supports. Because it does a cleaner job than a drill, we use a router, which we fit with a collar and a 1/4-inch-diameter upcutting bit, and guide it by a simple shelf-pin jig that we made out of MDF.
During cabinet assembly, the author uses a shelf-pin jig to guide a router fitted with a collar and a 1/4-inch-diameter upcutting bit to make clean holes for the shelf supports.
After gluing and screwing the panels together, we pocket-screw 1×2 stretchers to the fronts of the boxes to stabilize them and provide a mounting point for installing the face frames.
Face Frames
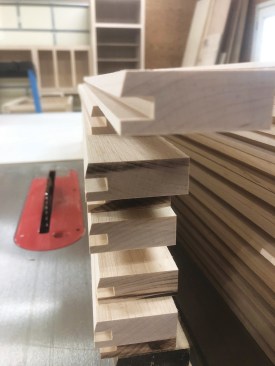
Most of our clients want face-frame cabinets with a paint finish. We mill the stock for the frames, doors, and drawer fronts from full 1-inch-thick S3S maple or white oak, which typically measures 17/16 inches thick and comes in random widths and lengths with one straight edge. This material is currently about half the cost of similar S4S lumber, and while it takes a little longer to rip down to a final 2-inch width, it gives our cabinets a sturdier feel.
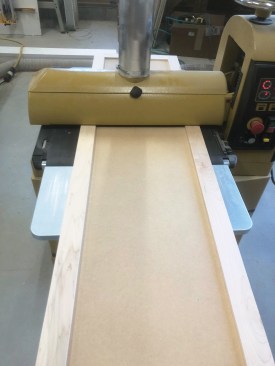
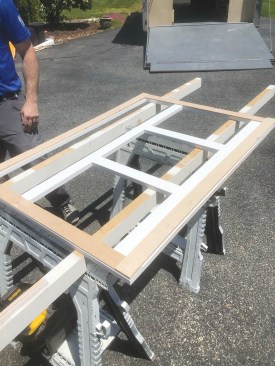
To eliminate the seams that you typically get with box units, we size the frames so that they are as long as they need to be for each run of cabinets, plus a little bit extra on either end. We join the frames together with glue and pocket screws, using a clampdown table that we made and Rockler clamps to keep the joints tight and flush when screwing them together. After assembly, we run the frames through a Powermatic 2244 22-inch drum sander.
The author uses pocket screws and glue to assemble the face frames.
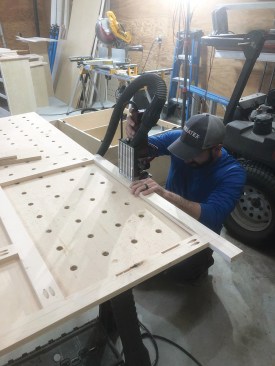
Once the frames are assembled, he cuts the slots for the biscuits following the layout marked on the cabinet boxes.
When we first started building our own cabinets, we joined the face frames to the boxes with pocket screws. We still use a lot of pocket screws in our production process and recently added a Kreg Foreman semi-automatic pocket hole machine, which definitely is faster than our old Kreg jig. However, for attaching the face frames to the boxes, we now use Lamello’s Zeta P2 biscuit joiner and P-System connectors, which results in a cleaner-looking install with no visible pocket screw holes. Another advantage is that we can completely assemble a cabinet in our small, 750-square-foot shop, then quickly break it down again to make room as we work on additional cabinets. Then we transport everything to the jobsite and do our final fitting and assembly on site, as described below.
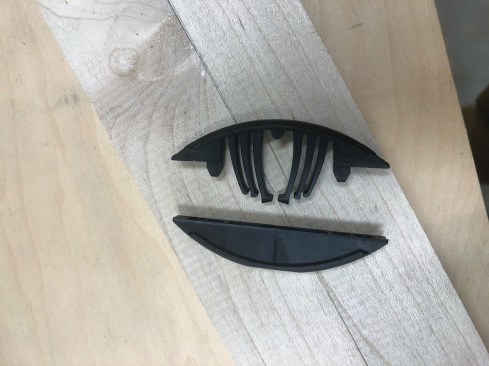
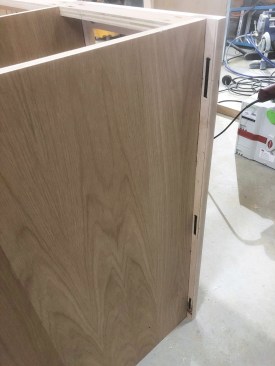
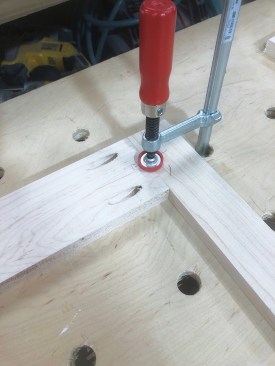
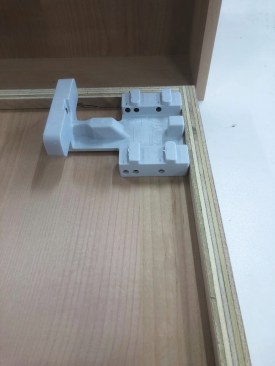
The two parts of the Tenso P-14 biscuit connect mechanically when fitted together but can be easily disassembled if needed (above). Holes bored in the plywood worktable make it easy to position the clamps used to securely hold the frame flat and square during assembly (right).
While different styles of P-System mechanical biscuits are available, we primarily use Tenso P-14 biscuits, installing them about every 10 inches around the perimeter of the face frame and cabinet box. With these biscuits, the frames simply snap into place onto the boxes.
Doors
For the kitchen in this article, we built inset doors and drawers, but on about 50% of our projects, we build 3/8-inch overlay doors, which are a bit more budget-friendly because they don’t require as much labor to fit. For inset doors, we size the doors slightly larger than the openings and trim them to fit later with a consistent 3/32-inch reveal between door and opening. We cut 2-inch-wide stiles and rails from the same stock as the face frames, typically paint-grade maple or white oak, and cut the panels from 1/2-inch MDF sheet stock.
The author rips full 1-inch-thick S3S stock to width for the stiles and rails for the doors.
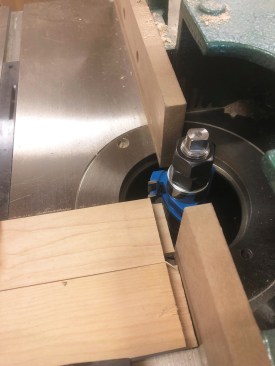
He profiles the stiles and rails with a shaper fitted with a tongue-and-groove cutter with a 15-degree bevel.
We have the cutters to cut raised panels, but most of the time we build Shaker-style doors with flat panels, running the stiles and rails through a shaper fitted with an Infinity T&G shaper cutter with a 15-degree bevel. On 3/4-inch stock, the bevel is probably unnecessary, but with our full 1-inch-thick stiles and rails, we think the bevel makes a noticeable improvement in the appearance of the door.
To aid assembly, the author clamps a wood square with a perfect 90-degree angle to the worktable, which helps align the door’s stiles and rails as he slides the 1/2-inch-thick panel into place.
During glue-up, the author is careful to make sure the door is flat, and checks that the diagonals are equal to ensure that the door is square.
We use either Titebond III or Titebond No Run, No Drip wood glue when gluing up the door frames. To ensure that they are perfectly square, we first screw a 90-degree wood bracket or jig to the clampdown table. The jig makes squaring them up—which is especially essential for inset doors—easy and fast. After the glue dries, we run the doors through a wide belt sander.
After the glue has dried, a couple of quick passes through a wide belt sander are all that is needed to clean up the glue joints and prep the door for a paint finish.
Drawers
We build drawers out of the same prefinished 3/4-inch plywood that we use for cabinet boxes. After cutting the sides to size, we rout them with a 1/2-inch-wide dado for the drawer bottom and apply iron-on edge banding. We glue and screw the drawers together through their fronts and backs with pocket screws, which will be invisible once the drawer fronts are fastened to the drawers and the drawers installed.
The author cuts his drawer boxes from the same prefinished 3/4-inch plywood used for the cabinets, finishing the top edge with iron-on edge banding.
He joins the fronts and the backs to the sides with pocket screws, which will be hidden once the drawer front is installed and the drawer is mounted on the slides.
The drawer bottom is cut from 1/2-inch plywood, and fits into dadoes cut into the drawer sides.
We make the fronts for shallow drawers out of solid stock. For drawer fronts that are at least 6 inches high, we make a frame-and-panel style that is identical to the cabinet doors. For drawer fronts that measure 5 inches high, we reduce the width of the top and bottom rails to 1 1/2 inches, a barely perceptible difference that allows for a full 2-inch-wide panel.
Finishes
Before installing any hardware and before bringing the cabinets on site, we spray the face frames, doors, and drawer fronts with Sherwin-Williams Kem Aqua, a waterborne lacquer finish. We apply two coats of primer, with a light sanding between coats using a Graco droptube airless sprayer. Then we apply another two finish coats, avoiding sanding between coats unless absolutely necessary to remove blemishes. As much as possible, I like to spray everything when it’s in a horizontal position to avoid drips and runs, though we do apply some touch-up work as needed on site.
Once the paint is cured, we install as much hardware as we can in the shop. Whether the cabinets are face-frame or frameless, Blumotion soft-close concealed hinges are our go-to option. For drilling the hinge cup locations, we use a Kreg concealed hinge drilling jig, which has the screw hole locations for predrilling, making squaring up the hinges easier. For the hinge mounting plates that fit in the cabinet boxes, we use a Rockler Jig It mounting plate template.
The author uses Blum’s drawer slide template to drill the holes in the back of the drawer box…
…which are needed for the slide locking devices used with the Tandem Plus Blumotion concealed undermount slides.
To mount drawers, we used to use side-mount soft-close slides, which required wood runners for the inside of the boxes to support them. But we’ve switched to Blum’s Tandem Plus soft-close undermount slides, which cost a little more but are much easier to install. We use Blum’s undermount drawer slide jig to accurately position and mount the hardware that needs to be installed on the drawer box.
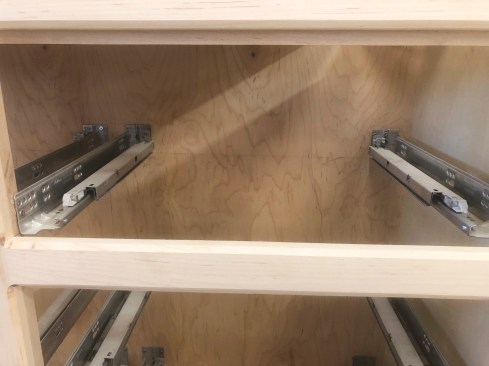
Here, the Tandem Plus Blumotion concealed undermount slides are ready for drawer installation.
Installation
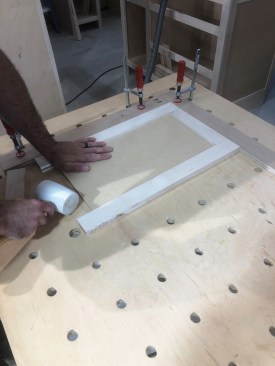
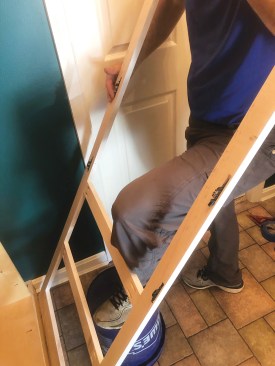
Along with the boxes, face frames, and other cabinet components, I bring a stack of 1/4-inch plywood rippings to the jobsite when it’s time to install the cabinets. After the boxes are leveled and screwed to the framing, I use the rippings to template the openings, joining the corners together with hot-melt glue. Then I lay the template down over the face frame to mark the exact size of the opening.
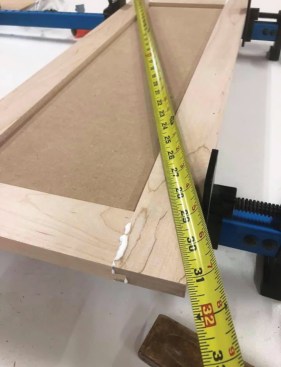
When cutting the face frame to fit with a track saw, I back-cut any side or end panels by 10 or 15 degrees to make it easier to scribe the panels for a perfect fit. Most of the time, just a back cut provides a tight fit to the drywall. Once I’m satisfied with the fit, I insert the Tenso biscuits and snap the face frame in place.
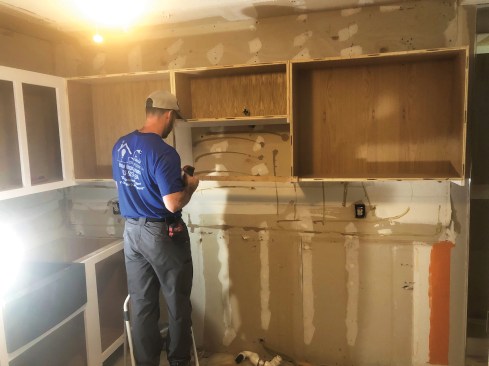
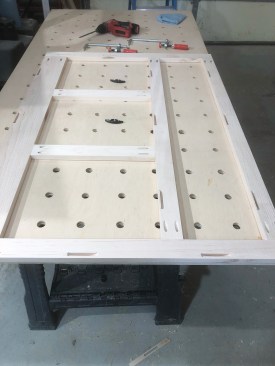
On site, the author begins the installation by screwing a set of cabinet boxes together and to the wall framing.
Once the boxes are in place, the author glues strips of hardboard together with hot-melt glue to make a template, which he uses to mark the final width of the frame.
He uses the templates to trim the frames to fit. Then he inserts the two parts of the mechanical biscuits into the slots in the frames and boxes, and snaps the frames into place.
To complete the cabinet installation, we finish up the drawer hardware installation and slide the drawers into place. Then we screw the door hinges into the predrilled holes, adjusting the hinges as needed for the proper fit.
The author fits some cabinets—such as wardrobes—with flush interior LED cabinet strip lighting that runs inside an aluminum track covered by a diffuser. The track fits into a dado routed into the cabinet box.
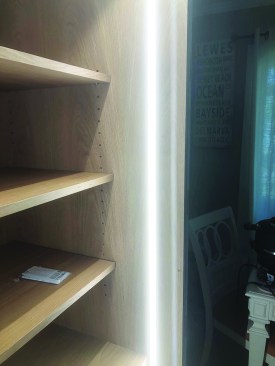
Manufactured by Häfele, the Loox LED lighting is controlled by a daylight sensor that turns the lighting on and off automatically when the door is opened or closed.
Adding equipment such as a Lamello biscuit joiner, a wide belt sander, and a robust Laguna dust collection system to manage the sawdust was a big investment for my small shop, but it is definitely paying for itself. Besides saving a lot of time, these tools and this process have greatly improved the quality of our work. I’d prefer to hire another experienced cabinetmaker, but a labor shortage in our area has made that difficult. Meanwhile, these new purchases have increased our efficiency and allow us to offer our clients quality custom cabinets at a price that is competitive with stock boxes.
Photos by the author.


