From the 1950s through the ’80s — before poured concrete became the norm — many homes in northern New England were built with concrete block foundations. Unfortunately, block isn’t the best material for a long-lasting foundation in this area. Frost pressure, melting snow, and heavy clay soil put a lot of stress on block walls, and I see the resulting damage every day. Our company, Tri-State Basement Systems in Berlin, Vt., specializes in waterproofing and repairing leaking and damaged foundations.
On a recent job, we were called to the home of a retired couple. The long side of their house had bowed in about 3 inches in the center, and the short section of wall next to the garage door had sunk several inches. When cracks in the plaster started showing up, they gave us a call.
|
|
Two-Part Repair
The repair and stabilization plan developed by our estimator called for two support piers to prevent the subsided footing from sinking further and three wall ties to pull the bulging foundation wall back in line.
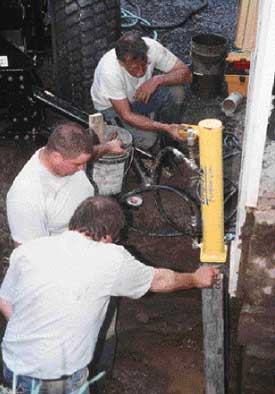
To stabilize the footing, we use a push-pier jacking system from Grip-Tite Foundation Systems (877/474-7848, www.griptite.com). Hydraulic rams powered by a portable pump push steel posts into the ground until they develop sufficient bearing capacity. At this point, L-shaped brackets are bolted to the post and support the footing from below. The system works in principle a lot like an automotive bumper jack, except the lifting action is hydraulic rather than mechanical. While smaller repairs like this one are more common, we’ve also used the push-pier system to stabilize entire foundations built on poor soil.
Ties. Wall ties, the other half of the repair plan, are an inexpensive and effective solution to buckled walls. A large metal plate on the inside of the foundation wall and another below grade on the outside are connected by a threaded rod. As the nut on the rod is tightened, it gradually draws the plates closer together, straightening the wall. It works similar to the rail bolts used for joining sections of laminate countertop or handrail.


