

Kim Katwijk

Patricia Steed
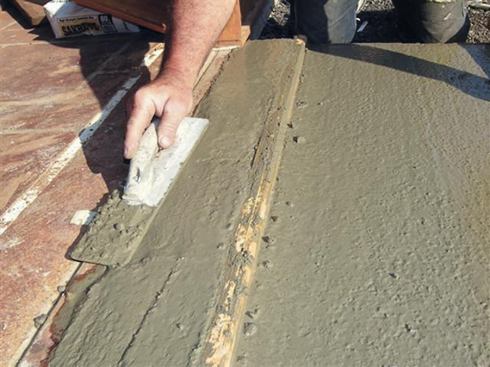
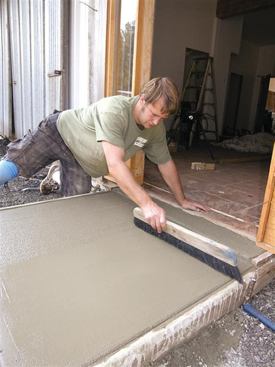
After being screeded, large slabs are flattened with a bull floa…
Outside of footings, small slabs are what deck builders use concrete for most often. But rather than calling in a sub to pour a stair landing, hot-tub pad, or sidewalk, having the know-how to do it in-house can make jobs go a lot smoother. I’ve poured a few thousand yards of concrete in my life; here’s some of what I’ve learned over the years.
Ready-Mix or Site-Mixed?
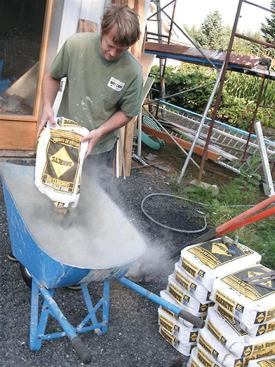
One of the first considerations is whether to order the concrete by the truckload or mix it on site from bags. Your numbers may vary, but I find that for pours smaller than one cubic yard, site mixing is more economical than ordering from a ready-mix company.
To determine how much concrete you will need, find the volume (in cubic feet)of the slab you want to pour by multiplying together its length, width, and thickness (in feet). If you are mixing the concrete yourself, divide the slab’s volume by 0.45 cubic feet (the volume per bag) to find the number of 60-pound bags of concrete mix needed; for 80-pound bags, divide by 0.60 cubic feet. To convert cubic feet to cubic yards — for ordering ready-mix — divide by 27.
The bag mix I use is Sakrete, which makes 4,000-psi concrete (more on this later). Not all bagged concrete mixes will make this strength, so check the label before you buy. You can add extra Portland cement to make bagged concrete stronger and easier to work.
Specifying Ready-Mix
A good formula for concrete is a mixture of 26 percent sand, 41 percent gravel, 16 percent water, 11 percent cement, and 6 percent air, by volume. Commonly, the cement portion will be Portland cement — a combination of limestone, clay, and shale that has been ground into a very fine powder and then heated. When Portland cement gets wet, it reacts chemically by hydrating, heating up, and becoming hard. The amount of time this takes depends on the type of cement and the exact ratios of the other ingredients in the concrete. How long the concrete will remain workable is influenced by external factors as well — temperature, humidity, moisture content of the ground, thickness of the pour, mixing time, and sun exposure, to name a few.
When ordering concrete, you will have a number of choices to make. First is the strength of the concrete, determined by the mix ratio. In the West where I work, mix ratios are usually given in number of sacks — 5-sack mix or 6-sack mix, for example. A 5-sack mix has five 94-pound bags of Portland cement per cubic yard of concrete. It yields concrete that will reach 3,000 psi strength in 28 days and is good for footings; 5.5 sacks yields 3,500 psi, good for patio slabs; 6 sacks yields 4,000 psi, best for commercial projects. In other parts of the country, concrete is specified by its 28-day psi strength — for instance, 3,000.
The type of aggregate can also be specified, from 1/4-inch to 1-inch, smooth or crushed. The smaller the aggregate, the easier the concrete is to work, although you sacrifice a little strength — generally not a big deal for residential work. Most concrete is made with 3/4-inch crushed stone aggregate.
Another specification is “slump,” or the wetness and thereby workability of your concrete. Slump measures how far wet concrete placed in a 12-inch-high metal cone lowers (slumps) when the cone is removed. On commercial and public-works jobs, an inspector will verify each truckload’s slump. On residential jobs, the ready-mix company’s word is usually all the verification that’s required. A 4-inch slump is a good place to start, although you may have to add water to make the concrete easier to install. However, concrete does not need a lot of water to set up; in fact, any water beyond what’s needed to react with the Portland cement will reduce the strength of the concrete and cause surface cracks, so you should add only enough to make the concrete workable.
The final specification is for the air portion of the formula. Air-entraining — purposely placing microscopic air bubbles into the concrete — reduces the effects of freeze-thaw action. For exterior concrete with 3/4-inch or 1-inch aggregate in climates subject to freezing, you should order the concrete with 6 percent entrained air and verify with the concrete company that you are getting it. Otherwise, the surface will spall (break off from the top of the slab), exposing the aggregate. Smaller aggregate needs more air — 7 percent for 1/2-inch aggregate and 7.5 percent for 3/8-inch aggregate. Entrained air is a major advantage of truck-mixed concrete; it’s impossible to entrain air in site-mixed concrete — the fast rotation of the truck’s drum is necessary for mixing in the air.
Ready-Mix Additives
Various additives can make ready-mix concrete more workable or suited to the conditions. Talk with your ready-mix company to find out what is typically used in your area.
Retarder slows down the reaction to provide more time to finish the concrete, which is helpful in hot weather.
Accelerator speeds the reaction, reducing the time required to finish concrete — good for cold weather.
Hot water can be used at the plant to make the concrete set faster, also good for cold weather.
Plasticizer makes concrete flow better. It reduces the amount of water needed to make the mix workable, and is good for walls or other vertical work.
Colorings can be added to the concrete, usually to the top of the concrete when it’s being finished, but lamp black can be added to the entire batch to achieve a darker concrete.
Forming Basics
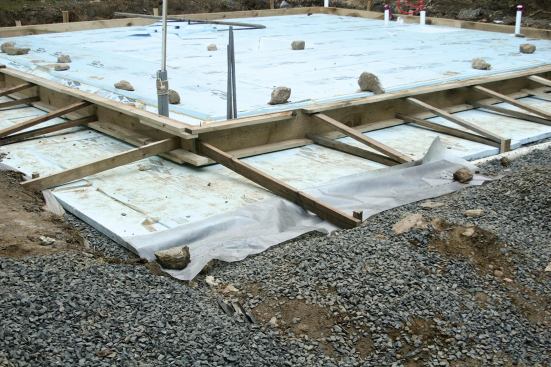
Concrete slabs are usually placed on a base of several inches of crushed stone or clean gravel. This helps with drainage and allows the hardened slab to move laterally. That’s important, as concrete expands when it heats up and shrinks when it cools down. When a slab’s bottom can’t move easily, it’s more likely to crack.
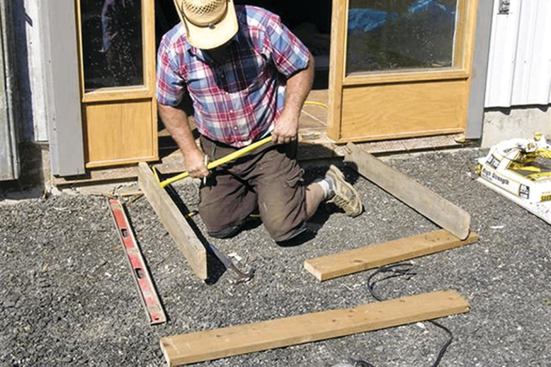
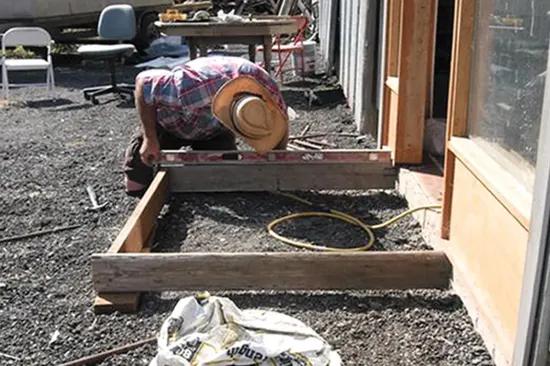
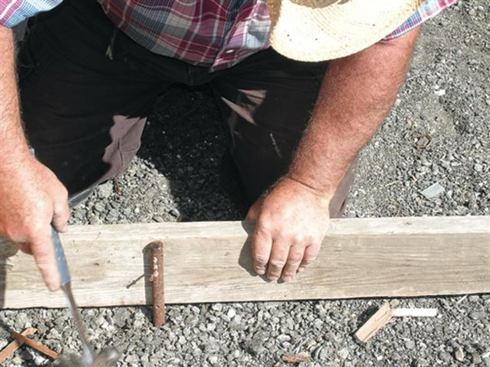
Because concrete starts out more or less fluid, some type of form is needed to hold it in place until it hardens. Forming is mostly done with 2-by materials or plywood, but anything can be used, especially when forming for a curve. A form can be as simple as a box on the ground made with 2x4s, or very complex, like the forming needed for a suspended set of stairs. Using straight form wood is important.
Forms also determine whether a slab is level or pitched. Most slabs are pitched for drainage. Since the top of the forms determines the elevation of the top of the slab, pitching the forms results in a pitched slab. It’s pretty easy to get any desired pitch. For example, if you want a 1/8-inch-per-foot pitch, tape a 1/2-inch-thick shim to one end of a 4-foot level. When the bubble reads level, the form is pitched down 1/8 inch per foot toward the end with the shim.
Because wood floats on concrete, most forms will need to be staked into place to keep them from rising or moving around. Being heavy (2 tons per cubic yard) and fluid, wet concrete can exert tremendous pressure, enough to bow a 2-by form. For most slabs, placing steel or wood stakes every couple of feet is sufficient. The deeper the pour is, however, the more pressure put on the forms (particularly the bottoms), and the more bracing required. Retaining walls formed against a dirt bank in particular require extra bracing. Not only do they tend to be deep (as in tall) pours, but since the dirt bank isn’t going to move, the pressure of the concrete against the forms is multiplied.
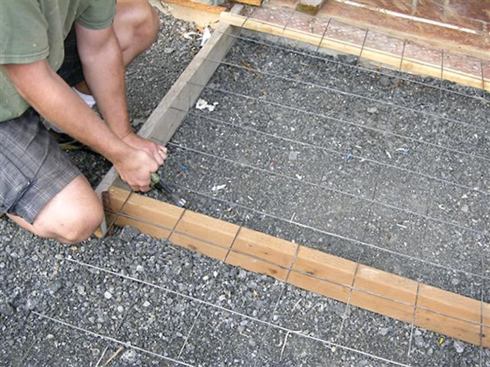
Concrete is strong in compression but weak in tension. Tension will allow cracking or even structural failure. Reinforcing concrete by adding steel rebar or wire mesh to take the tension load solves these problems. Structural slabs such as garage floors or large patios should be reinforced with a rebar grid. Rebar is specced by diameter in 1/8-inch increments. A #4 bar, the most common size in residential construction, measures 1/2 inch in diameter; a #5 bar, 5/8 inch; and a #6 bar, 3/4 inch.
Metal mesh or welded wire doesn’t add as much strength as rebar, but it’s cheaper and faster to install, and is adequate to prevent surface cracks in smaller slabs. The most common size comes in a roll 5 feet wide with 1/8-inch wire in a 6-inch-square mesh pattern. Another way to prevent surface cracks is to have fiberglass or plastic fibers added to ready-mix concrete.
Any metal reinforcing needs to be suspended in the concrete, not rested on the base. Rebar can be held up on “chairs” designed for this purpose. Mesh needs to be pulled up into the center of the slab as the concrete is being placed.
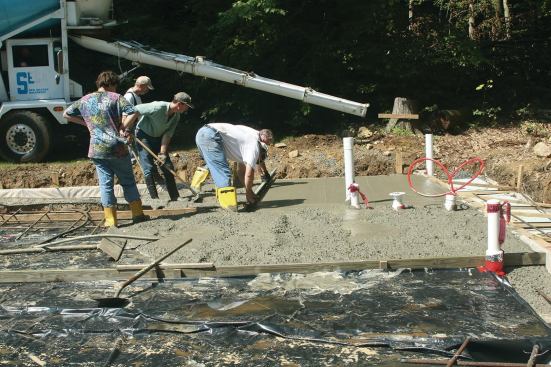
Depending on the slab’s size, temporary 2×4 supports may be needed to divide the form into smaller sections. This is because concrete gets leveled by screeding — placing a straight 2×4 on top of the forms and pulling it toward you while sliding it back and forth. In most cases, the practical length of a screed board is about 10 feet; longer than that, and it’s too hard to work, as well as being too flexible to make a flat slab. So for large slabs, screed supports — usually 2x4s — are installed. Each support is nailed to steel stakes so that its top is set at the elevation of the slab. Once one section is poured and screeded, the supports are removed. The next bay can be “wet screeded,” using the already poured concrete as a guide.
Placing Concrete
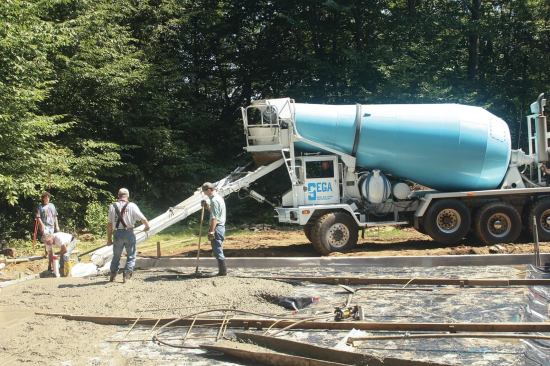
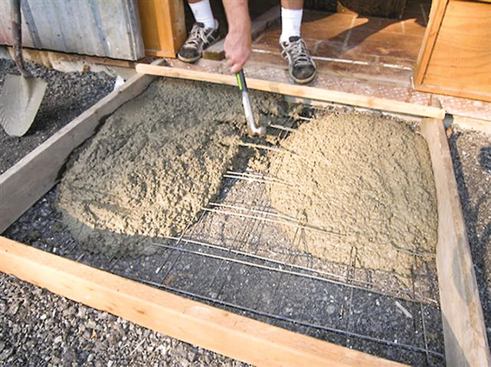
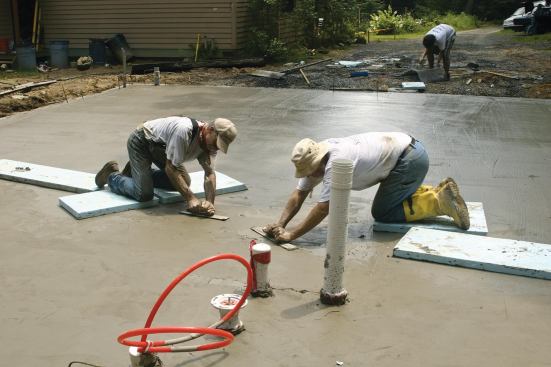
Location will determine whether you pour right out of the truck into your forms, wheelbarrow the mud, or get a small line pump or larger pump truck. Regardless of which method you use, concrete always takes more manpower to lay down than finish. Two well-trained workers can handle 2 yards of flat work if the concrete is being dumped right into your forms, though they will be hard-pressed for time. If the concrete needs to be wheeled in, it will take four workers. Pump trucks are expensive, around $1,000 for a typical slab, but they can save a lot of work on a big project. If you are laying concrete down with a pumper, you’ll need at least three workers.
As the “mud” (wet concrete) is placed, it will need to be spread and worked into the forms to make sure there are no voids and that it is close to the right height. This is done with a rake or a concrete placer (“come-along”) that looks like a rake with no teeth. Use a straight 2-by to screed the concrete and get it to the exact height using a sawing or scraping motion. While one worker is screeding and filling in any holes, it’s helpful to have a second worker rake the excess mud.
Finishing the Slab
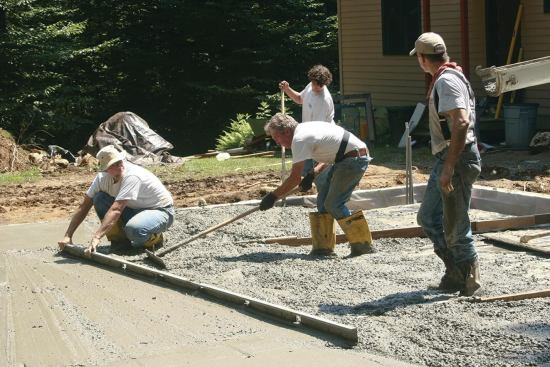
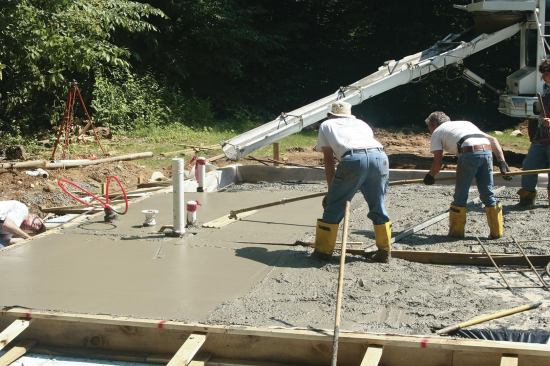
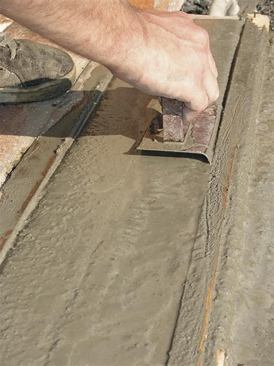
Once the concrete is screeded, it’s time to use the bull float. It will have a handle 6 to 16 feet long and a large 3-foot (or larger) by 10-inch cast-magnesium float. Bull-floating consolidates the slab by bringing the “cream” or “paste” to the surface and pushing down the coarse aggregate. This makes the slab easier to finish with a steel trowel later, because there won’t be large chunks at the surface for the trowel to dislodge. The bull float also levels the surface by cutting the high points and filling the lows. Wherever a bull float is too big, use a magnesium hand float, or “mag,” in its place.
Don’t overdo the bull-floating or magging. Excessive troweling will bring too many of the fines to the surface, weakening it and eventually creating hairline cracks. Let the concrete sit while the “bleed water” comes to the surface. While you’re waiting, use a 3/8-inch or 1/2-inch edger to put a smooth curve along the slab edge. This will help the slab resist chipping after the forms are removed, as well as provide a clean-looking edge on patios, curbs, sidewalks, and driveways. Edge again after the bleed water disappears from the concrete surface.
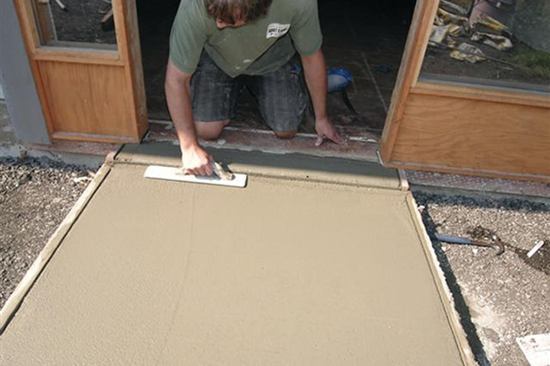
Once the bleed water evaporates, run the bull float or mag over the slab to break the surface and smooth out any lines left from the first bull-floating. Then wait until the concrete is no longer fluid, but the top is still able to take a steel-trowel finish. Be vigilant — particularly on a hot day, concrete can go from workable to not in minutes. Use the steel trowel to achieve a smooth, shiny, and level surface without any voids.
For larger slabs, you will need to get out on the slab to finish the center. This is done with a set of knee boards. These can be anything that spreads out your weight over a larger area so you don’t sink into the concrete. Usually, they’re made of plywood. Mine are typically about 18 inches by 24 inches with a 2-by nailed in the center as a handle.
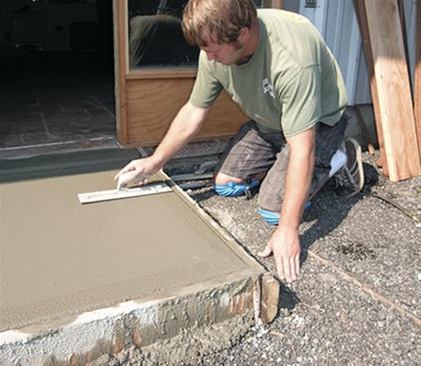
When using a tool such as a trowel, float, or edger on wet concrete, use a light hand to float it while slightly raising one edge and slowly sliding it in the direction of the raised edge. To reverse, stop and raise the opposite edge and slide the tool in that direction — forward, then back, forward, then back. After you get used to floating the tool on the concrete, your motion will become fluid. The goal is to smooth the wet concrete without leaving trowel marks. It may take some practice to become good at it.
A Word of Caution
Final Finishing
At this point you’ll need to let the concrete rest until the surface is becoming hard, but not dry. Then you will apply your final finish. For a flat, hard finish, use a steel trowel once again.
A steel-troweled finish can look great, but it can also be slippery when wet. For a grippier finish, sweep lines into the surface with a broom. In most cases, broom perpendicular to the slope, if there is one. Any broom can be used, but special concrete brooms are available that will give a nicer finish. Note that a broom-finished exterior surface is just as durable as a smooth one.
Curing concrete is necessary to keep it from developing cracks. Rapid loss of water by evaporation — accelerated by high heat, low humidity, and wind — will cause the top of the slab to dry before the lower portion, making the top shrink relative to the bottom (the slab can actually curl upward, just as a board left out in the sun cups — it’s a similar phenomenon). This differential causes cracks. Keeping the slab damp for the first 72 hours helps it dry more uniformly. You can use a sprinkler or a spray-applied sealer, or cover it with wet burlap or plastic.
In cold weather, cover the concrete and keep it from freezing for a minimum of three days. A layer of plastic covered with several inches of hay is usually enough to hold in the heat generated by the chemical reaction that hardens the concrete.
Because of thermal shrinkage, most large slabs will crack no matter what you do. To manage the cracking, saw-cut the slab to a depth of 1 inch every 10 feet or less, which will encourage the crack to occur in the cut. Saw cuts are neat and look deliberate; cracks look like flaws.
Concrete work may seem difficult at first, but if you start with small projects and gain some experience, you’ll soon be able to tackle larger projects with confidence.
Contributing editor Kim Katwijk is a deck builder in Olympia, Wash. His wife Linda co-writes with him.


