I have to admit that coming up with the bench design I describe in this article was due more to luck than to skill. It happened several years ago, when I was building a deck for a political socialite who wanted a conversation area with benches for hosting planning meetings. Pointing to a chair, she asked, “Can you build me a bench that’s as comfortable as this?” I said, “Sure, I’ll just base the bench’s design on that chair.” I traced the shape of the chair’s back onto a piece of plywood and reproduced it on the 4×10 stock I was using for the back posts. I framed the seat with 2x4s and installed 5/4-by-6-inch deck boards to form the seat and the back. The result was a curved-back bench that draws rave reviews from everyone who sits on it.
Patterns Ensure Consistency
The first step is to make a pattern on a piece of 1/2-inch plywood. You can either use the dimensions in the drawing (Figure 1) or trace a comfortable chair. If you plan to build benches regularly, paint the plywood and seal its edges to make it last longer.
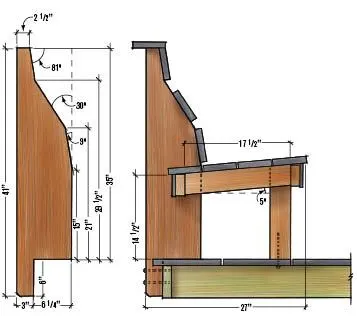
Figure 1. The secret to a comfortable bench is getting the height and the angles right. The author's design is based on that of a comfortable chair, the shape of which he traced onto a plywood template.
Using the pattern, lay out the back posts on the 4x10s, alternating the orientation of the pattern to use the material most efficiently. I get four pieces out of a 10-foot 4×10.
You’ll need to make one post for every 4 feet of bench, plus one more — but don’t cut the corner posts just yet. Use a circular saw with a 10-inch blade to cut all the way through the thick stock with one pass (Figure 2,). Then finish the cuts with a reciprocating saw and smooth the saw marks with a hand-held grinder equipped with a 24-grit abrasive disc (Figure 3).
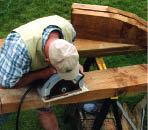
Figure 2. The back posts are laid out next to each other on 4×10 stock, minimizing waste. Cutting such thick material requires a 10-inch circular saw; the author will finish the cuts using a reciprocating saw.
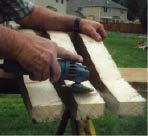
Figure 3. It's nearly impossible to cut thick stock perfectly, but a coarse abrasive disc makes quick work of the glitches.
After cutting the posts for the straight run, I turn to the corners. The deck shown here has a 45-degree corner, and the corner posts are notched to fit the angled rim joist (Figure 4). (If it were a 90-degree corner, the main difference would be in the angle of the notches.) The notches are made with blind cuts — that is, they stop before reaching the end of the workpiece — so one circular saw can’t make both cuts. You’d have to start one side with a plunge cut or back the saw into the second cut — both dangerous maneuvers.
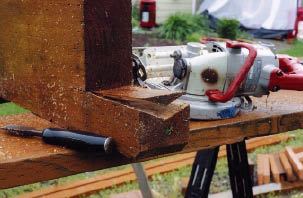
Figure 4. Two circular saws — one right-tilting and one left-tilting — are used to notch the back posts to fit the angled rim joist. A chisel cleans out the waste.
A better way is to use two circular saws: one that tilts left and one that tilts right. Set the saws at 22 1/2 degrees and cut the notches. Remove the waste with a sharp chisel. Cutting 4x10s can expose untreated wood (Figure 5) — preservatives rarely reach the center of large timbers — so you’ll need to treat the cuts with an end-cut preservative such as Jasco Copper Brown Wood Preservative (The Homax Group; 800/?729-9029, www.homaxproducts.com).
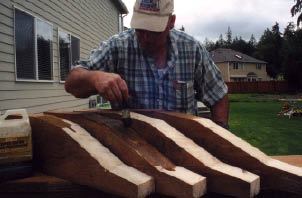
Figure 5. Cutting timbers usually exposes an untreated core. For longevity, coating all cuts in pressure-treated wood with an end-cut preservative is crucial.
Frame the Seat With 2x4s
To support the seat boards, I attach two 2x4s to each back post (Figure 6). For all the seat supports except those for the end and corner posts (which I’ll get to shortly), I cut the 2x4s 17 1/2 inches long with a parallel 5-degree angle on each end. Then I mark the posts just below the first angled cut — which, when the posts are installed, will be 141 3/16 inches from the deck surface — with lines slanting 5 degrees down to represent the top of the 2x4s. The 2x4s will extend 3 inches onto the back posts, leaving plenty of room for the long 2x4s that will eventually be fastened to the back of the seat supports, between the posts.
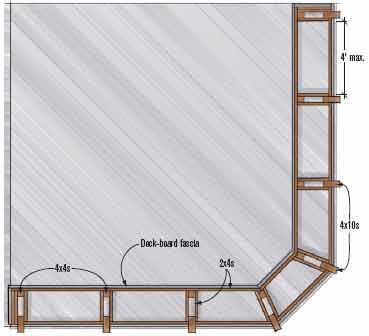
Figure 6. Seat posts shaped from 4x10s are placed no more than 4 feet apart to support the 2×4 framing of this bench.
I preinstall the seat supports on the posts. To start with, I attach the 2x4s with construction adhesive and one nail (Figure 7). Before locking them in place with a second nail, I set the 2x4s at 5 degrees to the bottom of the post, verifying the angle either with a layout square or with a framing square set at a 1-in-12 pitch, which equals 5 degrees. When I’m certain of the angle, I drive a second nail to lock it in place. It’s important to accurately place the 2×4 seat supports, as they must all line up when the assembly is installed on the deck.
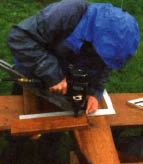
Figure 7. The author uses a framing square to be sure the seat-support 2x4s are at the correct 5-degree angle — which is a 1-in-12 pitch — as he nails them to the 4×10 posts.
On the end posts, the inside 2×4 supports are preinstalled just like those described above; the supports on the outside, however, are a little different. They are also preinstalled, but they’re longer, and there are two of them. I cut two 19-inch-long pieces for each end post and set them 41/2 inches, instead of 3 inches, onto the post. The extra 1 1/2 inches brings the back of these 2×4 supports even with the long 2x4s that will be installed to support the back of the seat. Doubling the outside supports provides better attachment for the short section of seat board that continues past the end of the last post.
Screw the Posts to the Rim
To install the back posts, I notch the decking as needed and fasten the lower part of the post to the deck’s rim joists using two 51/2-inch FastenMaster LedgerLoks. Once all the posts — except the corners — are in place, install the 2x4s that run the length of the front of the seat, allowing them to run long at any inside corners (so you can measure from them to size the seat supports).
Next I fasten the corner posts to the rim joists with 5 1/2-inch LedgerLoks, as I did with the other posts. Then to determine the angles and lengths of seat supports for the corner, I measure from the corner posts to the 2x4s that I let run long for this purpose (Figure 8). I cut 2x4s to my measurements and fasten them onto each side of the corner posts.
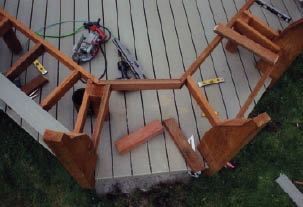
Figure 8. Allowing the 2x4s that join the front of the bench to run long made figuring the angles and lengths of the corner seat support 2x4s a matter of measurement, not complicated math.
The 2x4s that will run along the back of the seat can now be cut to fit between the back posts and screwed to the seat supports. Install 4x4s for front posts by nailing through the front and side 2x4s. These 4x4s should be about 16 1/4 inches tall. To fasten them to the deck, I run a LedgerLok into them up through the decking. For a finished look, I attach the appropriate fascia material on the front, back, and sides of the seat frame.
Surface the Seat and the Back With Deck Boards
Once I’m done putting the fascia in place, I start installing the seat decking, using stainless steel trim-head deck screws. To avoid having to match up the mitered ends of the seat boards at the corners, I use a divider board. This is a piece of deck board ripped to about 4 inches wide, whose edges I round over with a router. I attach the board over the center of the corner 2×4 seat supports, and allow it to run long in the front. This leaves plenty of meat on the 2x4s for attaching the main seat boards
I lay the seat boards, including those on the angled corners, from back to front, and I gap them 3/8 inch. The front and ends should hang over the fascia by 1 inch. I trim the front ends of the corner divider boards even with the seat boards, and round over the ends with a router.
I start the back by installing the bottom board between the two corner posts. The joints between the corner backboards and the rest of the backboards will be compound miters. The bevel cuts will all be 22 1/2 degrees (45 degrees if the corner is square), but the miter angles will vary depending on what part of the post the board is on. I lightly draw a line down the center of the posts, and mark where the top and bottom of each board will intersect it. Measuring between these lines at the top and bottom of each board gives me the board’s length and the angle of the cut.
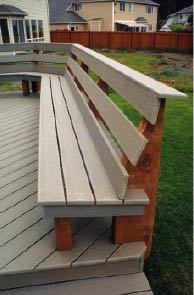
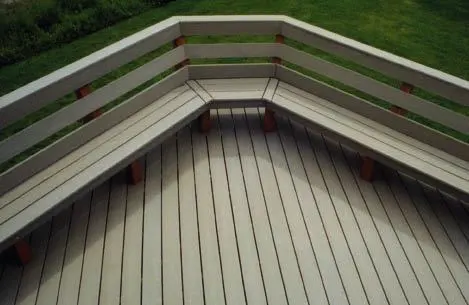
Figure 9. Installing the seat and back is the easy part, although compound angle cuts are required at the inside corners.
The cap board is installed last (Figure 9). Starting at the center between the two corner posts, line it up with the top backboard to make a smooth transition. Once this beauty is complete, sit down and relax your back for a moment. You deserve it! !
Kim Katwijk is a deck builder in Olympia, Wash. Linda Katwijk coauthored this article.


