1
of 8
Jerry Bannister
Bison Versadjust pedestals can be used to support conventional w…
Jerry Bannister
Bison Versadjust pedestals can be used to support conventional w…
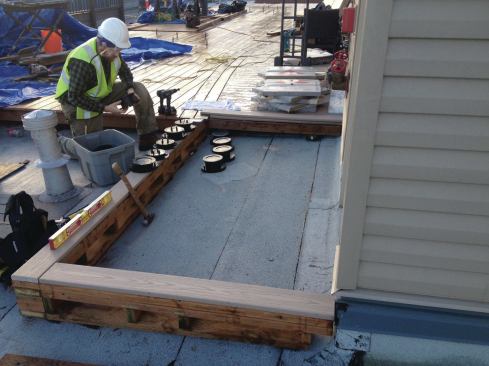
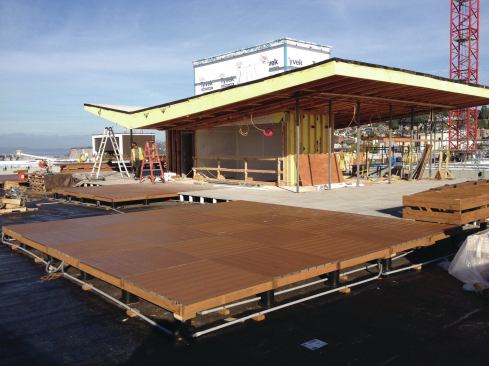
My company builds a lot of decks for hotels, condo complexes, and restaurants in the Seattle area. These decks are often located on roofs, which presents a number of challenges. For one, we must make sure we don’t damage the surface of the built-up roof system during construction. Another tricky part of building a deck on top of a commercial building is that a BUR roof surface often slopes in multiple directions, making it difficult to produce a level finished product above it. To address both problems, lately we’ve been using adjustable pedestals instead of our traditional method—4×4 or 4×6 sleepers ripped to the slope of the roof—to support our deck framing.
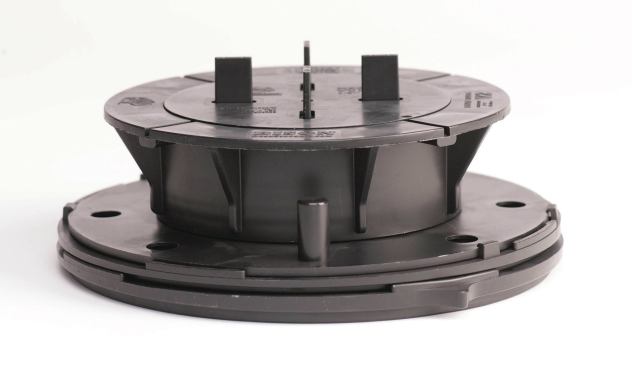
Pedestal systems are available from a few manufacturers; on the project shown in this article, we used Bison’s Versadjust adjustable pedestals. Pedestals can be used with conventional deck framing, but here we used them to support modular 4-by-4-foot grids that we framed off site with pressure-treated 2x4s. Pedestals are also often used to support wood tiles and large-format concrete pavers.
Bison makes both fixed and adjustable-height pedestals, along with adapters and installation accessories for different types of deck surfaces. The Versadjust pedestals we used here are made of high-density polypropylene and have a weight capacity of up to 1,250 pounds. Their design features an adjustable screw thread that allows them to be set to a predetermined height; they come in four different sizes, ranging from the V-1 (with a height range from 2 1/4 inches to 2 3/4 inches) to the V-4 (with a height range from 5 3/4 inches to 9 3/4 inches). Extensions are available to increase the height of a pedestal assembly to up to 24 inches, though bracing, available from the manufacturer, must be added to the assembly.
Versadjust pedestals also have an adjustable slope. Rotating the bottom can adjust the slope up to 5 degrees, which is useful on some of the roofs that we work on. At the top of the pedestal, a four-way tab automatically spaces the grids or tiles while preventing them from moving around. Screw-in anchors are available that can be used to lock certain wood tiles in place after installation (the anchors aren’t required for heavier stone or concrete pavers). If maintenance is necessary, the anchors can be unscrewed, allowing individual tiles to be removed from the pedestals for access to the roof deck underneath.
The trick with any pedestal system is accurately estimating the number of pedestals that will be needed. Bison offers plenty of layout and planning help, though an engineer may be required to calculate roof loads and determine that a structure is capable of supporting the pedestals in their proposed positions.
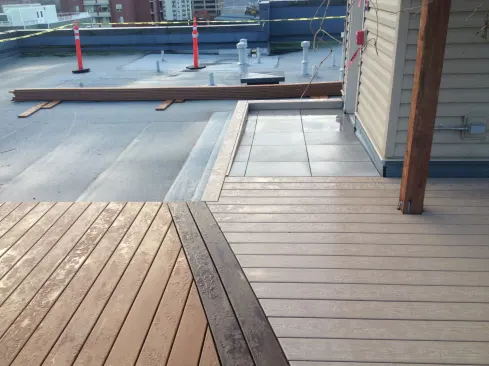
When we’re working on top of a commercial roof, we need to carefully control and monitor weight distribution so that we don’t damage the roof during construction. On this job, we preassembled 4-by-4-foot grids, which we framed with pressure-treated 2x4s and finished with Trex Transcend decking (in the “treehouse” color) installed with hidden fasteners. Each of the assembled grids weighed about 100 pounds, making them fairly easy to handle.
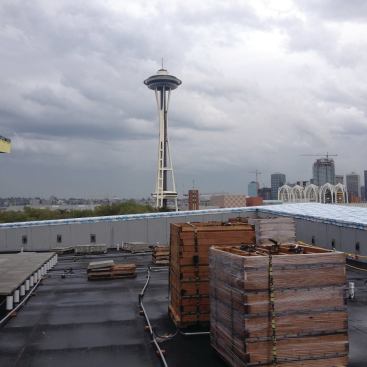
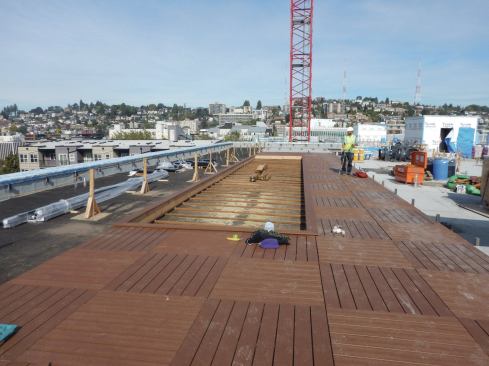
We needed to build about 150 grids to cover the more than 2,400 square feet of deck that the project called for, so we saved a lot of time by constructing the grids production-style in our shop. After trucking the prefab grids to the jobsite, we stacked them 15 high on pallets, and strapped them together so that we could lift them onto the rooftop using a crane. Each pallet weighed about 1,500 pounds, so we were careful to evenly distribute them across the roof. From there, it was simply a matter of placing each grid on the adjustable supports, with each corner of the grid supported by a pedestal.
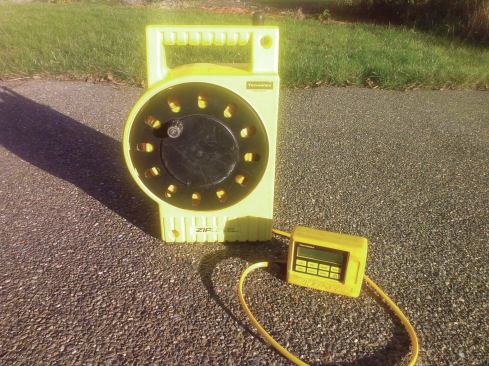
Layout. Working from a square layout that we snapped on the roofing, we marked the location of the supports using a can of white marker paint. Using our trusty ZipLevel (see “A Tougher Jobsite Level”), we checked the rough height at each support location to determine which size pedestal would be needed. Then we dialed in the rough height of each support by spinning it up or down. Later, as we set the grids, we fine-tuned the heights so that our deck surface was perfectly flat.
Installation. On most of our commercial jobs the roofing is completed before we arrive on site, with the base sheet and torch down ready for us to place the pedestals. The pedestals aren’t fastened to the roof structure, but are just held in place by the weight of the deck, so the roof system doesn’t require any additional waterproofing. Still, there are a few extra steps that we take.
When we cut any PT framing, we carefully seal all exposed ends with Copper-Green Brown Wood preservative, a 10% copper naphthenate solution. In addition, we take care not to leave joist hangers, screws, or any other metal products that could damage the roofing surface in contact with it. As we work, we carefully sweep or blow debris out from below the installed deck to keep the understructure clean. Finally, we protect the roofing by placing each pedestal on top of a 5-inch-diameter rubber mat.
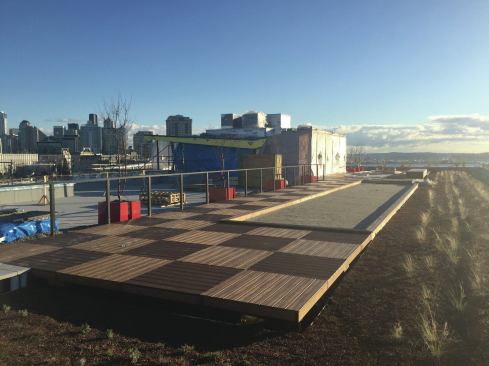
Once our grids were installed on top of the pedestals and leveled, we screwed them all together with structural screws. Using long bits, we drove the screws through the gaps in the decking. Then we installed Trex 1×8 and 1×12 fascia around the perimeter to help lock the panels together. The weight of the deck is sufficient to resist typical wind uplift loads in this area.
Usually our rail systems are mounted independently of the roof system. However, on the job shown here, steel stanchions had been installed before the roof was torched down. Later, powder-coated aluminum rail posts were slipped down over the stanchions.
In other cases, we lag-bolt 4×4 PT posts to the deck frame—which we beef up around the perimeter with 4×4 and 4×6 blocking—and then install post sleeves. If we’re using surface-mounted posts that are lag-screwed in place, we reinforce the deck frame underneath with PT 4×6 blocking laid flat and securely fastened to the substructure.
The cost to build a rooftop deck using Bison supports varies depending on the type of framing, the size of the finish decking material or grid, and the height off the rooftop. For example, on a different project, we installed an access ramp composed of 2-by-2-foot Kronos pavers, thereby increasing the number of Bison supports needed as well as the cost per foot. In addition, support pedestals are sometimes required in areas other than at the corners, depending on the layout and loads. On this project, the cost to support the 4×4 grid system worked out to less than $2 per square foot of deck area.
Jerry Bannister owns BHD Construction, in Seattle, Wash.


