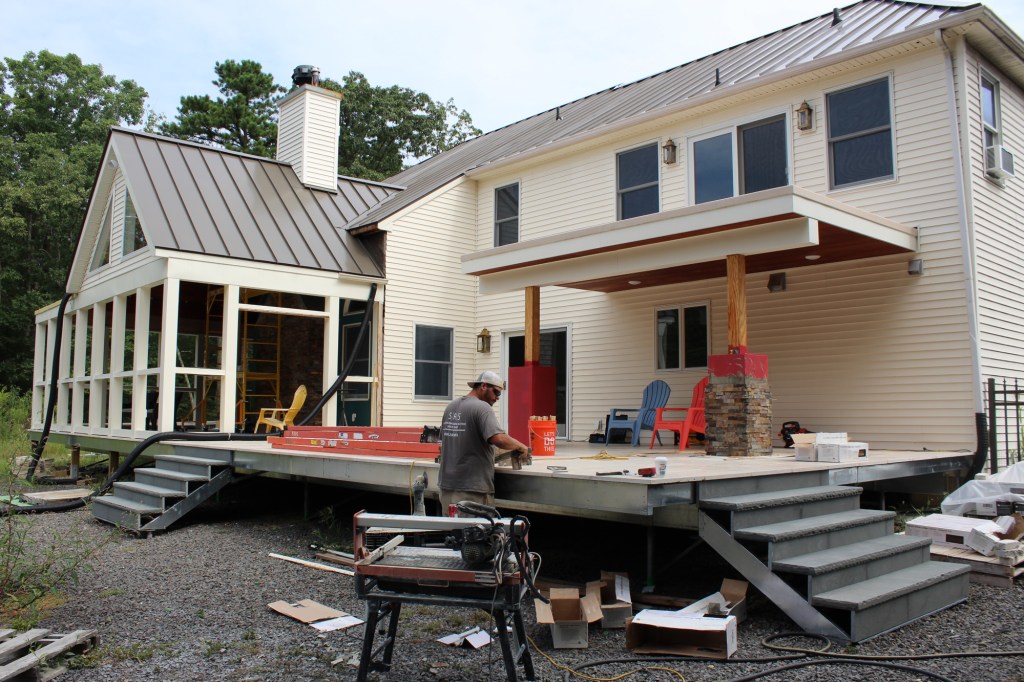
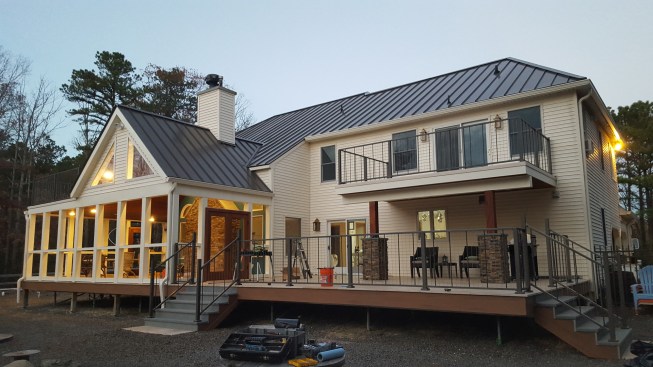
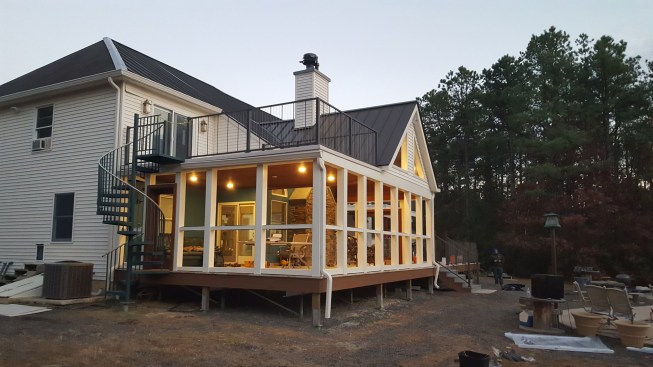
My company completed an extensive outdoor living project featuring a large screened porch, a ground-level deck, and a pair of waterproof rooftop decks. When the project began, the scope was much smaller, and our role, as a licensed Techno Metal Post installer, was limited to installing helical piers for the homeowner, who planned to build a conventional wood-framed deck himself.
Over the course of about a year, though, the project evolved, and the homeowner abandoned his original plan. He asked us to also install steel Paverdeck framing—a proprietary galvanized-steel framing system that can be used to support a variety of pavers—as well as additional piers for a future balcony and a screened porch. Eventually, we became the design/build contractor for the entire project.
Helical Pier Foundation
Using concrete for the piers and footings on this project wasn’t feasible. The heavy first-floor Paverdeck had a total design load of 200 psf; concrete piers and footings that satisfied its foundation design requirements would have been impractically large. In addition, because this was a freestanding deck next to a home with a basement, we would have needed to excavate any footings that were within 5 feet of the house, to the depth of the house footings, which was 7 feet.
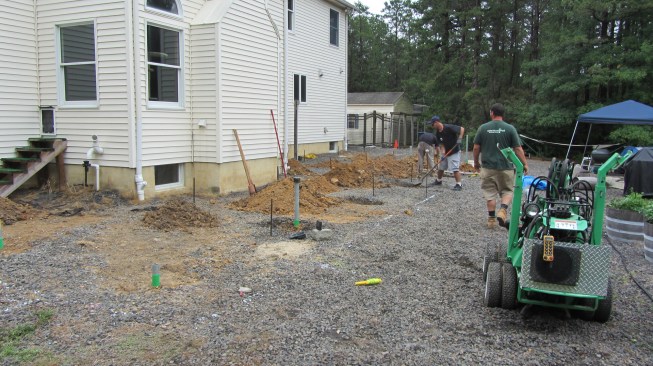
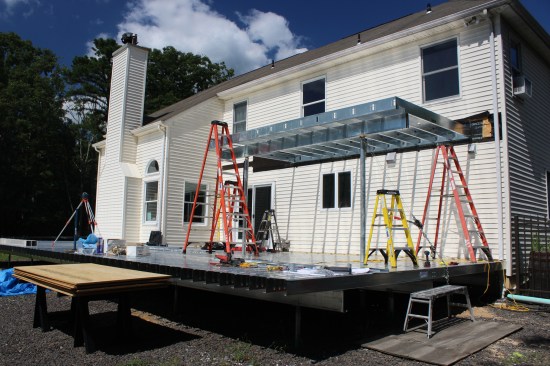
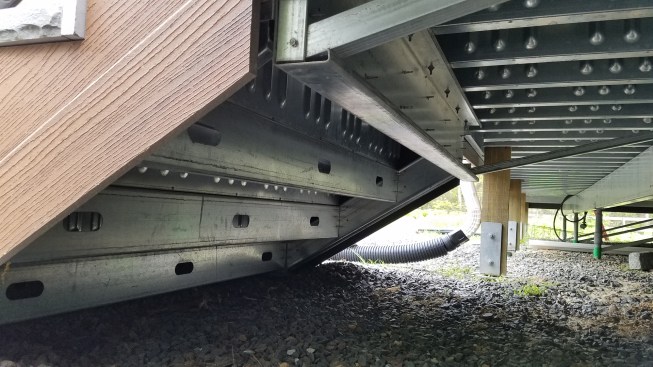
Instead of massive concrete footings, helical piers—each capable of supporting 5,000 to 8,000 pounds—were installed to support the freestanding deck.
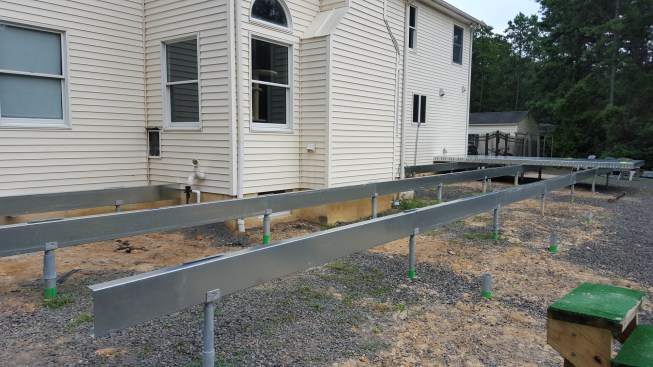
The 6 1/4-inch Paverdeck panels are screwed to galvanized 10-inch LGS steel beams bolted to the brackets on top of the piers
Instead, we used helical piers (see “Helical Pile Deck Foundations”). We installed 35 of them, working from a framing plan supplied by Paverdeck. Helical piers are faster and easier to install than concrete piers, and they have a verifiable bearing capacity. Yet another advantage to using them is the support that we get from the engineering department of Techno Metal Posts. Besides specifying the post size and load capacity, the TMP team specced the custom brackets needed for the project, including the large U-shaped brackets that we had fabricated for the pressure-treated glulam porch columns.
Steel Framing
We prefer to frame decks with galvanized LGS (light gauge steel) rather than with pressure-treated lumber, as long as the deck is not located near salt water. The steel allows us to use longer spans and fewer piers, taking full advantage of the greater bearing capacity of helical piles. And for us, framing with steel is also more cost effective and much faster.
On this project, the first-floor deck is a freestanding Paverdeck. The system consists of 6 1⁄4-inch-high steel deckpans, along with various other starter, finish, and trim panels that are fastened together to create the deck frame. According to Paverdeck, its deckpans can span up to 14 feet with an additional 39 inches of cantilever while supporting distributed loads of 560 psf and point loads up to about 1,000 pounds.
The LGS joists on the upper deck hang from galvanized rim track with preformed, prepunched tabs at standard spacings.
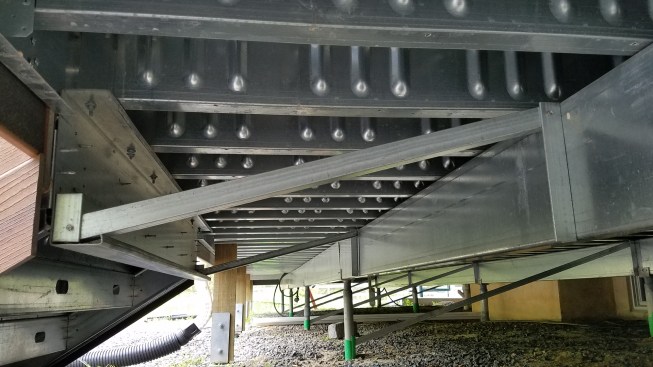
Diagonal bracing was installed on the lower deck to solve a pesky vibration problem in the steel deck framing.
Because we do a lot of steel framing, we already had all the specialized tools needed to install the Paverdeck panels. We found installation to be incredibly fast, even with just a carpenter and a laborer, since the deckpans and trim pieces just screw together and to the support beams with galvanized self-tapping hex-head sheet-metal screws.
Normally, we like to use flat-head screws for anything on top of steel framing, to avoid problems later on with the decking. But on this project, the client wanted the entire Paverdeck system pop-riveted, a method that is approved by Paverdeck. As we installed galvanized pop rivets using a pneumatic rivet gun, we found that the rivets were quick to install and tightened up the decking well. As a result, we’ll be using them from now on.
Cross-bracing between the posts under the deck wasn’t required to satisfy lateral load requirements, either by the Paverdeck engineer or by our architect. But we installed it anyway, to rectify a slight vibration in the deck framing that we discovered.
We framed the second-floor master-bedroom balcony with LGS joists, using a rim and ledger with pre-spaced tabs for easy attachment of the joists without hangers. While tabbed rim joists weren’t a stock item at the supplier we used, Clark Dietrich Trade Ready Rim Track is a standard item from the manufacturer, and delivery usually only takes a couple of days. We use it for both rim and fascia, and because there’s no measuring for joist spacing and there are no extra brackets or hangers to attach, it’s a huge time saver. Once the deck frame is all screwed together, we just pull the corners to square things up and then attach the joists to the carrying beam.
Because this balcony would receive a fiberglass walking surface, we installed a 3⁄4-inch AdvanTech subfloor over the steel joists. Later, the fiberglass subcontractor installed 1⁄2-inch AC plywood underlayment over the subfloor, staggering the joints. For this balcony, lateral loads are absorbed by the attachment to the structure, the bolted connection of the steel beam to the posts, and the plywood subfloor diaphragm.
Interestingly, while the balcony is structurally robust, we had an issue with ghosting of the steel joists through the fiberglass walking surface in certain weather conditions. This showed up as condensation in the morning, and then dirt, pollen, and debris would stick there and remain on the fiberglass once the condensation had dried. Spray-foaming the underside of the balcony fixed the problem.
Support columns for the sunroom bear either on the house foundation or directly on piers.
Screened Porch
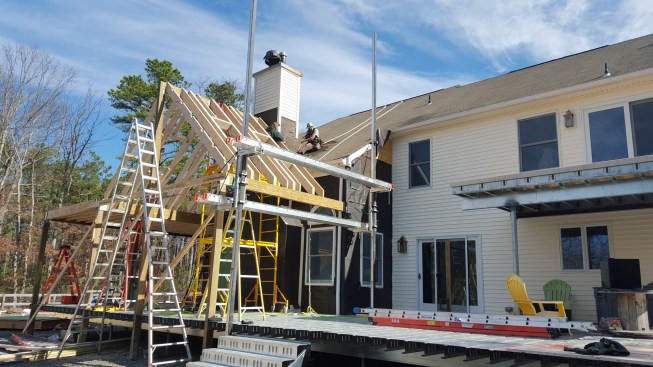
A traditional wood-framed structure made the most sense for the screened porch and the roof deck above it. Because the porch has a vaulted ceiling, we treated it as a post-and-beam structure, with PSL and glulam posts and PSL Plus beams. The engineered exterior posts and beams are PT lumber, while the intermediate posts and rails are a combination of PT lumber, LSL studs, PT plywood, and marine plywood. It was a complicated design, but it resulted in a nearly bomb-proof structure, with the exact proportions requested by our client. The majority of it is covered in PVC-coated aluminum trim coil.

The structure was timber-framed with a combination of pressure-treated sawn and engineered lumber.
While we were framing the porch, we had to open up the exterior wall of the house and chimney chase to post down to the house foundation. The beams and ridge are all pocketed into the house and bearing down to the foundation. We opened up the walls from the outside, added posts and studs as needed, and added blocking in the basement from subfloor to plate. Where the porch columns bear on helical piers, we had to cut holes through the Paverdeck panels.
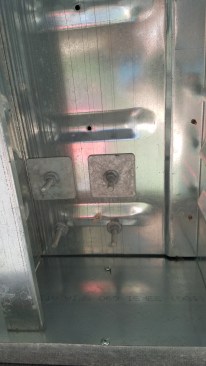
The through-bolts that attached the posts through the stone treads to the Paverdeck pans were backed with large washers.
Stairs
Because we were concerned that Paverdeck’s original stair design wasn’t adequately strong, we modified it somewhat with additional steel framing. The Paver-deck design—simply C-channel stringers with Paverdeck pans screwed to the top of each stringer with a single screw—presented many issues. The primary one was the single screw attachment, which was at an odd angle to the load on the stair treads. In fact, we initially built the stairs using the Paverdeck method and were apprehensive after it was completed. So was our client, who emailed me saying that he wasn’t happy with the stair construction.
So we modified the design and rebuilt the stairs. Our redesign consisted of boxed LGS stringers, with “joists” hung between them using Simpson Strong-Tie angle brackets, and then the Paverdeck pans on top. This made for a solid structure, with plenty of properly oriented fasteners.
Once we’d installed the 2-inch-thick Pennsylvania bluestone treads on top of the Paverdeck pans, we bolted the aluminum railing posts through the stone to the steel deckpan below, using large washers on the bottom side of the panning. The resulting rail-post connection is one of the strongest we have ever installed, with virtually no movement. This is the rail-post installation technique recommended by both Paverdeck engineering and the railing manufacturer.
The author modified the original Paverdeck stair framing design, beefing it up with boxed galvanized LGS stringers and joists.

The treads and risers were formed with Paverdeck pans.
Multiple Walking Surfaces
We installed 24-inch-by-36-inch pieces of 1 1⁄4-inch-thick travertine stone on the lower level of the deck. We cut all the stone on site using a Husqvarna 14-inch wet masonry saw, and we glued the perimeter pavers and stair treads and risers to the steel framing with Laticrete Latapoxy 310 stone adhesive, a non-staining, non-sagging two-part epoxy.
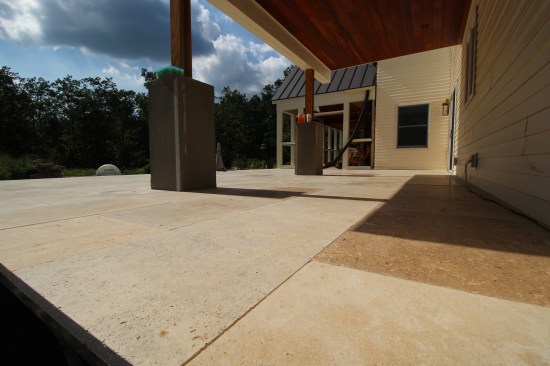
The lower deck is finished with travertine stone that was glued around the perimeter to the steel framing with two-part epoxy. In the field, the pavers were dry-laid, and the joints filled with polymeric sand.
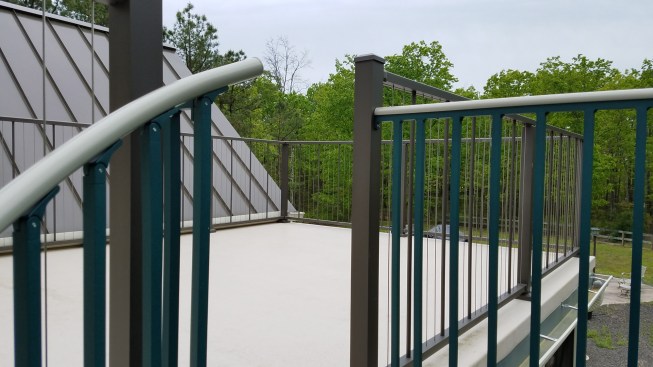
A subcontractor installed waterproof fiberglass walking surfaces on the two upper decks.
The second-floor balconies have fiberglass walking surfaces, which were installed by another contractor. Fiberglass is common in our shore towns and was an easy choice for this project. It made two waterproof areas on the first floor and nicely complemented the color and style of the house.
Finishes
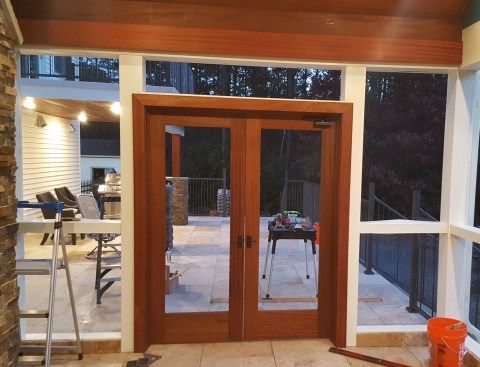
Among my favorite aspects of this project were the custom patio doors connecting the outdoor paver deck to the screened porch. We built them in our shop from the same utile mahogany that we used for the rest of the exposed wood trim on the project, including the tongue-and-groove vaulted porch ceiling. Not only did this allow us to exactly match the color of the rest of the porch trim, but we were also able to scale the doors up to match the post and beam requirements of the structure (see “Building Custom Patio Doors,” below).
For low maintenance, the porch trim and the balcony trim were wrapped with PVC-coated coil stock, while Trex fascia trim was used to finish the edge of the deck and the stair stringers.
The aluminum vertical cable railings are Digger Specialties’ Westbury VertiCable.
All the porch and balcony trim that is not wood is PVC-coated coil stock, while we finished the porch gable using the recycled vinyl siding that we had saved after removing it from the wall. On the deck, we used Trex fascia trim to finish both the edge of the deck and the stair stringers. We used stacked slate veneer stone to finish the columns and the chimney chase inside the porch.
Custom Patio Doors
The doors, jambs, and casing—like the porch ceiling, the trim, and the drink rail on the first-floor railing—are constructed with utile (also called “sipo”) mahogany. We processed the wood down to the size and thickness we needed before running it through a drum sander. Next, we routed two dadoes into the inside edges of the rails and stiles. The screens are held in place with a stop on each side.
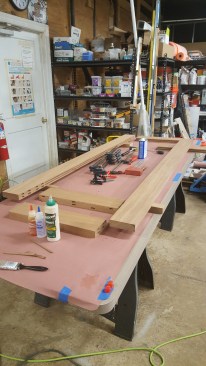
I used Festool dominoes and West Systems G/flex epoxy for the rail-to-stile joints, but I glued up the bottom panel with Titebond III because it gave me more time and workability.
After the doors were assembled, we sanded again, then mortised all the hinges, locksets, and slide locks, and dry-fit everything before finishing. The doors and jambs were finished in the shop with a coat of Milk Paint 50/50, the same finish used on all of the wood. Once the wood was installed, it was cleaned and a second coat was applied.