My deck company builds about 50 projects a year, running the gamut from basic to elaborate. That makes for a lot of footings, and I hate digging footing holes. The frostline in the area of New Jersey where I build is at 36 inches, and we’re blessed with every rocky soil type known to man. Before I switched to helical piles, I wore out plenty of post-hole diggers and shovels, and I even bought a compact track loader with an auger to make installing deck foundations a little less offensive.
Digging the holes was only part of the fun. Next I’d have to schedule an inspection with building officials incapable of committing to a specific time or day, but with a knack for showing up after a heavy rain when my formerly pristine holes had become mud bogs. Sometimes, I’d get a red tag with a note saying, “Clean mud from bottom of hole.” So after mucking out the hole (which I would have done anyway), I’d have to wait for a re-inspection.
Then I’d load 80-pound bags of concrete mix into my truck, unload them at the job site, and carry them to the back of the house. This would be followed by hours of joyless mixing in a wheelbarrow. If we used a ready-mix truck, it was a little easier, but they cost a lot for small jobs, could damage driveways, and didn’t always show up on time. And we’d often still have to wheelbarrow yards of concrete from the street to the backyard.
Additionally, I always wondered how much weight my concrete piers could support. Without a soil engineering report, it’s impossible to know the exact bearing capacity of the soil, so I’d usually over-build the footing to be safe.
Whenever I recognized bad soil conditions during excavation, I brought in a soil engineer, which was expensive and time consuming. The last time I did this, the homeowner ended up with a $6,000 change order for additional excavation, not including the soil engineer’s fees.
Helical Piles?
About two years ago, I stumbled upon a photo of a deck project that wasn’t built on concrete piers, and I emailed the contractor to inquire about what he had used. His answer – helical piles – changed my business.
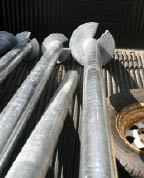
Figure 1. Helical piles are screw-shaped plates welded to a steel shaft. Various sizes are available for different soils and applications.
I had never heard of helical piles and had to Google them to find out what they were. I learned that a helical pile is a manufactured steel foundation that screws into the soil (Figure 1). It has a lead or shaft – usually 7 feet long – welded to a helical bearing plate or helix, and a cap that attaches the shaft to the framing.
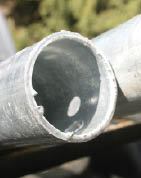
Figure 2. A thick coating of zinc protects the steel piles from corrosion.
Typically, piles for residential use are hot-dipped galvanized steel (Figure 2). If the soil is particularly corrosive, sacrificial anodes (similar to those used to protect underground LPG tanks) can be used. In most commercial and industrial applications, however, the piles aren’t even galvanized.
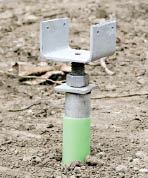
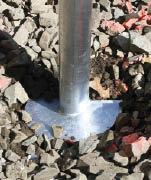
Figure 3. Several types of caps are available to attach piles to framing. Some can be adjusted in height to fine-tune a deck's elevation.
The size of the helix will vary based on soil conditions. Generally, a helical pile installer will select a smaller helix for rocky soils and a larger one for marshy and clay soils. Once the pile is set, a variety of caps are available to tie the pier to the framing; some of them have a screw assembly that allows fine tuning of the elevation (Figure 3).
My first inclination was to dismiss helical piles as just another gimmick. But it turns out that they have been used for more than 100 years in the United States, mainly on heavy commercial projects. Structures far more engineered than a backyard deck, sunroom, or addition rely on helical piles for their foundations. I was so impressed that I bought a dealership and now install helical piles for other contractors, as well as for my own decks (see “Helical Piles for Residential Work”).
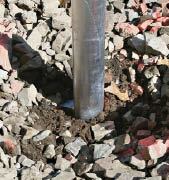
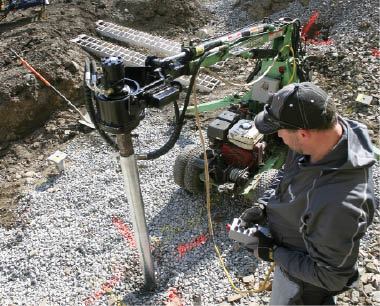
Figure 4. As the driver turns the pile, it simply screws into the ground until the installer is confident it's below the frostline and in soil with sufficient bearing capacity.
How They Work
Helical piles are screwed into the ground to below the frostline using hydraulic machinery (Figure 4). The load-bearing capacity of a helical pile usually relates to the amount of torque required to install it, a function of both the size of the helical plate and the soil’s bearing capacity. A pressure gauge on the installation machine reads the torque as the pile is rotated into the ground (Figure 5).
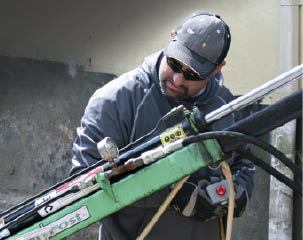
Figure 5. The helical pile's bearing capacity usually relates to the torque required to drive it. A gauge on the machine measures the hydraulic pressure, which correlates to the torque.
If the soil is weak, the pressure gauge will read low numbers, which means the pile must be screwed in deeper to stronger soil. When the helix is below the frostline and the pressure gauge hits a high enough number relative to the loading requirements of the structure, the installation is complete. This pressure reading is plugged into a formula called a torque correlation that calculates the actual bearing capacity of the pile.
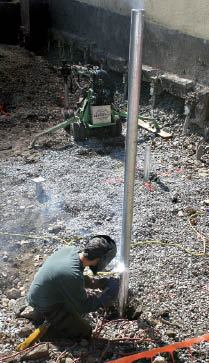
Figure 6. Additional lengths of shaft can be welded on, and the pile driven as deep as needed to reach soil with adequate bearing capacity.
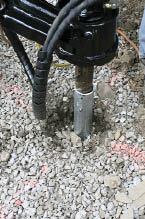
Figure 7. You wouldn't know it by looking, but this pile penetrates about 13 feet into the ground. Helical piles don't create piles of waste soil the way conventional footings do.
When poor soil conditions mandate going deeper than the standard 7-foot-long shaft, an extension is welded on (Figure 6). Sometimes all it takes is a foot more depth to go from utterly terrible soil to rock-hard soil. This is particularly relevant if you’re building a free-standing deck where the piers close to the house might start out in backfill. With a concrete footing, you have to dig down to virgin ground at the house foundation level, as much as 7 feet or 8 feet if the house has a basement. It’s no problem to drive a helical pile to this depth (Figure 7).
Also, with a traditional concrete footing, you never really know what lurks an inch below the bottom of your footing excavation. Now that I am in the helical pile business, I frequently see situations where seemingly good soil turns to mush inches below where I would normally have installed a concrete footing.
What About Rocks?
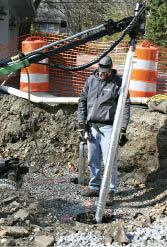
Figure 8. Sometimes, the pile has to be steered around a below-grade rock by moving the driver's boom. Once the obstruction is passed, the boom pulls the shaft plumb again.
“What do you do when you hit a rock?” is a question I hear frequently from contractors considering helical piles for the first time. The answer is, it depends. Normally, we just power through loose rock that’s basketball-size and smaller. The installation machine generates sufficient torque for the helix to push rocks out of the way as it turns. Sometimes, the installer can actually steer the helix around a rock, then use the machine’s boom to pull the pile back into plumb (Figure 8).
If a large rock is encountered below the frostline, the pile is parked on top of the rock and load tested (see “Load Testing”). Assuming it passes the load test – it usually does – the pile will never move. If it didn’t pass the load test, the pile would have to be installed in a different spot.
When a large rock is encountered above the frostline, it can be drilled and the pile’s shaft pinned to the rock sans helix. Occasionally, however, there is so much rock on the job that helical piles just won’t work. There are some locations where I don’t even bother trying to install piles because every lot on the street was blasted out of bedrock. In places like that, different methods need to be employed.
Advantages
Helical piles offer a number of advantages over traditional footings. Two big ones are that they eliminate the tasks of digging footing holes and dealing with concrete. But I’ve found several other reasons to use them.

Figure 9. A field report filled out by the installer notes the piles' location and depth and either their torque readings or the amount they sank in a sledge-hammer test. The report is sent to an engineer for review and stamping.
For instance, footing inspections aren’t required. The installer records the pressure readings, pile depth, and load-test results for each pile in a field report (Figure 9). The company I work with can then have the field report stamped by an engineer and sent directly to the building department, if required. (Some departments don’t require a stamp. Your local installer will know the acceptable way to proceed.) The cost of this engineering is built into the cost of every helical pile we install; a different manufacturer may charge separately for an engineering report.

Figure 10. Driving a helical pile in frozen ground begins with inserting a proprietary heating rod in a hole drilled with a rotary hammer (above). Once the ground is warmed, the pile is driven normally (right).Photo credit: Dave Northup
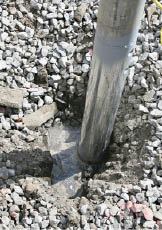
Figure 11. It would have been impossible to dig a traditional footing in this ground without it filling with water.
In frozen or wet ground, traditional footings can be difficult or impossible to install. For helical piles, frozen ground isn’t an obstacle (Figure 10), so in colder climates they make building decks all year round easier to manage. They can also be installed where a traditional footing hole would fill with water as it was dug, making helical piles a good solution for boardwalks, docks, and lakeside decks (Figure 11)
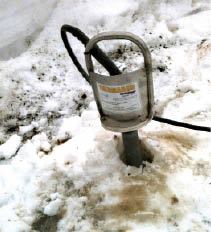
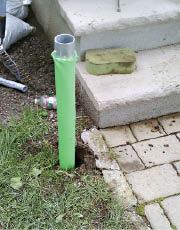
Figure 12. Because helical piles don't disturb the ground much, they can be installed alongside existing landscape features. Photo credit: Greg DiBernardo
The process of installing helical piles leaves most of the ground undisturbed (Figure 12). There’s no spoil dirt to lose on the site or haul away. A helical pile in poor soil might extend down 20 feet; think about a traditional excavation that deep – if it were even possible to do – and how much dirt would be brought up. With piles, there’s barely a trace other than the pipe protruding from the ground. Plus, the equipment is lightweight and can traverse a manicured lawn without damaging it
Helical piles also save a lot of time and offer a lot of load capacity in the bargain. Driving a helical pile in average soil takes only about 10 minutes – and it’s 100 percent ready to build on, with great bearing capacities. The smallest pile I install can support a 6,800-pound load, whereas a concrete pier would need to be bigger than 16 inches in diameter in verified 4,000-psi soil to achieve the same capacity. Another benefit of the larger capacity is that you can usually use fewer piers, although you may have to use larger beams to achieve the greater spans.
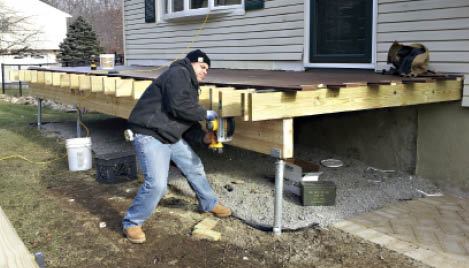
Figure 13. Because helical piles' load capacity can be verified, it's often possible to use fewer footings and a larger support beam. In this case, the span between piles is over 15 feet.Photo credit: Greg DiBernardo
With helical piles, the torque correlation combined with per-pile load testing also means there is no need to test the soil capacity or rely on guessing. You will absolutely know the bearing capacity of each pile (Figure 13)
Finally, there’s the value of an engineered product. That’s a big selling point to homeowners.
Drawbacks
For my company, the advantages of helical piles far outweigh the drawbacks, but that might not be the case for yours. To start with, installing a helical pile requires hiring a subcontractor to perform the work, unless you invest in training and equipment, as I did. You may not have a helical-pile outfit locally available to you, but call around. Most of the installers I know will travel significant distances to spread the word about their product.
As with any sub, you need to be careful about who you hire. Some manufacturers sell piles to anyone with a check that doesn’t bounce. Make sure your installer is properly trained and can provide engineering backup for their work. Be aware that some installers power their pile driver with skid steers or mini-excavators, which can damage customers’ lawns. Also, some installers are used to doing heavier commercial work and may charge commercial pricing, even for residential work.
Many contractors assume that helical piles are too expensive. The costs can vary regionally and with the size and depth of the pile, but our typical residential helical pile costs $150 to $250 installed. This includes the pile, installation, engineering, and a bracket to connect the pile to the structure. That’s less than it costs me to install a concrete footing when I factor in all my labor costs in addition to the cost of the materials.
You may experience some push back from your local building official the first time you propose helical piles. Chances are he or she has limited to zero experience with helical piles, so you may have to provide supporting documentation along with your construction drawings. Ask your installer for this documentation to submit with your plans. Generally, most officials just need to understand how a helical pile works, but some can make life difficult. My experience is that once they see the finished product along with a stamped field report, they not only believe in helical piles, they recommend them to other contractors.
Helical Piles for Residential Work
A Google search on “helical pile” will reveal plenty of manufacturers and installers. However, many of them don’t have small enough equipment to do residential installations, or the contractors are so used to doing heavy-duty work that they may not bother with small residential projects. I went with Techno Metal Post (technometalpostusa.com) – and even bought a franchise – because they are a good fit for my business. Their helical piers are accessible, both in cost and logistics. Most other helical piers require a skid-steer or an excavator to provide the power for their drivers, but Techno Metal Post uses proprietary equipment that’s small enough to fit through a gate, climb steps, and even drive onto an existing deck to retrofit footings, say to support a new hot tub.
Load Testing
Load testing a helical pile is far simpler than it sounds. The height of the pile above grade is measured (left). Next, a cap is inserted into the pile to protect its top. This cap is slammed five times with a sledge hammer (right), and the pile’s height is measured again. The sledge’s weight is specific to the size of the pile – a heavier hammer is used with bigger piles. The amount that the pile sinks indicates the soil bearing capacity, which an engineer will verify. The dynamic loading imposed by an impact load is surprisingly large and correlates to the static load a pile can handle.
Load testing, as opposed to taking a torque reading, is done in several instances. One is when the pile bottoms out on a large rock. Another is when the soil is particularly slippery – wet clay, for instance. With slippery soil, the bearing capacity can be higher than torque readings would suggest because the soil is lubricating the helix and reducing the force required to turn it.


