Recently, clients hired me to build an outdoor kitchen on their existing deck. I work in the Pacific Northwest, so even though this deck was roofed, moisture was still a problem. Additionally, the kitchen was going to be located on the windward side of the deck, where it would be exposed to wind-blown rain. That meant not only did I have to handle the extra weight of the kitchen on the existing deck framing, but I also needed to select components that could stand up to the constant water intrusion.
Outdoor Kitchen Materials
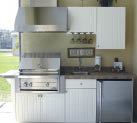
Typical outdoor cabinetry is plastic or stainless steel (see “Other Cabinet Options”), but on this particular job, the clients wanted a stucco finish to match their house. There are several ways to do this – it’s similar to building for a man-made stone finish. One way is to sheathe pressure-treated or steel-stud frames with pressure-treated plywood and cover that with wire lath, plaster, and man-made masonry veneer. Unfortunately, I’ve found these materials don’t last in my climate because they don’t dry out. A far more durable option is a 4-inch concrete block wall that’s stuccoed or veneered with man-made stone, but that’s a lot of weight to support on the wood frame of a deck.
Other Cabinet OptionsGalvacore panels are only one way to build an outdoor kitchen. Many manufacturers supply weather-resistant cabinet units that assemble much like interior kitchens. Materials include stainless steel, polymer or plastic, and wood. These are a few companies that supply outdoor cabinets: All Element Cabinetry 800/789-4811, allelementcabinetry.com Atlantis Outdoor Kitchens 877/223-4537, outdoorkitchensbyatlantis.com Danver 888/441-0537, danver.com In & Out Cabinetry 800/789-4811, outdoorcabinetry.com Plastic or polymer cabinets can create a surprisingly traditional feel. Bamboo (shown) and durable woods like teak look classic. Stainless steel cabinets give kitchens a modern, high-end look. |
On this job, though, I discovered a great alternative to more traditional methods: Galvacore’s structural panels (775/843-6900, galvacore.com). Each panel consists of two galvanized-steel welded-wire sheets with a wire truss in between (Figure 1). The panels can be formed into a wide range of shapes, and they’re lightweight and relatively inexpensive ($160 for a 3-foot-by-8-foot panel, either 1 1/2 or 3 inches thick; 4×8 panels cost $200). Installed vertically as a wall, they can curve around a radius as small as 18 inches. Installed horizontally as a countertop base, they can cantilever up to 18 inches without additional supports, and span up to eight feet. Once in place, Galvacore panels are covered with wire lath. From that point, adding the masonry finish materials is the same as with a stud or block cabinet.
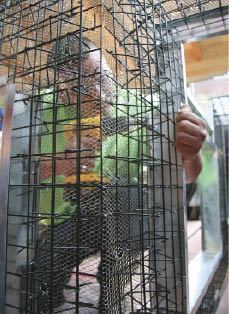
Figure 1. Structural panels made from heavy-gauge galvanized wire form the skeleton of this outdoor kitchen.
Galvacore structural panels come 92 inches long in three widths – 36 inches, 48 inches, and 60 inches – either 3 inches or 1 1/2 inches thick. For a standard counter-height barbecue island, you would use 3-inch-by-36-inch panels for the sides and a 1 1/2-inch-thick top panel, to finish at approximately 39 inches. A bar-height counter would also have 36-inch panels on the sides, but with a 3-inch top for a finish height of approximately 41 inches.
A 3-foot-by-8-foot Galvacore panel weighs about 32 pounds, which is roughly the same as a piece of 1/2-inch treated plywood. Including the metal lath, a scratch coat of stucco, a stone or granite overlay, the countertops, and the stainless steel appliances, the total weight runs between 60 and 125 pounds per square foot. This is still a hefty load, exceeding the typical 40-pound-per-square-foot live load of a deck by a considerable margin. Depending on the deck, you might need to add a beam, reduce joist spacing, or double joists. An engineer or a program such as StruCalc (800/279-1353, strucalc.com) can help you with the necessary calculations.
Working With Galvacore Structural Panels
Building with the panels is easy. Once the deck is built, spread construction paper to protect the decking from damage during the stuccoing, chalk out the kitchen’s footprint, and screw the mounting brackets supplied by Galvacore to the deck (Figure 2).
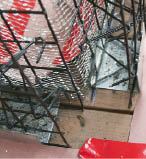
Figure 2. Channel-shaped mounting brackets secure the Galvacore panels to the deck.
The best way to cut the panels is with a pneumatic side cutter (Figure 3). You can also use steel cutting wheels on a grinder, a circular saw, or hand wire cutters. Panels are joined together using a pneumatic gun (which can be rented from Galvacore) that cinches C-rings tightly around the wire of the frames (Figure 4).
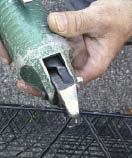
Figure 3. A pneumatic side cutter makes quick work of cutting heavy wire.
Once assembled, the panels can be tack-welded or joined with C-rings to the mounting brackets. Lay out the openings for appliances and sinks on the panels using colored painters tape, then cut them out.

Figure 4. A special tool rented from Galvacore joins together panels with wire rings.
Next, the C-ring gun is used to attach expanded metal lath to all areas that will be stuccoed. This is followed with the installation of a corner bead. Channels called ledger angles fit around the edges of the cutouts to create a smooth finish for the opening (Figure 5). Ledger angle is secured to the panels with a special clip.
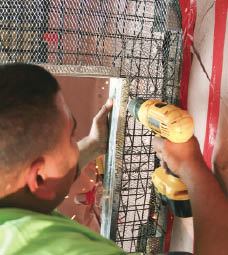
Figure 5. Sheet-metal angles close off the openings in the panels, readying them to receive appliances and doors.
Cabinet doors and interiors come from other suppliers. In this case, they were from Alfresco (SES, 888/383-8800, alfrescogrills.com).
Once the lath is installed, the first coat of stucco follows (Figure 6). The number of coats depends on the desired finish. If it’s to be a traditional stucco finish, then two to three coats are used. Cultured stone would be applied over one coat of stucco using a thinset mortar.
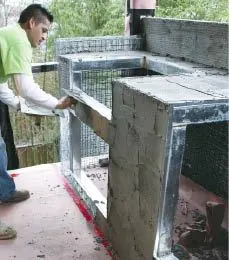
Figure 6. Once the panels are covered with wire lath, a traditional stucco or man-made stone finish can be applied.
Alternatively, you can skip the lath and stucco and use special clip plates between the vertical wires of the Galvacore to install decking over the panels.
Clean and wash the stone or paint the stucco, and you are ready to install the countertops, which can be granite, concrete, tile, or any weather-resistant surface that your client wants. Last, install all the stainless-steel components.
Kim Katwijk is a deck builder in Olympia, Wash., and a contributing editor.


