QUESTION & ANSWER
Q Why do mitered corners in decking or on cap rails tend to open up?
Lavrans Mathiesen, a woodworker and deck builder in Portland, Ore., responds: Miters open because the material moves. Wood, composites, and solid plastic all move, but in different directions and for different reasons. Synthetic decking, such as composites and PVC, expands more in length, while wood expands across its width. Synthetics mostly move because of heat, while wood moves as its moisture content changes. Both types of movement are functions of nature and aren’t easily overcome.
Synthetics change size with temperature, shrinking as the temperature drops and expanding as it increases. The change happens at a uniform rate that doesn’t depend on direction, except that it’s noticed more over the length simply because the boards are longer than they are wide. In cold weather, miters in synthetics tend to gap. In hot weather, the pressure from expanding boards may tighten the miters, or wedge them open.
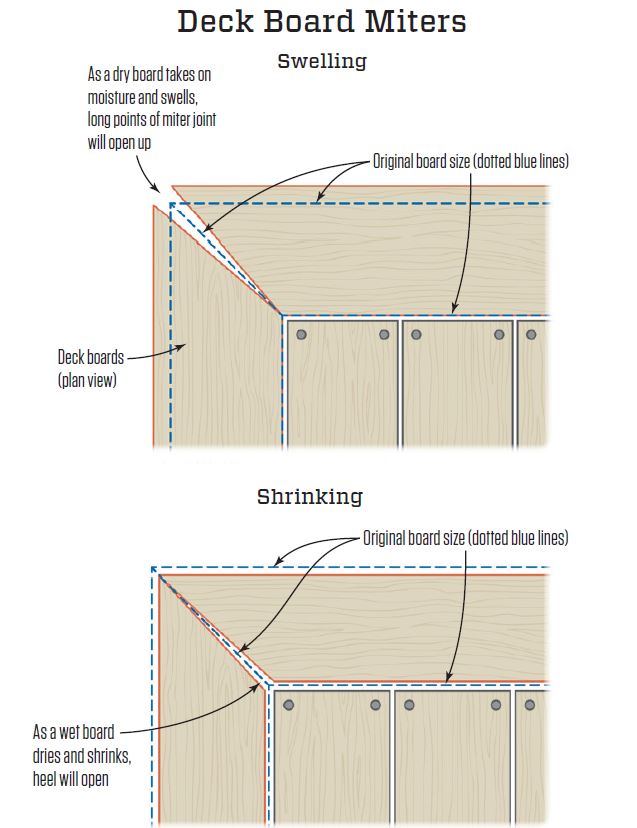
Wood acts differently. As its moisture content changes, wood expands or shrinks across the width of the board (Figure 1). This causes the miter to open at the toe (the pointy end of the cut) or the heel (the not-so-pointy end of the cut). Which part of the miter will open is related directly to the moisture content of the boards when they are installed. A wet board will dry out, causing the heel to open up. A dry board will expand as it takes on moisture, causing the toe to open up.
Figure 1. The dotted lines on the illustrations at left show the original board sizes. As a dry board expands with added moisture, the toe of the miter joint will open up (top); as a wet board dries and shrinks, the heel will open (bottom).
You can try to control these natural forces using biscuits, screws, or glue. They will work for a time, but chances are they’ll eventually fail. Glues break, material splits, fasteners work loose. The biggest problem is when the two boards twist in opposite directions. This will make even a good miter look bad, with one tip of the miter lifting up and the other drooping down. As the boards deteriorate from weather, and water works its way into the joint, it will eventually fail, and the boards will twist however they want.
On my decks, I assume nature is going to win out over mechanics, and I design joints to allow for movement. I leave a gap at the joints, and I “pillow” the edges of the miter (Figure 2). By pillow, I mean rout the cut edge with the same radius as on the rest of the decking. This radius is normally somewhere between 1/4 inch and 1/8 inch.
Figure 2. Leaving a gap in a miter joint and routing a radius on the cut ends disguises joint movement.
I install decking with a gap in miter joints and between the butt ends of boards, using the same spacing for both. The space between butt ends is actually required by some synthetic decking manufacturers, but it’s also good practice for wood planks. If the decking is butted together, it’s going to hold water, and that will accelerate decay.
The wider the gap, the less obvious it will be when the boards expand or contract, particularly with wood where miters move unevenly. But too wide and joints look sloppy. A gap of 1/8 inch to 1/4 inch looks relatively good and allows the area to dry out.
(As an aside, here in the wet Pacific Northwest I like to use a fairly large gap between decking — 3/8 inch to 1/2 inch. Carpenter’s pencils make great spacers: They are consistent in thickness, cheap, and easily available. Drill a hole in one end, stick a nail through it, and voil , spacer.)
I pillow the edges using a laminate router with a bit that matches the radius of the decking. Synthetic decking generally doesn’t have a grain and will cut cleanly in any direction. Wood has a grain and will split or fracture if you run the router in the wrong direction.
Clean pillow cuts on miters require that you start at the short end and move to the long — cutting with the grain (this same technique applies to cutting with a saw, as well). However, router bits turn only one way, so you’ll be able to pillow only the left side of the miter following the rules for safe router use. To get the smoothest cut on the right side, you’ll have to climb cut, or move the router in the same direction as the bit wants to pull it. Because of the small diameter of the bit, I don’t find this to be a big deal, but it’s something to be aware of, and it requires caution.
To give any miter its best chance, pick the straightest grain wood you can find, and make sure each piece is similar in grain, color, and moisture content. Ensure that the underlying structure is in plane and that there is good, solid framing to fasten to. These are all basic points of solid deck building (or of building any structure), but miters are one place that really make small errors stand out.


