Whether they’re elaborate entertaining spaces that cost $40,000 or simple pressure-treated platforms that cost 10 percent of that, all aboveground-pool decks have tricky angles to work with. Over the past few years, my company has created systems that allow us to build some pool decks off-site in a shop, which keeps costs down and helps us outbid other deck builders while maintaining decent profit margins.
Safety First
The first and foremost factor to consider when laying out a pool deck is safety. Each year, about 300 children under the age of 5 drown, and more than 2,000 are hospitalized for submersion injuries. If an accident happens, much of the liability falls on the homeowner. However, if building codes were not followed, liability falls on the builder as well. Requirements vary locally; gates, guardrails, fences, and alarms are all safety devices that may be part of your local building codes and must be taken very seriously. Never even be tempted to build a pool deck without permits, and be sure you understand your local requirements before starting.
Access and Other Considerations
After safety, the next consideration is providing access to the mechanical parts of the pool. Most aboveground swimming pools have one main pump, jet, and filter, plus a skimmer. The pump and the filter need to be accessible for routine cleaning and winterization. The skimmer is generally flush with the surface of the deck or a couple of inches below and has a prefilter – to keep large contaminants like bugs and leaves from entering the pump – that requires regular cleaning. Also, pool vacuums generally plug into the pool skimmer for suction. Avoid framing directly over any of these items, and make sure there are a few inches of clearance to access any mechanical parts. Always get your hands on the pool manufacturer’s manual before designing the deck. There may be certain construction guidelines or restrictions that can void the homeowner’s pool warranty if not followed properly.
“Where do I put all of my pool accessories?” is a common question among homeowners looking to build a pool deck. If they don’t have a pool house, they usually need a place to store the chemicals, the vacuum hose, and a net. Often we’ll create a storage space under the deck for tools and chemicals. Chemicals can be put in a weatherproof box made from scrap PVC decking. The pool hoses and nets can be stored on hooks that screw into the posts and beams in the frame.
On the recreational side, the owners need a place for the inflatables, diving rings, and other pool toys. These are used more often than the cleaners, so I offer to build the owners a bench with a hinged seat and tie-off points to keep the inflatable toys from blowing all over the yard when they aren’t in use.
Pool deck location is very important. If the pool stands alone, decks that don’t wrap all the way around usually can be put anywhere around the pool. If the pool is located in a partially shaded part of the yard, it is critical to understand where the sun is at the time of day the pool will generally be used. Some homeowners prefer a shaded area and some prefer the sun. Some decking gets a lot hotter than others, while other decking will become very moldy very quickly in a shaded area. I’ve had good success with Azek (877/275-2935, azek.com) and TimberTech PVC (800/307-7780, timbertech.com) decking around pools. And because of the corrosiveness of the pool chemicals, it’s a good idea to use stainless steel for all the hardware and fasteners, although that can be a tough sell in a competitive market.
If the owners are going to use the pool at night, I offer low-voltage ambient lighting. Be careful when wiring, though. Some lighting and speaker companies have their own guidelines for wiring near water that go beyond the local building code. And some jurisdictions require even low-voltage wiring near a pool to be installed by a licensed electrician.
Rectangular Pool Decks
I build pool decks with beams and cantilevered joists (as opposed to structural rim beams) for a couple of reasons. When the outside and inside rims are used as beams, the footing locations need to be perfect or the posts won’t hit the corners properly; with beams and cantilevered joists, you have more flexibility. Also, when framing an aboveground-pool deck, it’s important to keep the footings at least 12 inches away from the walls of the pool, and a structural rim would require footings right next to the pool. It isn’t good to undermine the pool walls with a footing hole because it’s very easy to puncture the vinyl liner with a shovel. And if the electrician has already done his job, there may also be a continuous grounding wire close to the edge that we don’t want to cut.
My company builds mainly two types of aboveground-pool decks. One is a large rectangular deck around an oval pool (see illustration). All the decking gets installed in the same direction, and the footing and railing installation is the same as for any other rectangular deck, but with angled sections that go around the pool’s curves.
The tricky parts are handled simply with cantilevers and blocking. A pair of beams run parallel to the long wall of the pool, and shorter beams handle the load at the short end. Near the curve of the pool runs an angled beam, over which joists cantilever toward the pool. My crew will set all of the joists except the outer two without trimming them to length. Once all joists are set, a chalk line is snapped from one end to the other and the joists are cut to length in place. Angled blocking between joists, with a minimum 2-inch clearance from the edge of the pool, keeps the framing from twisting and provides solid nailing for the decking.
Round or Polygonal Decks
Most aboveground-pool decks my company builds are polygonal decks that wrap a series of trapezoid modules around a “circular” pool. Most of the time, when someone refers to a circular aboveground swimming pool, the only round part is the wall – the pool frame itself is a polygon.
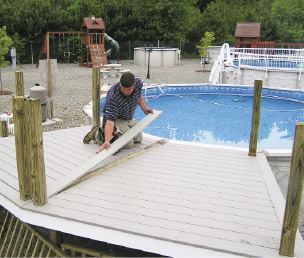
The trapezoid modules can be built off-site if you have a rainy week ahead of you. Their modular construction also means they can easily be taken apart in the future if there is a problem with the swimming pool. The smaller 8- to 10-foot-deep modules fit the budget for many people. With this size, one carpenter can frame and deck two modules, pre-assemble handrail sections, and prebuild the stairs in one day off-site. If you use footing blocks (because pool decks are freestanding, the IRC does not require frost footings), two to three modules (complete with rails and stairs) can be installed in one day with a three-person crew (27 hours).
Laying Out Polygons
The biggest challenge with polygonal pool decks is layout. For the math, I use a Construction Master calculator (Calculated Industries; 800/854-8075, calculated.com). You can do it with any calculator, or with a pencil and paper, but because the Construction Master is specialized (it calculates in feet and inches, for example), it’s really the way to go. The company even has smartphone apps.
To keep the math simple, I am using as an example a deck that projects 8 feet from the rail of the pool, but the same mathematical process applies to decks of any depth. Most “circular” aboveground pools have between 12 and 19 equal-length sides that make up the top rail (this is what we build the deck against). In the example, the pool has 16 sides (a hexadecagon). No matter the number of sides, the pool shape is a regular polygon – a polygon whose sides are all the same length and whose angles are all the same. The math in this section can apply to many angled decks, not just pool decks.
The deck itself is a series of trapezoids – basically truncated wedges. To find the angles at which the trapezoids will be constructed, we need to find the interior angles of the polygon (see illustration, above). The number of polygon sides determines the angle of the trapezoid modules. The sum of all interior angles in a regular polygon equals 360°. Thus, 360° divided by the number of sides yields the interior angle.
360° ÷ 16 = 22.5° per section
The angle where the joists intersect the slanted sides of the trapezoid will be half of the interior angle.
22.5° ÷ 2 = 11.25°
The angles at the far end of the trapezoid are the complement of that angle (see illustration, below).
90° – 11.25° = 78.75°
As with any deck, you need exact site measurements before you can generate a footing layout and cut lists for beams, joists, and rims. The depth of the deck (distance from the pool) in this case was 8 feet. The length of the pool sides is the starting point for all other dimensions; here, the length of one side is 4 feet 8 1/4 inches.
Calculate the Outside Dimensions
Once we know the angle, length against the pool, and trapezoid depth, we can figure the outside dimensions of the deck module. To make it very easy, break the trapezoid into two equal right triangles and one centered rectangle (see illustration, below).
The first length to find is a in the illustration – the short side of the right triangle. Using a Construction Master calculator, type the following:
11.25 [Pitch] 8 [Feet] [Run]
Hit [Rise]
a = 1′ 7 1/8″
Without clearing the screen, hit [Diag] to get the length of side b in the illustration.
b = 8′ 1 7/8″
To find the length of side c, multiply a by 2 and add the length of the side against the pool, 4′ 8 1/4″.
(1′ 7 1/8″ x 2) + 4′ 8 1/4″ = 7′ 10 1/2″
c = 7′ 10 1/2″
Start a Cut List
With the lengths of the perimeter sides determined, we can start generating a cut list for the module. I label each part with a letter – R for rims, J for joists, B for beams – and a number.
Starting with the rims, I number each piece clockwise. R1 and R3 run the total width of each end of the trapezoid and R2 and R4 are installed between those.
All of the rim pieces are cut at a bevel, so I label the points where the measurement is taken for each cut: LP = long point, SP = short point, S = square cut.
The lengths of R1 and R3 are taken from the previous example. To find the length of R2 and R4, subtract the thickness of R1 and R3 from the length of side b from the previous example (8′ 1 7/8″). On a square deck, we would normally subtract 1 1/2″ for the thickness of the rim joist. However, since these joints are at an 11.25° bevel, we need to figure the thickness of the material at the bevel. Using the Construction Master, enter:
11.25 [Pitch] 1 1/2 [Inch] [Run]
[Diag] = 1 9/16″
The material is 19/16″ at an 11.25° bevel.
To figure the total thickness of R1 and R3, multiply 19/16″ by 2.
1 9/16″ x 2 = 3 1/8″
To figure the length of R2 and R4, subtract 31/8″ from the overall length of side b.
8′ 1 7/8″ – 3 1/8″ = 7′ 10 3/4″
The length of R2 and R4 is 7′ 10 3/4″.
Calculate Joist Length
Next, I number the full-length joists as J1 and the short side joists as J2 and figure out their lengths. J1 is easy. Just as you would with a square deck, subtract the thickness of the two rims (3″) from the overall depth (8′).
J1 = 8′ – 3″ = 7′ 9″
One end of J2 is beveled; figure the length to the long point. This will take a few steps. Starting on the side against the pool, measure the distance from the closest J1 joist to the inside point at which R1 and R2 (or R1 and R4) join. In this case, the distance measures 11 1/2″.
We also need the length of d. Our joist layout is 16″ on-center, so we know the distance between joists is 14 1/2″.
To find length d:
14 1/2″ – 11 1/2″ = 3″
d = 3″
Enter d as the rise into the Construction Master.
11.25 [Pitch] 3 [Inch] [Rise]
[Run] = 15 1/16″
Subtract 151/16″ from the length of J1 (7′ 9″) to get the measurement of J2.
J1 – 15 1/16″ = J2
7′ 9″ – 15 1/16″ = 6′ 5 15/16″
J2 = 6′ 5 15/16″
Calculate the J2 Bevel
The bevel on J2 differs from the bevels of the rim. The angle of €†J2’s bevel is the complement of 11.25° (complementary angles add up to 90°). To find the angle of €†J2, subtract 11.25° from 90°.
90° – 11.25° = 78.75°
Calculate Beam Lengths and Footing Centers
I usually make beams from two pieces of 2-by. In cases where the ends of the beam are beveled, as in the illustration, I calculate the length of the center of the beam. Figuring to the center gives me the length to the long point of the bevel on the shorter piece, and the short point of the bevel on the longer piece. For these modules, I keep the center of the beam 1 foot in from R1 and 1 foot in from R3.
To find the lengths of B1 and B2, first find the lengths of e and f. We know the distances from B1 and B2 to R1 (1′ and 7′, respectively), and we know the pitch.
Find B1 on the Construction Master:
11.25 [Pitch] 1 [Feet] [Run]
[Rise] = 23/8″
Distance e = 2 3/8″
Without clearing the screen, push [Diag] to get the distance along R2 from the edge of the pool to the center of the first footing (F1) .
[Diag] = 1’01/4″
Distance to center of F1 = 1 ‘0 1/4″
Find the center length of B1 by multiplying e by 2 and adding it to the length of R1.
(2 3/8″ x 2) + 4′ 8 1/4″ = 5’1″
B1 = 5′ 1″ (center length)
B1 is made up of two pieces: B1a measures 5’1″ between its long points, and B1b measures 5’1″ between its short points, at an 11.25° bevel.
Follow the same Construction Master steps for B2 and F2 using 7′ as the run.
11.25 [Pitch] 7 [Feet] [Run]
[Rise] = 1′ 4 11/16″
Distance f = 1′ 4 11/16″
Without clearing the screen, push [Diag] = 7′ 1 5/8″.
Distance to center of F2 along R4 = 7′ 15/8″
(1′ 4 11/16″ x 2) + 4′ 8 1/4″ = 7′ 5 5/8″
B2 = 7′ 5 5/8″ (center length)
Footing Layout
Laying out the footings around a pool can be a real pain. Many deck builders have a hard time finding and calculating the angles, never mind trying to keep batter boards and strings in place. But another great thing about working with trapezoidal modules is the easy footing layout. We already know how far each footing needs to be from the corner of the pool. All that’s needed now is the angled layout line that the footings fall on. Instead of pulling out a calculator and trying to calculate hypotenuses, we do the following, depending on whether the pool has an even or odd number of sides.
Locating Footings
For even-sided pools, I have one crew member hold a string at the corner opposite the corner we’ll be building from (below left). Another crew member runs the string directly across the pool to the side we are building from, pulling the string through the corner of the pool and about 10 feet beyond. This is the exact line the deck frame will follow. A third person measures off the corner of the pool with a tape, and down from the string with a plumb bob to locate the centers of the footings.
If the pool has an odd number of sides, the crew member opposite the deck side holds the end of the string centered on the opposite side of the pool, rather than at a corner (below right). The rest of the process is the same as for even-sided pools.
Putting It Together
Now we have a complete cut list for the deck framing, along with footing locations. These should not vary, and you can build as many modules as are called for. There are several bonuses to these modules:
- You can build them on a rainy day in a garage.
- If the owner wants to make the deck bigger down the road, adding another module is easy.
- If there is a problem with the pool, the modules can be unbolted from each other and taken apart for access.
- You can build them at a comfortable working height.
I have had a lot of luck selling these modules as replacement decks for older above-ground pools, and I’ve also had luck selling them with new pools. My company has a display deck at one of the larger above-ground pool distributors, and we offer bundle pricing with each pool. –
Rob Arnold owns Efficient Exteriors in Saunderstown, R.I.


