If I said I didn’t like building fences, I’d be lying. The carpentry is fun, and looking down a 100-foot line of dead-straight, perfectly parallel fence posts rising from the ground, well, rocks.
A fence should enhance the piece of dirt it surrounds. I love seeing a completed fence rescue a nice yard by separating it from a dumpy one next door. Or, in better circumstances, a fence can form a gentle line between yards — and sometimes improve both spaces — saying, “This is mine; this is yours” without isolating neighbors from each other. Fences also keep the family pup from wandering the neighborhood and create safe zones where small kids can play. I work in town, where houses are close to each other, so the fences I build are intimately connected to the homeowner’s (and neighbors’) daily experience. They’re visible out windows. They’re leaned on. I design and build them with that in mind.
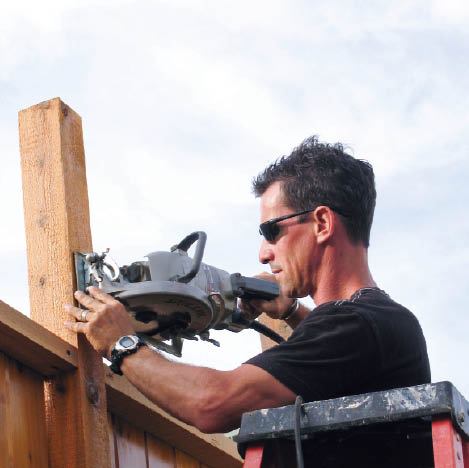
I’m not a specialized fence builder, but fences are a natural extension of my business: They go hand in glove with many of the decks I build, and they require deck-building carpentry and design skills. While I have assembled prefab panel systems, I prefer to build fences from individual parts. It’s a better fit for my production model, a small, skilled crew of just one or two people (Figure 1). Plus, it gives me the flexibility to customize each job — whether high-end, low-maintenance, or budget-conscious.
Figure 1. Building fences from individual components rather than store-bought panels provides a custom look and lends itself to smaller, quality-oriented deck-building crews.
In this article, I discuss the construction of three different fences that I’ve built. The basic structure for all of them is the same: Posts are spaced about every 8 feet and joined with horizontal rails to which upright slats are nailed or screwed. The first is a western red cedar custom privacy screen designed to block out the view of a terrible neighbor, shelter the interior, and offer a clean look from the exterior (Figure 2).
The second fence is made with FenceScape (TimberTech; 800/307-7780, fencescape.com), a low-maintenance composite product. I like it because its earth-tone colors blend into nearly any landscape, and, unlike a lot of synthetic systems, it’s customizable (Figure 3). Both of those fences are about 6 feet tall. The third is a production-style, relatively inexpensive pressure-treated southern pine fence that is both physically and visually substantial although only about 4 1/2 feet tall (Figure 4).
Figure 2. A western red cedar fence provides a high-end look but requires regular restaining to maintain its original beauty.
Figure 3. The matte finish of FenceScape’s low-maintenance composite fence, unlike the shiny look of some synthetics, blends into the landscape.
Figure 4. Treated southern pine (fir or hemlock in the West) is a lower-cost material, but with good design and attention to detail, it makes long-lasting and attractive fences.
Marking the Fence Line
Most fences run along the border of the property, so my first step is to find the property line. That can require detective work. The home’s plot plan — often required for permits and available at the building department or courthouse — should show property lines relative to some known points, like the house or iron rods driven into the ground to mark the corners. But because corner markers may be buried under several inches of dirt and grass, I often can’t find them, and instead I need to triangulate the true property line from other known points by criss-crossing hundred-foot tapes.
Once I locate the property line, I sink “control posts” at what will be the ends of each run of fencing. These can be permanent fence posts or temporary stakes, depending on the location of the property line markers. Sometimes a fence’s end is close enough to a property marker that I can simply set the endpost and use it as a control post. But when the end of a fence run is some distance from a marker, I sink a temporary iron pipe near the marker for a control post.
From the control posts, I pull the rest of the layout, using mason’s line to establish the fence’s exterior plane. I hold the exterior face of my work 1 inch back from the property line, just in case. Then I excavate for and set the first fence post (if it’s not one of the control posts) in quick-setting concrete. I let the top run wild, much higher than what will be the finished height.
To save time, I set control posts the evening before the job starts or while someone else unloads the truck or breaks down the lumber package.
Setting Posts
All my fences rely on posts set in concrete (one 60-pound bag per post) both for strength and for straightness. In most cases, I start at one end of a fence run and space the posts the length of the rails (usually about 8 feet). I don’t lay them all out at once — I dig three to five holes and set posts in those before moving on to the next group.
Using an auger mounted on a subcompact loader (for more on loaders, see “Subcompact Loaders Do a Deck Builder’s Dirty Work,” May/June 2009; free at deckmagazine.com), I dig the holes about 40 inches down (Figure 5). Our frost line is only 30 inches, but the deeper holes provide better lateral bracing. In high-wind or sandy areas or for fences higher than 6 feet or so, I might go even deeper.
Figure 5. An auger mounted on a sub-compact loader makes quick work of post holes (top). Loose dirt left by the auger can be compacted with the flat end of a digging bar (bottom). Skip this step and your posts may settle or, even worse, lean.
By setting the posts as I go, most of the concrete sets up while I’m still on site, making it less likely I’ll return in the morning to find that a post has moved. When I get to within four posts of the end of a run, I measure the remaining distance and divide it evenly to determine the spacing. That’s enough distance to maintain the illusion of full panels. For layout, I treat gateposts like end posts.
Before pouring concrete around the post, it’s crucial to support it in place. I have different methods depending on whether it’s a wood post or FenceScape.
Wood posts I brace with a couple of 2x4s nailed or screwed to the bottom of the post (Figure 6). Sometimes it’s necessary to brace from higher up on the post with a 2×4 that’s then screwed to a stake driven in the ground. Attaching the rails between posts braces them further, and when the concrete has set, backfilling the remainder of the hole with dirt helps even more.
Figure 6. Temporary braces fastened to the posts at grade help to steady them and provide a reference that aids in setting the posts square to the line of the fence.
I’ll describe bracing for the FenceScape system later.
Western Red Cedar Privacy Screen
In the case of the first fence, the clients wanted maximum privacy. I constructed the all-cedar fence with 10-foot rough-sawn 4x4s for posts, 2x4s for two rails and a cap, and 1×6 tongue-and-groove siding for slats. It converted a beat-down backyard into a thriving, high-end space.
I followed the Western Red Cedar Lumber Association’s guidelines and applied two coats of oil-based stain before installation. Plus, I soaked the end grain until it wouldn’t absorb any more stain — not because I was afraid the cedar wouldn’t last; rather, to help it last as long as possible. I like to prestain, as it’s impossible to stain the buried parts of the posts and edges of the boards after installation. This adds some time to a project, particularly since oil needs 24 hours to dry.
The rails (which I precut and stained) fit between the posts, so the post holes had to be augered accurately. Before placing the concrete, I poured about 4 inches of gravel into the holes to facilitate water movement around the bottom of the post.
The grade pitched down along the fence line, so I had to step the fence (Figure 7). Treating the posts as pairs, I measured 8 inches up from the grade at the uphill post to position the bottom rail, then leveled across to the downhill post. Of course, the space between the rail and grade grew larger as the grade dropped. I placed a 2-by flat on grade as a guide for the bottom of the slats. Removing the 2-by after fastening the slats to the rails left a 1 1/2-inch gap for trimming the grass (weed-trimmer space). Fences on really steep grades require closer post spacing if you intend to keep the bottom of the slats level. I let the height of the posts run wild, cutting them off after the panels were filled in (Figure 8).
Figure 7. Stepping the fence to match the grade keeps the rails level. Steeper grades require either spacing the posts closer or angling the rails.
Figure 8. It’s difficult to set posts to exactly the right height. Instead, run them tall and cut them to size once the fence is built.
Because the panels of this fence were all to be the same height, I jigged up my miter saw to cut the slats production style (Figure 9). I pocket-screwed the rails and cap in place (Figure 10), after soaking the screw holes with stain. The rails were set on edge and held in from the face of the posts by 1 inch, leaving a 1/4-inch reveal where the slats met the cap and the posts. It took 19 slats to fill between each set of posts; I had to rip the end slats to fit. I butted the slats to the cap and screwed through the rails into the slats to secure them (Figure 11). I used ceramic-coated deck screws throughout to minimize the risks of corrosion and staining.
Figure 9. While the slats of many fences are run long and cut in place, in this instance they were to be of uniform length. A miter saw with a stop table sped the cutting.
Figure 10. Pocket screws make stout connections. Depending on the material, be sure to soak the holes with stain or end-cut preservative.
Figure 11. Screwing through the rail into the back of the slats isn’t the first approach most carpenters would take, but here, with zero clearance to the neighboring fence, it was the only way.
FenceScape Composite Divider
his 6-foot-tall fence runs 18 panels — about 150 feet — straight, dividing three in-town backyards. Each end-panel swoops down elegantly where neighbors meet.
The FenceScape composite system consists of hollow 6×6 posts, rails, post caps, composite slats and caps, and powder-coated rail brackets. The color-matched components blend nicely with each other and with the landscape to deliver a polished look that’s also low maintenance. The 2-by rails have an internal steel mesh and can be cut with standard blades. They’re crowned — the crown should be installed facing up. Store the rails as flat as possible to prevent warping.
I never use braces to set FenceScape posts, because the screw holes would show. So, after augering the post holes and roughly locating the posts, I poured 20 pounds of gravel into each hole to trap the post bases. As with the cedar, I let the post heights run wild. Next, I screwed on the rail brackets and fastened the rails in place 8 inches up from grade on the high side of the pitched yard. Finally, I poured the concrete (Figure 12). With the bottom rail installed level, I measured and marked for the top rail — 66 inches up from the bottom of the bottom rail. Installing the top rails further secured the posts.
Figure 12. The FenceScape rails are fastened to the post with brackets and screws, helping to brace the post before it’s set in concrete.
Once the concrete dried, I backfilled and tamped the holes, which added further support. Next, I measured 4 inches above the top rail on the high side to determine post height. I installed the middle rail off-center — 30 inches above the bottom rail — a trick that makes the fence appear taller.
I let the upper slat height run wild during installation. On the bottom, as I did with the cedar fence, I rested the slats on a 2-by placed on grade.
FenceScape recommends fastening the slats to the rails with screws, 1/2-inch crown staples, or 1 1/2-inch ring-shank nails. I own neither a stapler nor a siding nailer so I screwed the slats. The best screw was Grip-Rite’s 1 5/8-inch washer-head composite screw. It sank flush with no mushrooming and blended with the FenceScape color. It was also ideal for the brackets, again because the washer head set flat. Were a second FenceScape fence in the pipeline, though, I’d buy a stapler in a heartbeat.
I made the final cuts on the slats after installation, using a circular saw. The tops of the slats are even with the top rail. I found the FenceScape post caps too brittle to install with a trim nailer, but setting them in caulk was easy.
To cap the slats, I face-nailed a 1×4 piece of composite to their sides as a frieze. Then I covered the frieze and the tops of the slats with another 1×4. Note: While the rails were 96 inches long, the rail-cap stock was shorter. For tighter trim tolerances, double-check these elements against each other before building.
I terminated the fence by “swooping” the slats at the ends (Figure 13). Because I run a no-math job site whenever possible, I plotted the arc by bending some cap stock between the last post, which is only 4 feet tall, and the first full-height post. I cut the arc with a circular saw set just deeper than the material thickness.
Figure 13. A “swoop” makes for an elegant termination (top). Avoid complicated layout by using cap stock to establish the swoop (middle). Setting the blade to just make it through the slats allows the circular saw to cut wide-radius curves (bottom).
Southern Pine Production Fence
This fence looks good and goes up fast. Although the control-post layout requires the same care as any fence on a property line, surface-mounting oversized rails and trimming them in place allow for rough field-post spacing.
For this project, the end points — one at the property line and one at the end of the house — were clear, so I knew those post locations. I set them first and poured concrete. I then laid out and installed the gateposts. I pulled string between the end posts and located the field posts by knotting caution tape around the string every 8 feet (Figure 14). It was important only to get close to being on 8-foot centers.
Figure 14. When speed counts more than a precise post layout, mark the approximate post locations on the string using caution tape, and auger away.
I set each post plumb along the string, then nailed braces to each side, as with the cedar posts in the first example. Every three to five posts, I poured concrete. (In freezing weather, quick-setting concrete is a time saver, although it doubles concrete cost. Typical concrete mixed with hot water works but takes much longer to cure.)
This fence’s height was subjective. It had to obscure the neighbor’s considerable “stuff” but at the same time remain neighborly. I worked with the homeowner to dial it in by pulling a string across the span between the end posts, tweaking its height until the goals were met — something that would not have been possible with a prefab fence-panel system.
Once I’d set the posts, allowing them to run high, I let the concrete cure; then I pulled mason’s string tight across the post tops at the finished height and cut the posts 1/2 inch below finished height. I set the top of the top rail 6 inches below the post tops and set the bottom rail no more than 48 inches below the top rail (because of the subjective way in which this fence’s height was established, the fence height varied). Remember that I set the field posts at approximately 8-foot centers. Because of this, I used 10-foot rail stock so I wouldn’t have to fiddle around with an inch here and there. I just screwed the rails to the posts, marked them, and cut them to length on the post (Figure 15).
Figure 15. By using longer rails, the author can fasten them to the posts, then cut them to length without measuring. Not having to measure saves a lot of time.
The butted 1×4 slats arrived in 16-foot lengths. I cut them in thirds and ran them all the way to the ground, letting the tops run wild. This fence has no weed-trimmer gap at the bottom because the site required a hard break between the properties (the adjacent property is 20 inches lower in spots).
I gun-nailed the slats to the rails with 2-inch, ring-shank double-hot-dipped-galvanized nails. Because the rails mount outside the posts rather than between them, the slats run continuously with no breaks at the posts. They install very quickly. Though I set the first slat plumb, it doesn’t take much to get tilted, so I threw a level on every half dozen boards and tweaked accordingly.
The longest run on this fence was over 100 feet. I had to snap the chalkline for cutting the tops of the slats off in three sections to minimize string sag, using the post tops as control points (Figure 16). A circular saw was used to trim the slats to the finished height (Figure 17).
Figure 16. Long runs of fencing may require snapping the cutline in sections to avoid line sag.
Figure 17. Cutting the slats off in place ensures a straight, continuous line.
Figure 18. The key to gates that don’t sag is a Z-shaped support structure.
This fence has a 4-foot-wide gate, made with two 2-foot-wide operable gate panels. One gate panel is fixed with a cane bolt; the other operates daily. I like gates to be at least 3 feet wide for easy egress. I always ask the homeowners if they’ll need a wider gate for equipment access — for example, if someone cuts their grass using a wide commercial lawn mower. I make sure the posts are dead plumb and build a gap of about 1/8 inch between the gate and its posts or a twin gate. The key to sag-free gates is a Z-brace running diagonally between the top and bottom gate rails (Figure 18). A 1×4 detail at the gate top adds a simple shadow line and provides a flat surface for mounting the hardware.
Mark Clement is a deck builder in Ambler, Pa., a PDB contributing editor, and a member of the DeckExpo live demonstration team.


