
Mark Clement
No matter how you slice it, installing effective, good-looking guardrails takes time. Cutting, plumbing, shimming, and fastening the numerous individual parts is not full-speed, turbo-charged framing. It’s trim work, where you can (and should) show off your carpentry skills to customers.
That doesn’t mean, however, that guardrails can’t be built efficiently. The system I’ve developed over the years combines simple installation with crisp looks and bomb-proof structure. Two key aspects are integrating the post with the framing on the inside of the band joist, and assembling the 2×2 balusters and the top and bottom rails into panels that install between the posts. I can employ the same process equally well with composites or wood.
Blocking Anchors the Posts
The first step is to lay out the post locations on the band joists. For MoistureShield composite railing and decking (Advanced Environmental Recycling Technologies; 866/ 729-2378, moistureshield.com), which I used for some of the projects shown in this article, post spacing must not exceed 72 inches on center. Measuring from the outside corners of the deck frame, I mark the locations of the posts as evenly as possible around the deck’s perimeter. This is the time to make final decisions about openings in the guardrail — for stairs, gates, and upgrades such as planters and benches — that might affect post placement.
Sometimes layout drops a post right on a joist, but don’t alter the post or the joist; just move the post to the side of the joist that’s closest to the proper layout. If you can, move any posts that might be in line with it on the other side of the deck a similar distance. If you can’t, spans are typically large enough that the difference won’t be terribly obvious.
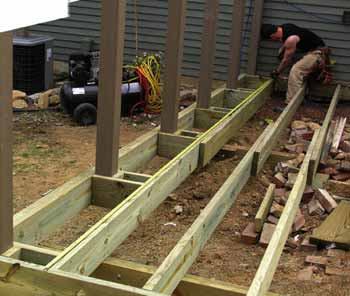
Figure 1. Housings assembled from joist stock and tied into the framing provide stout anchors for guardrail posts. Make the post opening a little big and cut the blocking a little short so it doesn't force the outer joist out of line.
For added stability, I frame housings for the posts into the joists using blocking cut from joist stock (Figure 1). I cut the between-joist blocking 1/8 inch to 1/4 inch short because joists are never perfect and pounding in a block can easily deform a joist, especially one on a side of a deck. This, by the way, is when you’ll thank yourself for setting up a slide compound miter saw. It saves untold amounts of time and energy (Figure 2).
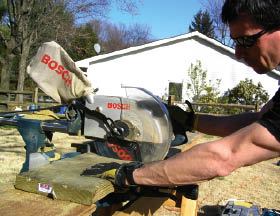
Figure 2. It takes a little extra time in the morning to set up a miter saw, but it pays dividends of fast and accurate cuts all day long.
I make the housings about 1/8 inch larger than the posts, which leaves wiggle room to slide the post into the housing. Later I’ll shim as necessary. It’s easiest to build the housings piece by piece in place, squaring them to the framing with a small square. I’ve tried making up blocking assemblies on the bench and then installing them, but I found it took more time.
You can use 3 1/2-inch screws or nails to assemble the housings. I drive a fastener into the top, middle, and bottom of the blocking at each nailing location. This fastening schedule not only makes a strong mechanical connection to the framing, it also leaves known areas clear of fasteners that could get in the way of drilling for bolts (Figure 3).
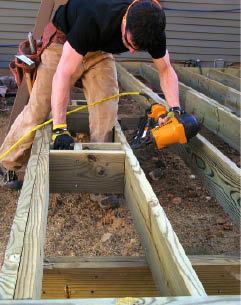
Figure 3. The post housings can be nailed or screwed into place. Locate fasteners where they won't be in the way later on when you drill for bolts.
Install the Posts
Finished post and rail heights vary (within code) depending on design, but posts should always extend at least to the bottom of the joists.
The key to laying out a post is to make a story pole showing all the spaces, gaps, and assemblies. This approach avoids math and makes it easy to see if you’ve remembered everything: the decking, the toe space, the baluster assembly, any post extension above that, and a rail cap. Once you’ve mapped out the story pole, you can forget all the numbers except for the overall height and the distance from the top of the post to where the post meets the joists.
After cutting the post to length on a miter saw, I measure down the post to where it will meet the top of the housing, square a line across, and partly drive two nails right on the line. Slide the post into the housing, and the nails will keep it at the proper elevation until it’s fastened. This common trick, when used in combination with a housed post (compared with a face-mounted post), enables one worker to handle a post solo (Figure 4).
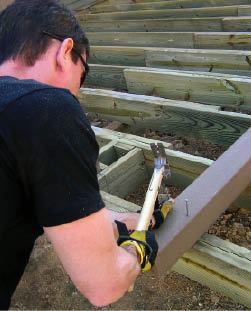
Figure 4. Nails driven partway into the post will support it at the correct height on the housing. This makes it easy for one person to plumb, shim, and bolt the post home.
For a rock-solid connection, whether I’m using composite or wood, I coat the interior of the housing with construction adhesive before inserting the post. With the post in place, I double-check that the bit won’t hit nails in the blocking, then drill two holes through the framing using a 3/4-inch-diameter auger bit. The holes go through the band or side joist, the post, and the blocking behind the post. One hole is drilled about 2 inches down from the top of the joist and the other about 2 inches up from the bottom.
I then install and lightly snug two 1/2-inch-diameter through-bolts. The oversize holes make it easier to place the bolts, and they allow some wiggle room to shim the post plumb before cinching the bolts tight (Figure 5).
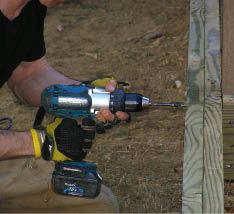
Figure 5. A heavy-duty drill and an auger bit make quick work of the bolt holes. The author drills 3/4-inch holes for 1/2-inch bolts to provide flexibility for shimming the post plumb.
Cedar shingles, naturally rot resistant, work nicely as shims. An alternative is to cut slivers from treated scrap for site-made shims. They work just as well, and you don’t have to transport a bucket full of cedar shingles from job to job.
When I’m satisfied, I tighten the bolts (whenever possible I use my cordless impact driver for this), checking that the posts remain plumb. When the bolt heads crunch into the joist stock, I know they’re tight enough (Figure 6).
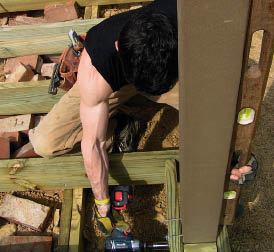
Figure 6. Use a cordless impact driver to quickly cinch down the bolts. LedgerLok screws are an alternative to bolts for wood posts, subject to local approval.
While both composite and wood posts can certainly be installed using the method above, on wood posts the local inspectors allow me to use 6-inch-long LedgerLok screws (FastenMaster; 800/518-3569, fasten master.com) instead of through-bolts as fasteners. The glued-and-screwed connections I made this way a year ago are still rock solid.
Notch the Decking
Unfortunately, 6-inch deck boards have to be notched to fit around 4×4 composite posts. I use decking scraps as test pieces before cutting new deck boards. The extra time spent is paid back with dead accurate cuts in the full deck boards. MoistureShield recommends a 1/8-inch expansion gap between the board and the post, but check with the manufacturer of the decking you’re using, as that space may vary. I begin by drilling the corners of the notch using a 1/2-inch spade bit, then I jigsaw the hole square.
On a wood deck, though, I can avoid notching the boards: I spec 4×6 posts rather than 4x4s and face the 6-inch side inward. I wait to install the posts that fall at the ends of the deck boards (usually the posts on the sides of the deck) until I’m installing the adjacent decking. By slightly tweaking the layout of the posts I can line them up with the deck boards, thereby eliminating the need for notching. I glue and finish-nail a short piece of decking on the outside of the post (Figure 7).
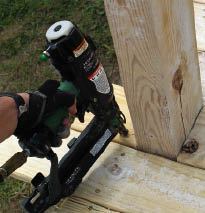

Figure 7. Using 4×6 wood posts eliminates the need to notch the ends of boards. Lay out the final location of the posts as you run the decking so that the boards and the posts are aligned. Construction adhesive and finish nails hold the outboard piece of decking in place.
The result is a clean look and faster installation, and without notches the deck boards will be less likely to split due to wood movement.
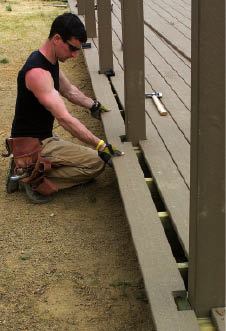
Figure 8. The last board always requires notching. Drill the corners of the holes first, then use a jigsaw to cut out the notches.
There’s no way, however, to avoid notching the last board (Figure 8). If it overhangs the framing more than 2 inches, I rip it to width and rout a bullnose on the inside edge to match the other deck boards (Figure 9). Another method is to rip the next-to-last board installed so that the last board on the deck is full width.
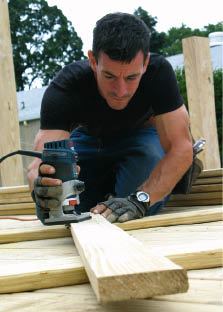
Figure 9. Often, the last (or next-to-last board, if you want the last one to be full size) must be ripped to width. Run a roundover bit in a router along the ripped edge to blend it in.
Assemble Baluster Panels
Instead of laying out 2-by rails and installing the 2×2 balusters one at a time, I build panels and install the whole assembly between the posts. While this approach is typical for composite systems, it’s fast and accurate for wood decks too.
I begin by measuring between the posts at the base. This determines the length of both the top and bottom rails. Unlike how I treated the blocking, I take on-the-money measurements and cut the top and bottom pieces of composite railings to match.
If I’m using wood, to increase the strength of the post connections to the railings I’ll cut the top rail longer than the space by the width of a 4×6. (The bottom rail is cut to fit exactly between the posts, just like with composite railing.) I lay out the balusters so that half this extra length extends out on each end of the panel. The top rail is placed on the 4x6s, covering up half of each one and providing plenty of meat for screwing the rail to the top of the post.
The balusters are spaced 4 inches apart on the railing using a spacer block. I start the baluster layout in the center of the rail so that the distance between the last balusters and the posts ends up equal. There are two choices when beginning the layout — you can center a baluster, or you can center one of the spaces. It’s worth looking to see which works better. Sometimes, to make the layout work just right, I butt a baluster right to the post.
With the rails cut to length and spread out with the balusters on the deck, I’m ready to build the rail panels. In the case of the MoistureShield system, the rails are an L-shape that requires setting fasteners in the face of the 2×2 (Figure 10).
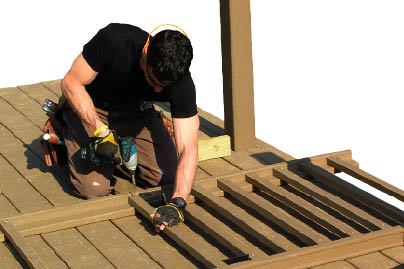
Figure 10. MoistureShield's rails are L-shaped and the balusters are face-screwed in place.
For wood decks, the top and bottom rails are 2x4s. I center 2×2 balusters on the rails using pieces of decking as a jig (Figure 11). One 3 1/2-inch screw in the top and bottom of each baluster secures it to the railing. While screws are best, gun nails work too; just make sure to keep the tool’s nose straight to prevent blow-outs.
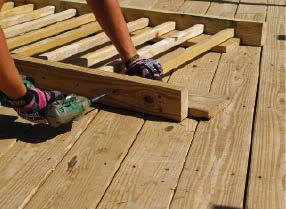
Figure 11. Spreading wood balusters out on pieces of 1-inch-thick decking centers them perfectly on 2×4 rails. An impact driver makes quick work of the 3 1/2-inch screws that join the parts.
Install the Rail Assemblies
To keep the rail panel at the right height, I set it on blocks that are the same height as the toe space (2×4 scraps work great) then fasten the railing per the manufacturer’s instructions (Figure 12). The cap rail, which installs quickly, is next; it isn’t just decorative, as it also reinforces the railing attachment. With MoistureShield’s composite system, the cap rail fits between the posts and covers the top rail. For wood, if your railing attaches to the top of the posts, you’ll run the cap on top of, rather than between, the posts.
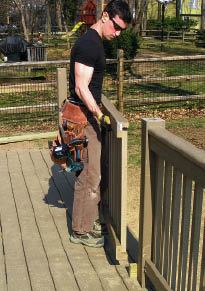
Figure 12. With a 3 1/2-inch toe space, you can rest the rail on 2×4 blocks for support while fastening it.
Without midspan support, most railings will sag, including those made of wood. The maker of MoistureShield requires this support, as do other synthetic-railing manufacturers. I use a piece of 2×2 (Figure 13).
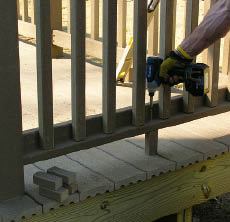
Figure 13. Pieces of 2×2 support the railing midspan. Composite-railing manufacturers generally require this, and it's a good idea with wood railings as well.
Only a few details are left. If there’s a gate, I assemble it as I would a rail panel. To prevent the gate from sagging, I install diagonal bracing. When there are post caps, I find that attaching them with adhesive is easier and faster than screwing them down. I use a bead of Phenoseal (Phenomenal Brands; 410/779-3265, phenoseal.com) on the top of each post (Figure 14), then set the cap into the bead. Before the adhesive sets, I eyeball the cap to make sure it’s square to the rail.
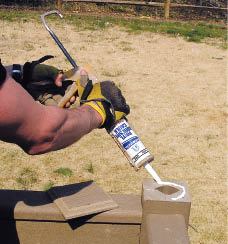
Figure 14. Instead of screwing or nailing post caps in place, the author uses a bead of adhesive caulk. This holds the cap firmly in place — without fastener holes.
The procedures I follow for stair guardrails are similar, but the differences are significant enough to be an article in themselves.
Mark Clement is a remodeler in Ambler, Pa., and a live demonstrator for DeckExpo.


