Q: I want to replace a ceiling fan/light with a regular light fixture. The cable from the switch box to the ceiling box has three wires—two identical blacks and a white—with one of the blacks connected to a mysterious blue wire from the fan. The light fixture I want to install has only two wires, one white and one black. What’s the best way to wire the new light?
A: Cliff Popejoy, a licensed electrician from Sacramento, Calif., responds:
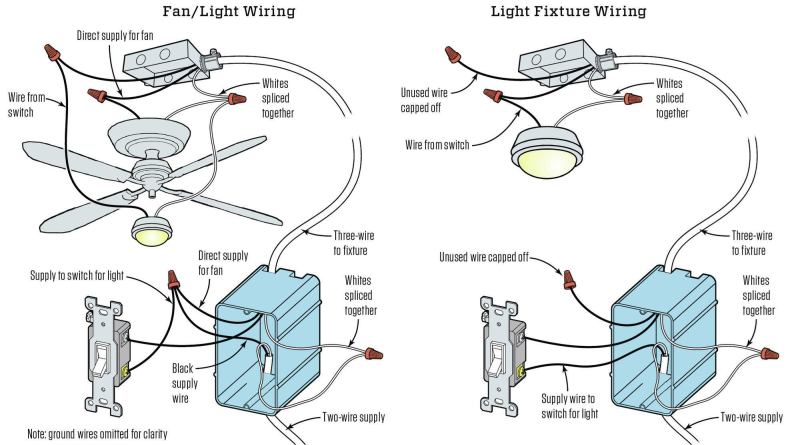
The cable going to the fan/light fixture is called a three-wire cable, and it usually has one red wire and one black—instead of two black wires—to prevent confusion. In your case, one of the black wires from the cable is connected to the fixture’s black wire, which goes to the light; the other black wire is connected to the fixture’s blue wire, which goes to the fan. The cable’s white wire connects to the fixture’s white wire.
At the switch box, there should be two cables: one with two wires (one black and one white), and one with three wires (two black and one white). The black wire of the two-wire cable supplies power coming in, and it should attach to one of the switch terminals, and also to one black wire of the three-wire cable, to power the fan. The other black wire from the three-wire cable connects to the other switch terminal, to power the light. The two white wires in the switch box should be spliced together. Wired this way, the wall switch controls the light, and a pull chain on the fixture controls the fan.
Given this arrangement, here’s how to wire the new light fixture. First shut off the power at the breaker or fuse and verify that it’s off by testing. At the switch box, leave the whites spliced together. Keep the black wire of the two-wire cable connected to a switch terminal, but disconnect it from the three-wire cable’s black wire, which you should then cap off with a wire nut. Make sure that the other switch terminal is connected to the second black wire of the three-wire cable.
At the fixture box, be sure that the three wires are separated from each other and are clear of everything else, then turn the power back on. Turn the switch on and move dimmer switches to the full on position. With a voltage tester, find out which of the black wires at the fixture box has 120 volts (testing between the black and the neutral) and mark that wire with a bit of tape. Now cut the power again. Connect the black wire from the new light fixture to the black wire marked with tape. Connect the white fixture wire to the white wire from the three-wire cable. Cap the other black wire with a wire nut and finish installing the fixture.
If you don’t have a voltage meter or tester to verify which black wire is connected to the switch, hook up one of the black wires from the three-wire cable to the black fixture wire before you install the fixture. Then power up the circuit and turn on the switch. If the light goes on, cap the other black wire and you’re all set. If the light doesn’t go on, cut power and connect the other black wire to the fixture wire. With this strategy, never suspend the fixture by the electrical-wire splices. Instead, make a hook from a coat hanger to hang the fixture from until it’s installed.


