
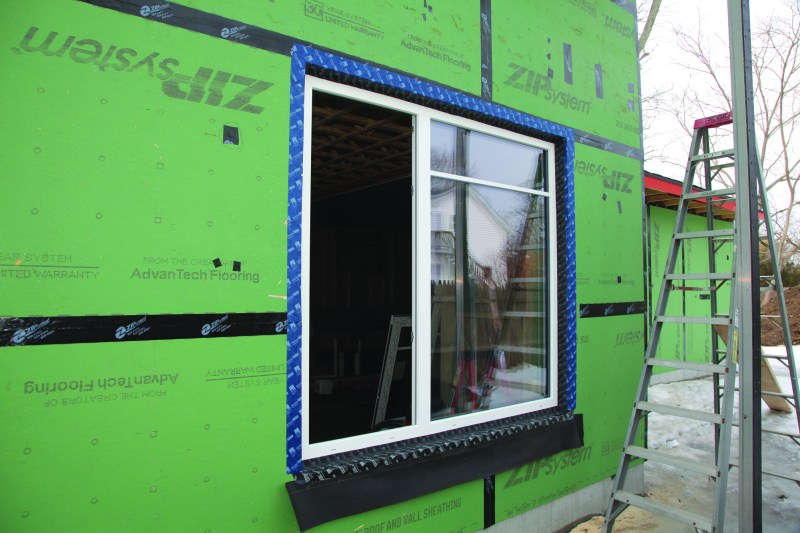
As home construction has evolved and buildings have become more and more efficient, we have been turning to high-performance windows that keep pace with our wall systems. Recently we built a certified-passive new home in Rhode Island, and despite being on a tight budget, we opted for triple-glazed vinyl windows produced in Europe. The trick was installing them properly as an integral part of our complex wall system.
Innie, Outie, or Midi?
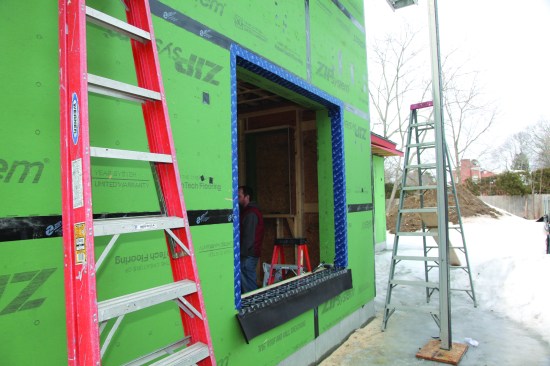
The walls in this home were 12 inches deep, and the first question we faced was where within that wall thickness the windows would be placed. One consideration was aesthetics, of course. In addition, there were construction details that would need to be worked out. Locating the windows inward would require exterior extension jambs; locating them midway would require extension jambs on both sides of the windows, which would involve more work and more expense than a single, deeper extension jamb on just one side. In addition, any exterior materials would need to be detailed properly for water management.
We also considered durability of the wall system, occupant comfort, and thermal performance with the window at various positions. Putting a window in the inner third of an opening exposes a wall assembly to a greater risk of water damage, especially at the sill.
Installing a window in the outer third of a wall system, on the other hand, puts the window on the colder side of the opening and risks creating a micro-climate in the window opening, especially with smaller windows. This micro-climate could get cold enough for moisture to condense on the inside of the glass (a good case for triple glazing). Also, the colder the glass surface, the colder we feel when standing next to the window opening, because our warm bodies tend to radiate heat toward cold surfaces.
As far as thermal performance is concerned, the optimal position for a window is in the center third of an opening (4 inches to 8 inches from either side). This effectively places the window in the middle of the R-value of the wall.
For this house, we opted to set the exterior face of the window 5 inches in from the exterior surface of the sheathing.


Roe Osborn
Acoustical sealant would bed the sheathing that would bridge the…
Building the Openings
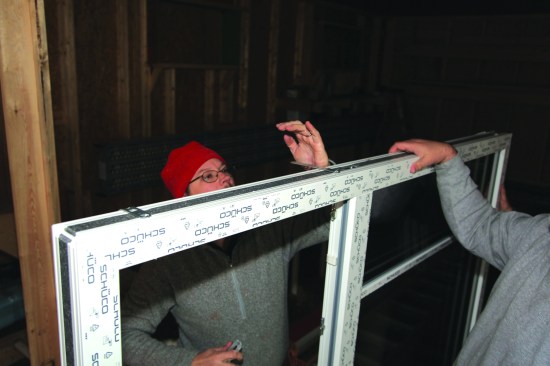
The windows we chose for this project were from Shuco and were framed in uPVC (unplasticized polyvinyl chloride, a more rigid and durable form of PVC). These triple-glazed windows have an overall U-value of .13, which translates to an R-value of 7.6. Each of the window units had either fixed glazing, a tilt-and-turn window, or a combination of the two, depending on its location in the house.
Delivery took about 12 weeks from the order date. With the windows sourced in Europe, we paid extra attention to the window schedule and to the accuracy of the order before placing it. The windows were delivered on schedule, in the correct sizes, and in good condition.
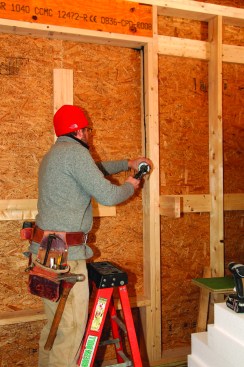
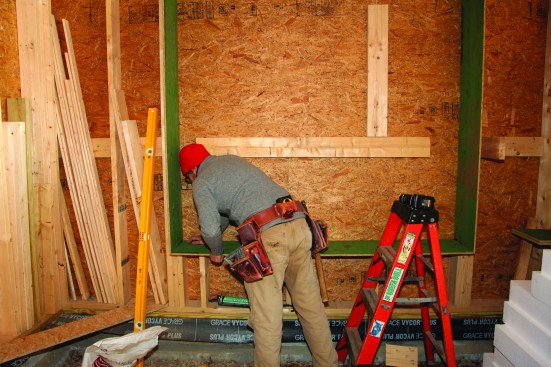
The wall system for this house consisted of a 2×6 exterior wall, a 2×4 interior wall, and a 3-inch space between the two walls, for an overall wall-frame depth of 12 inches. We oversized the width of the framed rough openings by 2 inches—1 inch for the OSB sheathing that lined the opening and 1 inch for the rough-opening width of the window. For the rough-opening height, we added 3 inches—1 inch for the OSB sheathing top and bottom, 1 inch for the sill dam, and 1 inch for the unit rough opening.
Because of the double-wall construction, we used 1/2-inch OSB Zip Wall sheathing to make the structural connection (bridging) between the interior and exterior framing at each of the openings. The sheathing in the openings was also a simple way to maintain the continuity of our external weather barrier, with the exterior sheathing essentially folding into each opening.
To prep for the “bridging” installation and to maintain continuity in our exterior air barrier, we applied a bead of acoustical sealant to the face of the 2×6 outer frame. We then bedded pieces of sheathing into the sealant around the perimeter of the opening.
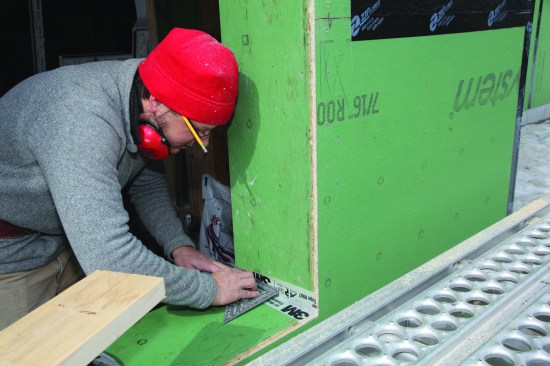
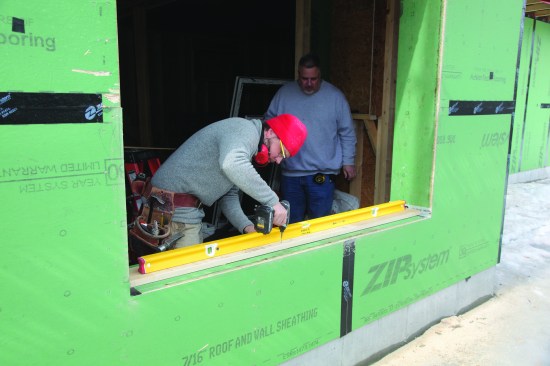
At this point, we removed the exterior sheathing from the opening, using a flush-trim bit on a router. We had initially sheathed over the window openings to keep out the winter weather and, more importantly, to test the integrity of the Zip Wall as a continuous exterior air barrier. When we performed a blower-door test, the walls performed extremely well, as expected, at 38CFM@50pa.
Prepping the Sills
The router made quick work of cutting the openings, but left a bit of a mess, so we vacuumed and wiped down the openings. A clean surface was imperative for applying the various layers of tape during the preparation of the opening and the installation of the window.
We began by sealing the sill-to-jamb intersection on both sides of the opening, using 3-M All Weather tape. Each piece of tape was carefully pressed into place and then rolled for maximum adhesion.
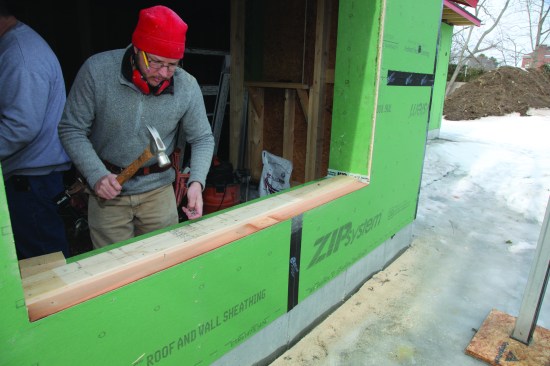
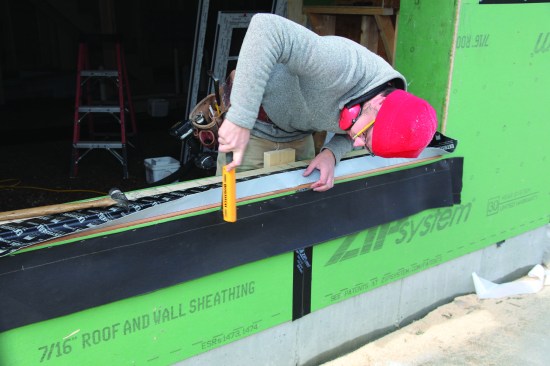
Next, we installed a 5/4-by-6-inch dam—which would eventually support the window—across the entire length of the sill. Because the dam was set inward in the rough opening to accommodate the placement of the window, we needed to provide a sloped drainage plane to direct any water to the outside. We ripped pieces of beveled siding to extend to the edge of the opening and nailed them into place across the full length of the sill.
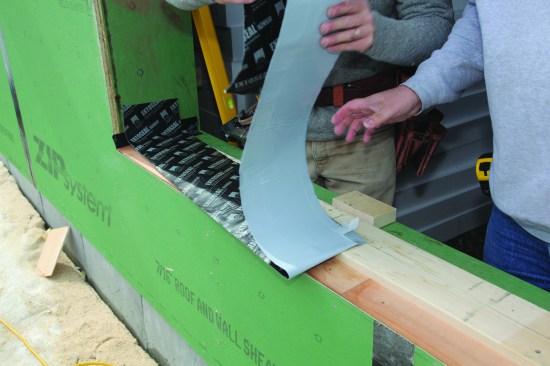
Flashing tape is pretty flexible and to make sure it stays straight as it goes in, we always draw lines for positioning the edge of the tape. To keep the flashing tape even side-to-side, we marked the centerline of the dam. We cut the length of the flashing tape to the width of the opening plus 8 inches so it extended up the jambs 4 inches on both sides. Then we simply folded the tape in half lengthwise and lined up the fold with the centerline before peeling the back from the tape. We installed the flashing tape along our guideline about 2 inches from the edge of the dam. We folded the tape down the face of the dam and over the bevel siding, with the ends of the tape extending 4 inches up the jambs.
Below the opening, we stapled a 10-inch-wide strip of felt paper that would integrate with the felt-paper WRB that would be installed over the walls. Properly lapped, the felt paper will help to shed moisture under our exterior finish. We then folded down and adhered the remaining 2 inches of the flashing tape over the building paper. We neatly stretched and tucked the tape out over both corners and carefully rolled every surface of the flashing to complete the sill flashing.
Flash the Rest of the Opening
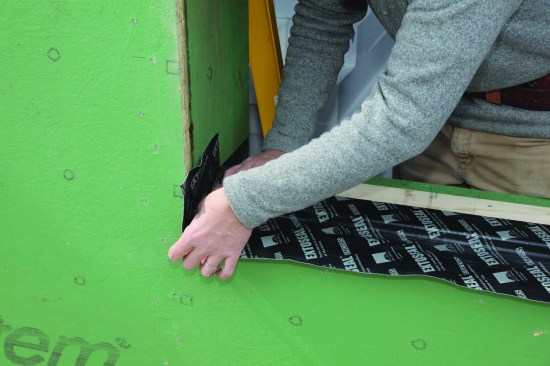
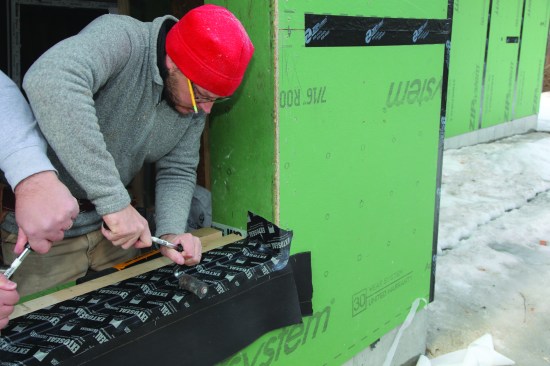
Next we applied flashing tape shingle-fashion to both jambs, with the lower portion of the jamb flashing lapped over the upturned portion of the sill flashing. We placed the guidelines for the jamb flashing so the inside edge would be near the middle of the dam and inside the exterior face of the window when it was installed.
The final piece of flashing sealed the head of the opening. The head flashing extended down over the jamb flashing, and we had to do a bit of origami, cutting and folding the corner and then adding a small piece of flashing material to seal the intersection of the three planes. With the flashing for the opening installed and neatly rolled out, we were finally ready for the window.


Roe Osborn
Scraps of OSB served as shims and provided space for expanding f…
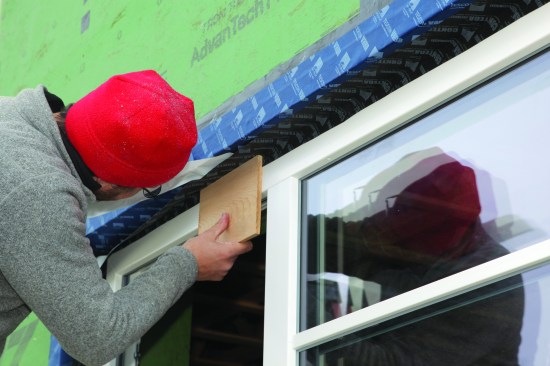
Bring on the Window
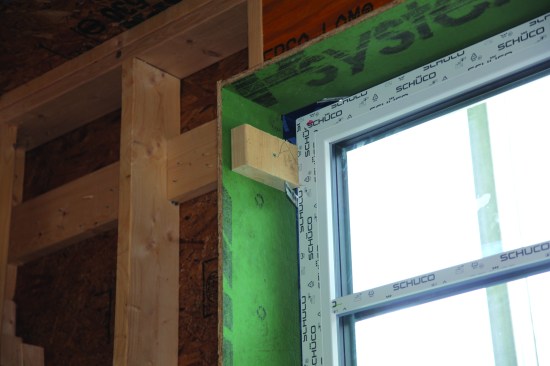
We put scraps of OSB sheathing on top of the 5/4 dam to provide points for shimming the window if needed. These shims also provided space for the expanding foam sealant that would be used when the house was insulated.
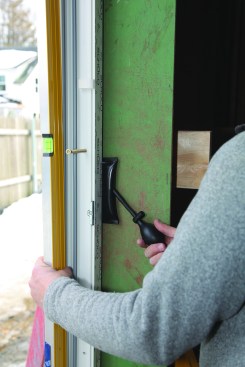
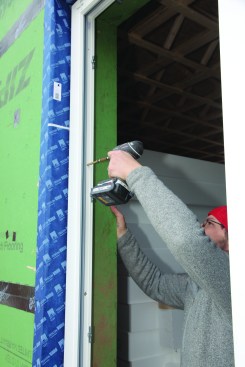
The windows do not have an integral flange for attaching them in the openings. Instead, metal installation brackets snap into grooves around the perimeter of the window unit. We installed them roughly 24 inches apart, starting about 6 inches in from the corners.
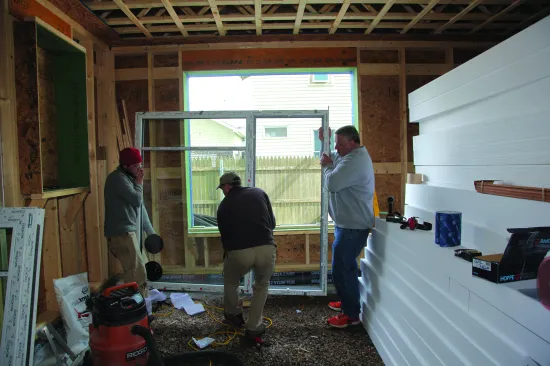
We removed the operable sash of the unit to help reduce the unit’s weight (triple-glazed windows can be pretty heavy). With the help of suction cups and three strong backs, we maneuvered the window into place. While one person steadied the window in the opening, we screwed temporary 2-by blocks in the opening to hold the window at roughly its finished inside-to-outside location.
We used a Winbag inflatable bladder to tweak the window side-to-side in the opening and to adjust the unit for plumb. After double-checking the placement, we screwed the brackets to the opening to secure the window in its final position. The free side of the opening for the operable portion of the window is attached with screws driven through the frame.
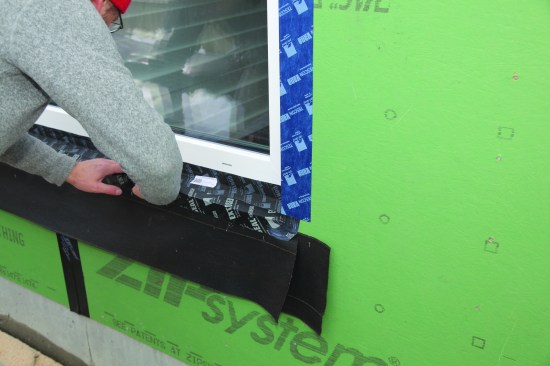
Seal the Window to the Opening
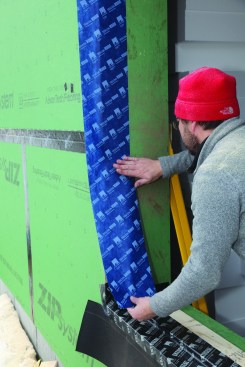
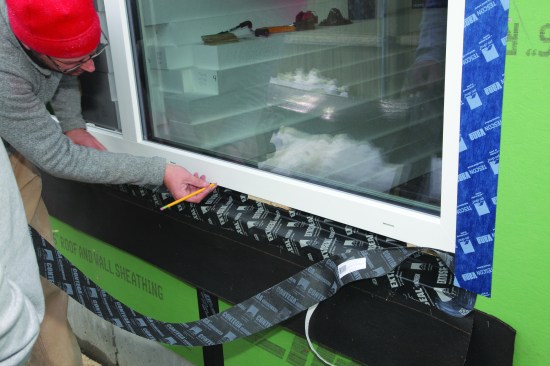
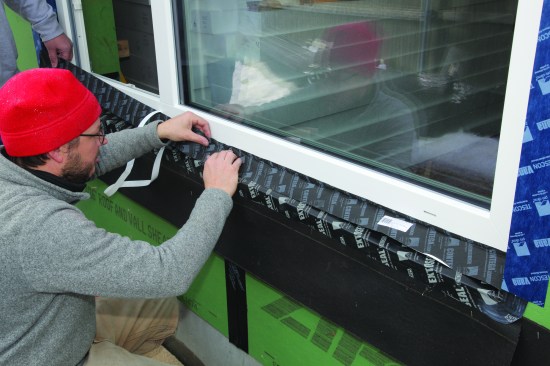
The final step was sealing the window to the opening to incorporate it into the exterior weather barrier, moisture-management system, and exterior air barrier of the house. We began by flashing the window to the sill of the opening. We made a light pencil mark along the bottom frame of the window about 1/2 inch up to guide the placement of the flashing, ensuring that the longitudinal weep holes in the window frame weren’t compromised.
The flashing tape we chose for sealing the window to the opening was different from the flashing tape we’d used to seal the opening itself. We used a “vapor open” tape—a Proclima product called Contega Solido Exo—which both repels water from precipitation and allows vapor to pass through it. This means that any moisture from the interior of the home that might get into the area around the window can dry to the outside before it causes damage.
We peeled the backing from the top inch of the tape and then worked across the window, adhering the tape a few inches at a time. An extra set of hands helps to keep the tape extended while you’re sticking it in place. Once the tape was attached to the entire length of the window frame, we peeled off the rest of the backing and smoothed the tape down the face of the dam and onto the sill flashing tape.
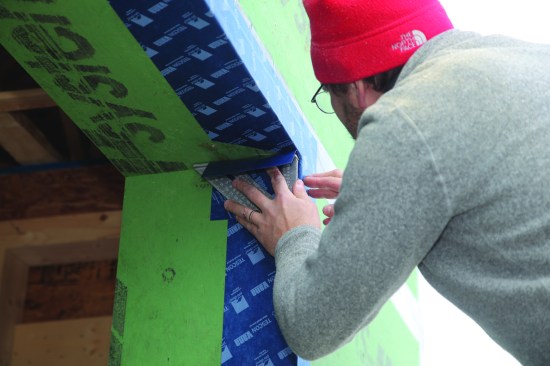
As on the sill, we adhered the jamb flashing to the window frame first and then extended it over to the previously installed jamb flashing for the rough opening. We used the butt edge of a cedar shingle to press the flashing tape into the 90-degree corner. The bottom ends of the jamb flashing tape extend down to lap over the sill flashing. We repeated the same steps to install the head flashing for the window, with the ends of the head flashing lapping onto the tops of the jamb flashing to complete the window install.
With all the windows installed, we tested them for leaks by spraying water directly onto each one for about 10 minutes total. Our installation strategies proved successful, as our testing revealed no leaks. We also did a final blower door test: The results were 36CFM@50 pa. for .16ACH50—well within the range for Passive House certification. With our earlier test for comparison, we can gauge the airtightness that was lost by the window install to guide us in future projects.


