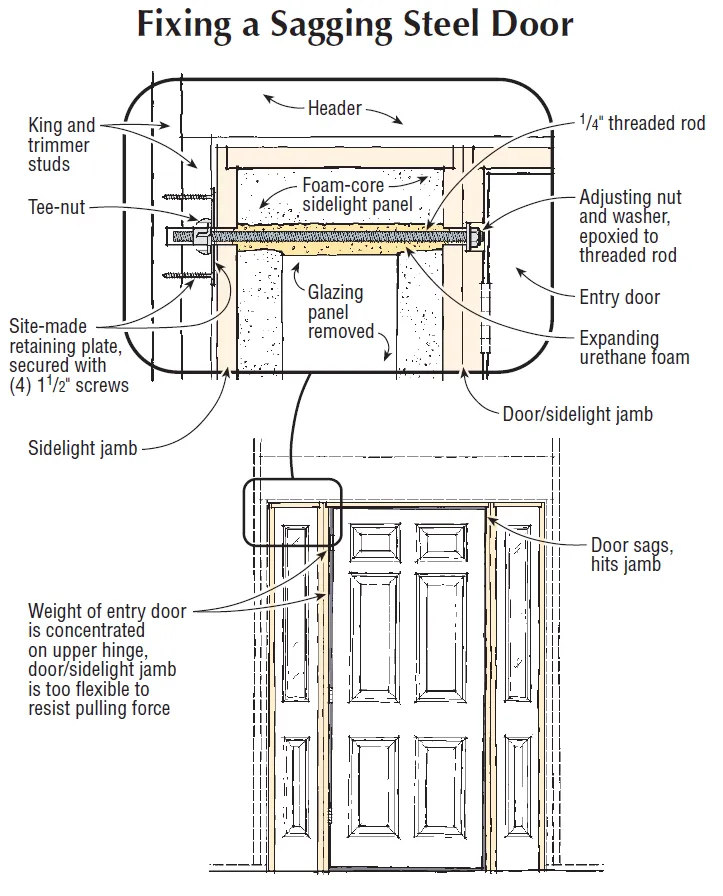
Q. I just replaced the insulating steel and fiberglass door in an entry door assembly with dual sidelights. The new door strikes the jamb near the top on closing, and the clearance along the top is uneven. I tried driving a couple of long screws through the top hinge leaf to pull it over, but the mulled jamb assembly isn’t stiff enough to resist the weight of the door. There’s no framing behind the jamb, just the foam core of the flanking sidelight. How can I pull this door into alignment?
A. JLC editor Dave Holbrook responds: I had the same problem recently. The weight of an entry door is mostly concentrated on the topmost hinge, which calls for beefy hinges and an unyielding jamb. Prehung door manufacturers usually leave one or two screws out of the top leaf and ship a couple of 3- to 4-inch-long screws with the door, expecting you to drive them through the jamb into the framing. When your closest framing is a foot or more away from the hinge because of the foam-core sidelight, you’ve got a problem. The hardware stores don’t seem to carry #10 wood screws 16 inches long.
I solved the problem with a length of 1/4-inch threaded rod and a tee-nut connector secured in the framing. Installing this rig was a job, though: I had to pull the entire door assembly to install the connector. But when I discovered that one sidelight jamb was rotted, I decided it was worth the hassle. I pulled the whole door frame out, replaced the bad jamb, and proceeded. I left the sidelights loose in the frame and took the door off the hinges to make the job easier.
Threaded rod, drilled clear through a flanking sidelight into the framing just high enough to clear the glazing, counters the weight of an entry door at the topmost hinge and prevents it from sagging. A site-made steel retaining plate prevents the tee-nut connector from pulling out of the framing under tension. The adjusting nut is recessed in the hinge jamb, just above the hinge.
Tacking the frame back in the opening, I drilled a 1-inch-diameter hole in the hinge jamb, directly above the hinge, high enough to clear the sidelight glazing and just deep enough to recess the rod’s nut and washer. Then, using an extra-long 1/4-inch-diameter twist bit, I drilled a hole through the center of that counterbore and through the sidelight. The bit bottomed out a little shy of the far jamb, but it gave me enough of a pilot hole in the sidelight to let me pull the sidelight and complete the hole from the back side. The bit didn’t emerge exactly opposite the starting point, but side pressure and plunging action on the drill bit reamed the foam sufficiently to realign the hole.
I put the sidelight back in the jamb and inserted the threaded rod to mark the jamb for drilling. A light hammer tap on the nut-capped rod did the trick; I pulled the sidelight again, drilled through the jamb into the framing, and once again pulled the entire jamb assembly out of the rough opening. I enlarged the hole in the framing to accommodate the tee-nut connector’s shank, drilling deep enough to allow the rod to pass through with room for adjustment. Although barbs on the flange of the tee nut prevent it from twisting, they don’t resist pullout, so I capped the nut with a steel mending plate, center-drilled for clearance and screwed to the framing with four 11/2 -inch screws.
I permanently reinstalled the door frame and inserted the threaded rod, finger-tightening it in the tee nut. After sliding a washer on and sending a nut after it, I dabbed some 5-minute, 2-part epoxy adhesive on the threads, nut, and washer to fuse them together, then cut off the excess rod with a hacksaw, flush with the nut and hence the jamb. After letting the epoxy cure, I gave the nut a few cranks with a socket wrench to snug it up.
I hung the door on the hinges, closed it, and checked the clearance. Initially, it hit the striker jamb, but a few turns to the nut fine-tuned the clearance and alignment to perfection. I gave myself a pat on the back.
Because my crude sidelight drilling had removed enough foam between the sidelight’s steel facings to create a potentially sweaty, cold-weather condensation flash point above the glazing panel, I removed the glazing from the sidelight. (The glazing panels in the sidelights and door consist of a pair of matching plastic frames that screw together from the interior side, sandwiching the glass panel and the panel cutout in compression. A couple of beads of silicone caulk around the outside perimeter of the glass and the cutout seal the deal.) Sure enough, there wasn’t much polystyrene left around the rod. I hosed the cavity with expanding urethane foam, let it cure, cut away the excess, and reinstalled the glass.


