As an architect practicing in Marin County, Calif., I’ve designed dozens of remodels, additions, and new buildings in the last decade and a half, and I’ve served as architect and general contractor on several of my own properties. Since most of our area is built out, remodels and additions tend to be the most common projects.
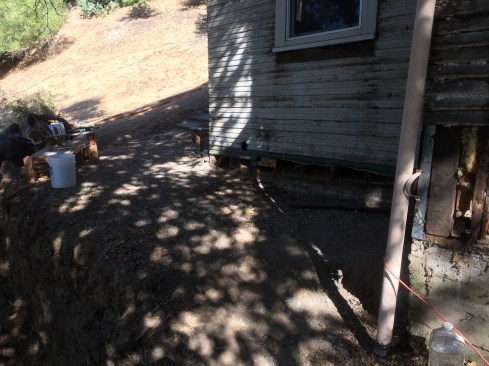
Last year, my wife and I purchased a dilapidated 1927 Craftsman on a steep upslope lot in Fairfax, Calif., to rehab as a rental property. Among the many issues we encountered, the biggest challenge involved the foundation of the house and the concrete garage immediately below it. As was typical of hillside houses of the time, the garage was built at street level, downhill from the house, with reinforced concrete walls and roof, and partially submerged in the hill. The garage’s back wall was less than 7 feet from the foundation of the house up the hill behind it.
The existing home’s shallow foundation was lightly built in the 1920s, and the building’s floor system and cripple walls had been buried in accumulated soil and were damaged by dry rot.
In the vicinity of the garage, the house foundation had settled noticeably, with the wooden cripple wall between the foundation and the framed floor nearly submerged into the soil. We raised the corner of the house by 6 inches to level the floors; trimmed and raised the bottom of the cripple wall to remove rot and increase separation from grade; and replaced large portions of the foundation. Because I was concerned about settling in what looked like loose fill, we dug the footing of the foundation to 24 inches below grade (rather than the typical 12 inches permitted by code).
The garage had significant water leaks at the back and was showing signs of stress. In order to waterproof the garage and to relieve some strain, we dug the back half of its roof out of the hillside, leaving a 7-foot-tall-by-12-foot-wide soil cut above the back wall of the garage and tapering cuts on either side.
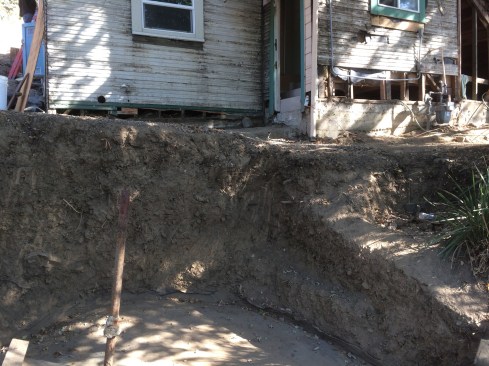
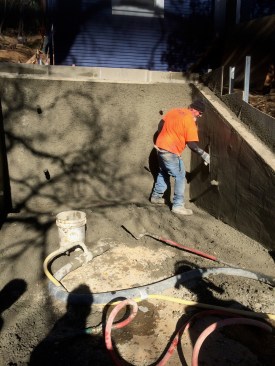
When soil on top of the concrete garage roof, downslope of the house, was excavated, the garage roof was found to be in need of repair to restore effective drainage and waterproofing.
With the soil removed, we learned that the garage had previously been unearthed and reroofed with torchdown material, and the soil replaced as loose fill—which provided little or no structural support for the house above it. The slope of the garage roof was inadequate in several parts of the area we uncovered, allowing water to pool on it. Our plan is to remove the torchdown material, correct the roof slope with lightweight concrete, and restore the roof’s waterproofing. With proper drainage and upwards of 20 cubic yards of soil removed from the roof, the garage will be far more robust.
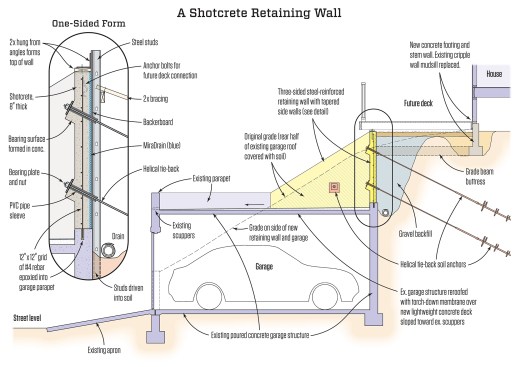
Meanwhile, I considered how best to support the house. While hillside houses in our area typically rest on concrete piers, they would not be able to support the soil cut above the garage, leaving that structural problem unsolved. After extensive back and forth with the structural engineer (considering concrete piers, steel reinforcement cages for the garage, or garage replacement), we concluded that a three-sided retaining wall—doweled into the existing structure, with helical tie-back soil anchors for supplemental strength—above the garage could support the house and the soil above the garage, and provide a foundation for a front-yard deck—triple duty.
Tim Healey
Secured by helical tie-backs driven to refusal into the strong, rocky soil under the house, the steel-reinforced shotcrete retaining wall had the strength to hold gravel backfill, support the soil under the house footings, and serve as a foundation for a new wood deck to be constructed later in the house rehab project.
While we were sorting this out, an unseasonably early rain caused the soil cut above the garage to collapse, leaving us with only 30 inches of level ground between the house foundation and the steep slope down onto the garage roof. Completing the retaining wall became an emergency, and we had to think fast.
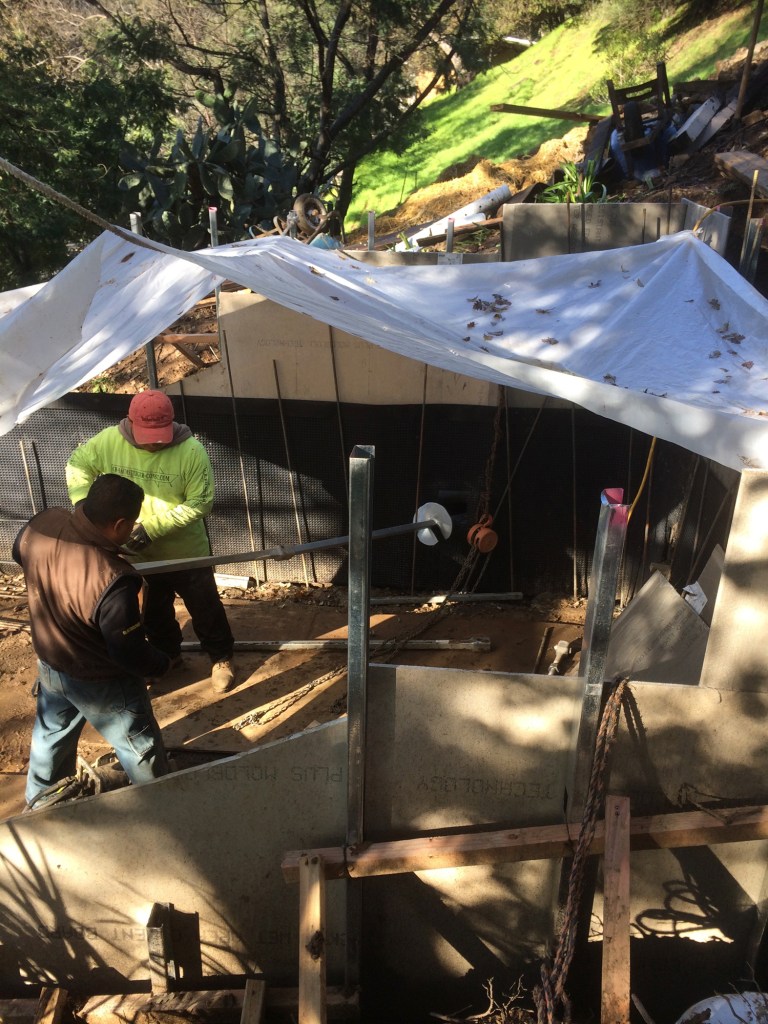
The first decision was about concrete forms. The typical local approach for smaller residential projects is to build the forms with stacked 2-by lumber, using form ties and wedges to hold the sides of the form together. The size of the retaining wall made this option seem labor- and material-intensive—and also risky, because a 7-foot-tall form is prone to deformation and blowouts at the bottom. I considered using commercial plywood forms and snap ties, but that was expensive for a one-off project. So, on a friend’s recommendation, I contacted shotcrete contractor Oscar Duckworth, of Valley Concrete Pumping. Duckworth informed me that we could eliminate most of the formwork in favor of a single-sided surface for him to spray concrete against. With the rains threatening, I opted for this quicker and less costly approach.
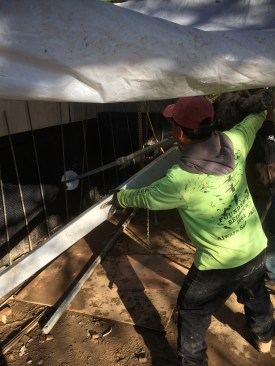
After removing the slumped soil, contractor Spencer Dobrolvony and his crew installed perforated pipe around the base of the future retaining wall in a “drain sock” filled with gravel, sloped toward the street. For the shotcrete forms, following Duckworth’s instructions, they drove light-gauge-steel framing studs about 12 inches into the soil every 16 inches just outside the perimeter of the garage roof where the new walls were to go. Next, they screwed cementitious tile backerboard to the steel studs. Over that, they installed MiraDrain waterproofing and drainage mat. Near the tops of the steel studs (which extended higher than the top of the wall), they installed 2×8 lumber for a top form—level along the back wall and tapered on the sides—holding the 2x8s horizontally on edge with inverted steel shelf brackets screwed into the steel studs and the top of the 2x8s.
Once the shotcrete form was in place, the crew drilled into the top of the concrete garage walls and epoxied reinforcing steel into the holes at 12-inch-on-center spacing. Following the engineer’s design, they constructed a 12-inch-by-12-inch grid of #4 rebar throughout what would be the new wall. This was assembled in typical fashion, except that splices were kept separated by a 1 1/2-inch gap (shotcrete does not flow like liquid concrete, and tight splices can result in voids within the wall at critical points).
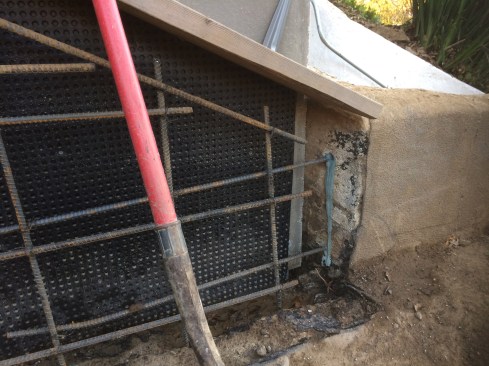
Using a hand-held hydraulic rig, the site crew drove helical screw tie-backs into the earth to a refusal depth of about 12 feet. The tie-backs would restrain a steel-reinforced retaining wall.
Next, the helical screw anchors were installed through holes cut in the tile backerboard. The engineer specified six helical anchors: two at the top and two at the bottom of the rear of the retaining wall, plus one in each of the tapered side walls. These screw anchors (also called “screw piles”) are premanufactured steel “corkscrews” that are twisted into the soil using hydraulic machinery. The exposed ends are threaded, and large washers and nuts are installed after the wall is in place. The piers go through the concrete wall in plastic sleeves, to allow the nut to bear the force and the washer to distribute it over an 8-inch-by-8-inch bearing surface. In our case, the subcontractor used a large hand-held hydraulic rig to insert the piers, which were driven nearly horizontally to refusal at distances ranging from 12 to 14 feet. The soil on the property is rocky, which was helpful for strength, and we were fortunate to get the piers installed at the requisite strength in the course of a few days.
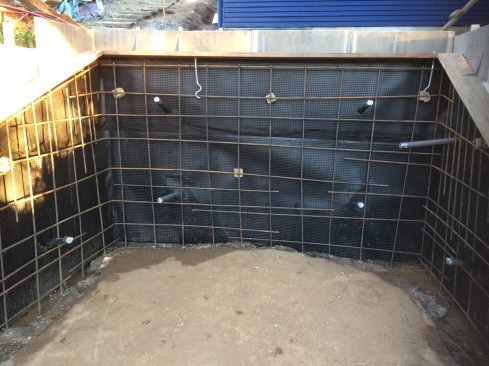
To prepare for the application of shotcrete, the crew assembled a light-gauge-steel one-sided form with a cementitious panel face, applying MiraDrain drain board to the form faces and installing a 12-inch grid of rebar.
The rebar grid was doweled into the existing garage structure.
Installing shotcrete requires a concrete truck and a pump, plus a large air compressor. The concrete pump sends the concrete to a special nozzle, and the air compressor sprays it against the form. The shotcrete installer orders a specific concrete mix for the day’s weather conditions, but it is generally a higher cement ratio than with poured concrete. In our case, it was a “7 1/2 sack mix.”
The application by Duckworth and one employee (with a little help from Dobrolvony and his crew) was fast, smooth, and dramatic. Shotcrete goes on pretty dry, and the vacuum effect of the compressed air causes it to pack fairly tightly to the form. After Duckworth sprayed the shotcrete against a section of the wall, the finisher screeded the wall flat, using the top form and some wires as a guide.
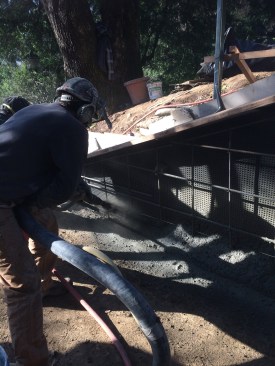
Shotcrete contractor Oscar Duckworth applied concrete to the reinforced form.
Once the material was applied to the specified thickness, a finisher troweled the material smooth, using the 2×8 top edge of the simple formwork as a guide.
With one day’s work, we had a complete retaining wall that reached strength by the next day, allowing us to remove the steel studs and backerboard. We then formed and poured two grade-beam horizontal buttresses—tied into rebar stubs on the back of the retaining wall and resting against the house foundation footing—to help hold the house in place. We did not dowel into the house footing, so that, if the retaining-wall failed, the buttresses would move away from the house foundation and not drag it down the hill. We backfilled the area behind the wall with self-compacting gravel, which also provides good drainage.
The result is a strong, engineered solution; but for us, the big advantages of this approach were its simplicity and speed. Near the end of the retaining-wall project, we were anxiously checking the weather report and racing the rains to get the walls completed. If we hadn’t gotten the work done when we did, we might have experienced catastrophic failure of both the garage and the new house foundation above it. Instead, we’re now satisfied that once the top of the garage roof is resloped and waterproofed, we’ll have a solid solution to a previously worrisome problem.


