Twenty years ago, I built my first frost-protected shallow foundation here in Maine. It cost me less than $500 to install and has performed flawlessly ever since; I still live on it today. Admittedly, this type of foundation is eyed somewhat warily by those unfamiliar with its design principles. But, in fact, as foundations go, it’s quick and cost-effective and provides an excellent base for the super-insulated homes we build.
Water and utility lines are always placed first, eliminating lat…
Compared with a full foundation, a frost-protected slab can reduce construction costs in my market by about $20,000 for a house with 850 square feet on the first floor. Part of that economy comes from the fact that the base prep and formwork for a shallow foundation can be done by a crew of carpenters instead of a foundation contractor. That’s one less sub to manage and pay. Other savings come from reductions in the amount of excavation and concrete needed. Also, there’s no first-floor deck to frame.
The Shallow Concept
A frost-protected shallow foundation (FPSF) relies on rigid foam insulation to protect the foundation from frost. (One-inch-thick extruded polystyrene foam — XPS — has an R-value of 4.5 and an insulating effect equal to 4 feet of soil.) On a typical FPSF, a layer of rigid insulation is placed vertically around the edge of the slab and extended horizontally for a given distance, depending on the severity of the climate. This “wing” insulation traps the heat of the earth under the foundation, ensuring that the soil there doesn’t freeze.
Although FPSFs can be configured as crawlspace foundations, I’ve always favored the slab-on-grade approach, both for the economy of using the slab as the finish floor and for the thermal mass it provides in a passive solar design. Of course, this limits me to relatively flat sites. I’ve built FPSFs on slopes with a 3-foot change in elevation from one corner of the slab to another, but if the site is much steeper than that, the cost of elevating the low side with gravel fill becomes an issue. At that point, a frost wall or full basement probably makes better sense.
(Also keep in mind that not every locality approves FPSFs; regions with high termite infestations are less likely to allow buried foam. Check with your local building department for applicability.)
There’s probably no single best way to design and detail an FPSF. A lot of information is available on the Web to guide the installation of these foundations. I’ve found the NAHB document “Revised Builder’s Guide to Frost Protected Shallow Foundations” the most useful (toolbase.org). This document divides FPSFs into two categories, those for heated buildings and those for unheated buildings, with different details for each.
Heated buildings. The theory behind FPSF design for heated buildings is that the indoor heat will move through the slab to the ground below and prevent it from freezing. In mild climates, only the slab’s vertical edge has to be insulated. In colder regions, wing insulation of a given thickness and width is specified according to the specific regional air freezing index (AFI). You can find AFI data for 3,110 cities in the U.S. and Puerto Rico at the National Climatic Data Center (ncdc.noaa.gov). And IRC Table R403.3(2) categorizes the index for all 50 states by county.
Unheated buildings. Though garages, barns, and other outbuildings may not be heated, they can still be built on FPSFs. At a certain depth, which varies by geographic locale, the ground temperature remains at a constant temperature well above the freezing point all year round. By insulating the surface of the ground beneath the foundation, sufficient heat can be trapped to prevent freezing. That’s the principle behind FPSF design for unheated buildings. Insulation is placed beneath the entire slab and out beyond its edges, again to a distance determined according to the regional AFI. Vertical perimeter insulation is unnecessary. In all but the most severe climates, 2- or 3-inch-thick sub-slab foam is all it takes to protect the foundation.
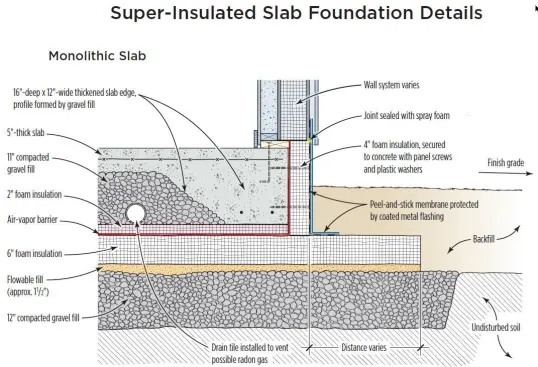
Super-insulated slabs. In coastal Maine, we have an AFI of less than 2,250. Here, according to the NAHB design guide, a slab foundation for a heated building requires neither horizontal rigid insulation underneath nor insulation extending beyond the slab’s perimeter. But losing heat to the ground below is not consistent with the super-insulated approach our company uses. So even though the homes we build are heated, our shallow foundation design resembles that used for unheated buildings, except with much greater insulation levels. When insulating a slab, we aim for R-values as high as 30 or even greater (see “Sub-Slab Insulation: How Much Is Enough?,” below).
Sub-Slab Insulation: How Much Is Enough?
The question of how much R-value to place under a slab is not as simple as it may seem. Because concrete is a good thermal conductor, it makes sense to insulate beneath a slab to the same degree that you would insulate a wall or ceiling. But the difference between ground temperature and air temperature makes a big difference in how much heat is lost by conduction through a slab versus an exterior wall.
At a certain depth, the ground remains at a constant temperature. This varies by region; here in coastal Maine, it’s about 50 degrees F year-round. Air temperature, however, can fluctuate greatly between the seasons. When determining insulation levels, the coldest winter temperature is the operational factor. Here, that temperature is around 0 degrees F. So, on the coldest winter day, when it’s 0 degrees F outside, the sub-slab temperature will still be around 50 degrees F. Therefore, it takes less insulation to keep the slab’s thermal resistance at the same level as a wall or roof assembly’s.
So what is an appropriate quantity of insulation to install below a slab? We asked environmental building consultant Marc Rosenbaum, P.E., to do a heat loss analysis for an 8-inch layer of EPS foam board beneath the slab and 4 inches of foam installed vertically on the foundation’s edge. Rosenbaum used a software program called THERM to model our specific site conditions. (The software was developed by Lawrence Berkeley National Laboratory and is available free online at windows.lbl.gov/software/therm).
Rosenbaum set up a case with a constant deep ground temperature of 50 degrees F occurring 10 feet below the slab insulation. Soil conductivities can vary widely; he picked a soil conductivity that implied some dampness in the soil, making it relatively conductive. He set the outdoor temperature at 0 degrees F and the indoor temperature at 70 degrees F. The model allowed him to look at the entire slab surface and have THERM calculate its effective U-value (the inverse of R-value) to the exterior temperature.
In this case, the model indicated an equivalent insulation value of R-78. (Rosenbaum notes that values vary somewhat throughout the year because the soil has lots of mass and its heat flow doesn’t change nearly as fast as the air temperature.) The outcome is analogous to saying that when it’s 0 degrees F outdoors, the slab will lose heat as if it were insulated to R-78 — about twice the claimed R-value for the foam itself.
Which Foam is Best?
Unlike a conventional foundation that bears directly on the ground, an FPSF foundation bears on a platform of foam. Our structural engineer specifies the appropriate foam density to support the weight of the building. Typically, for a two-story wood-framed house or barn, we’ve used foam with a density of 2.4 pounds per cubic foot and a compressive strength of 15 psi.
Depending on the energy goals of the project, we’ve placed between 2 inches and 6 inches of XPS or expanded polystyrene (EPS) under slabs, giving us sub-slab insulation values between R-10 and R-30. XPS is generally rated at R-5 per inch and EPS at R-4.5. The traditional view has been that XPS is best for burial because it absorbs less moisture over time. However, a more recent 15-year study indicates that EPS may actually absorb less water and retain a higher R-value over time than XPS.
One important difference between the two types is that EPS is more environmentally friendly. Both foams are produced with blowing agents, but EPS is expanded using a relatively benign hydrocarbon such as pentane or butane, while XPS production uses HCFCs, which have implications for ozone depletion and global warming.
Available material thickness is another consideration. Although some sources imply that it’s okay to place multiple layers of sub-slab foam, our structural engineer advises us to use a single layer to avoid the chance of sideways slippage between sheets, or of voids occurring between them that could cause eventual settling. We can readily get 6-inch-thick EPS but have had no luck finding XPS in sheets thicker than 2 inches. For these reasons, we typically use 4-foot-by-16-foot sheets of 6-inch-thick Geofoam EPS (branchriver.com), which has a nominal R-value of 4.6 per inch, or R-27.6 overall. These sheets can be easily handled by two workers.
Site Prep
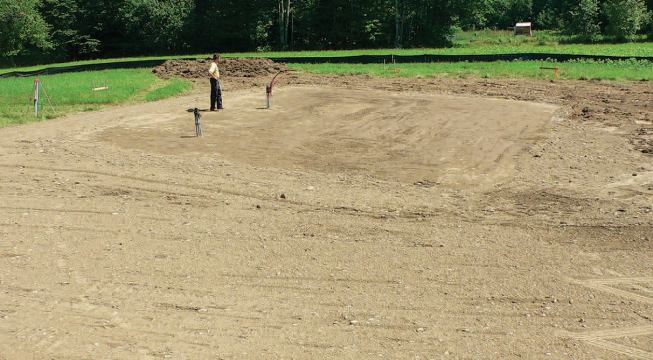
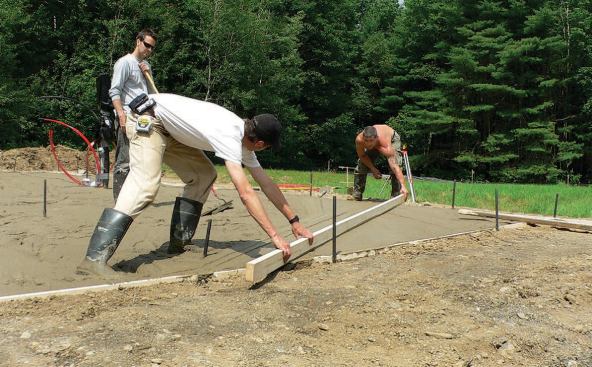
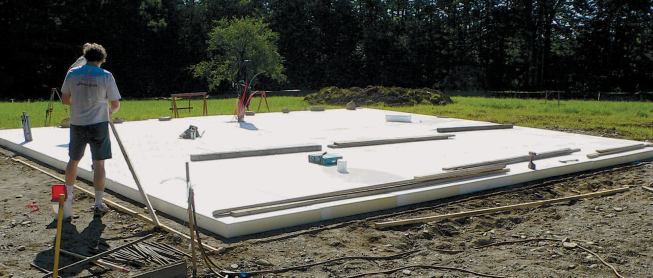
We start by removing the topsoil from the building site and bringing in water, electric, and sewer lines as needed. Around these, we place good-quality bank-run gravel, compacted in 6-inch lifts, to a minimum depth of 12 inches. The gravel layer extends on all sides beyond the footprint of the building by at least 2 feet. To prevent voids underneath the foam, which might cause it to deflect, we take extra care to level the compacted gravel. Alternatively, we’ve used a 1 1/2-inch layer of flowable fill — a thin, aerated concrete mix with sand aggregate — to true the surface. We form the area with leveled 2x3s, then screed the fill flat. This is a less forgiving method than moving gravel around, but it produces excellent, void-free results.
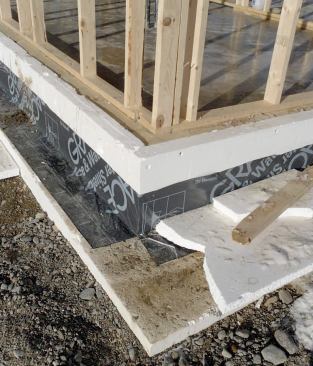
Installing foam. We then lay the rigid foam over the leveled base, extending the sheets about 2 feet beyond the foundation footprint. The sheets are substantial enough to stay put until we’re ready to place the concrete forms for either a monolithic slab or a perimeter grade-beam foundation.
Forming a Monolithic Slab
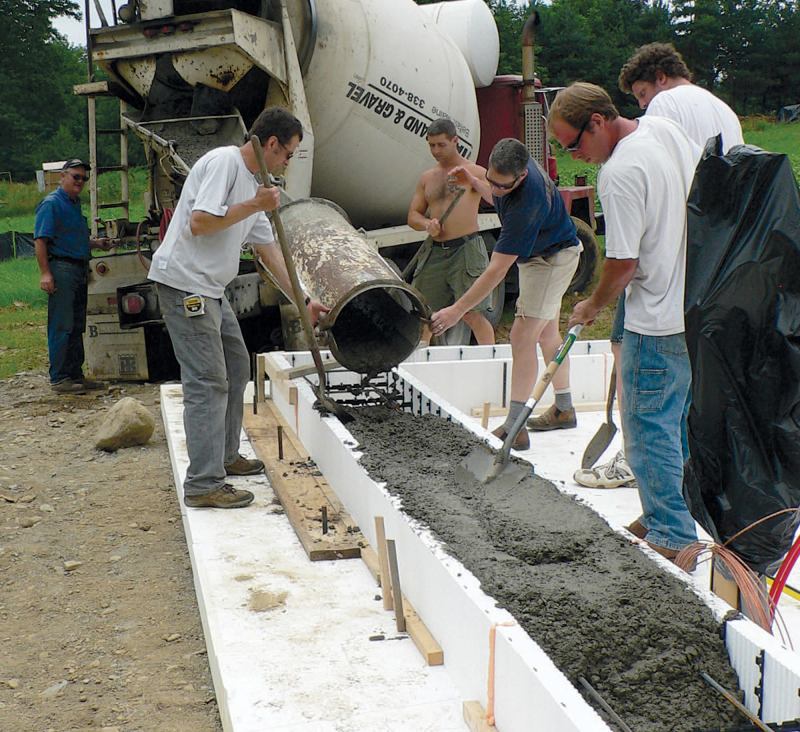
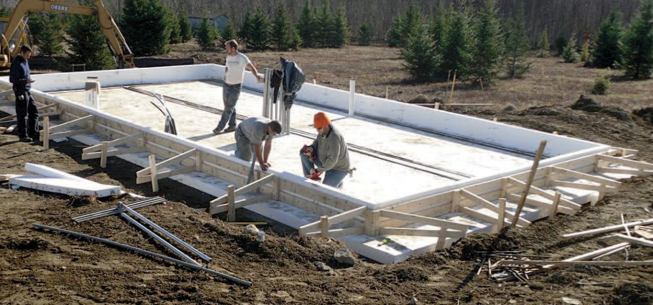
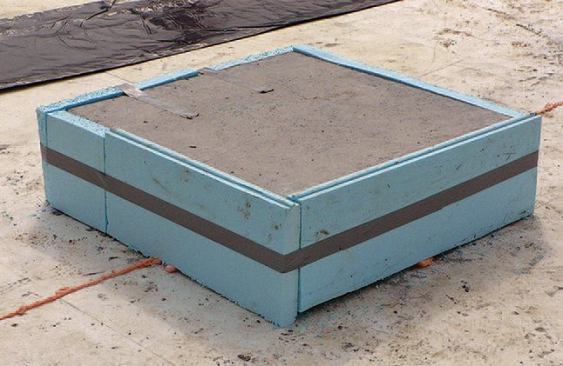
The more conventional of our foundation designs is the monolithic slab, which has an edge that’s 16 inches thick and at least 12 inches wide at the bottom. Working on top of the foam base, we form the slab with stacked 2×6 framing lumber connected with 2×4 gussets. We line the inside face of the forms with 4 inches of foam. To make sure the foam will be secured to the concrete, we push long panel screws with plastic washers through from the back.
We stake and brace the forms at no more than 6 feet on-center. The closer, the better; wet concrete is heavy stuff and the last thing we want is a blowout. To prevent the forms from moving laterally at the bottom, we drive steel stakes along their edges down through the foam base into the compacted gravel.
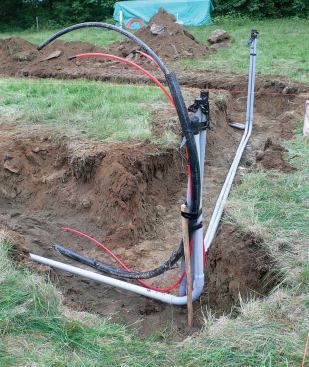
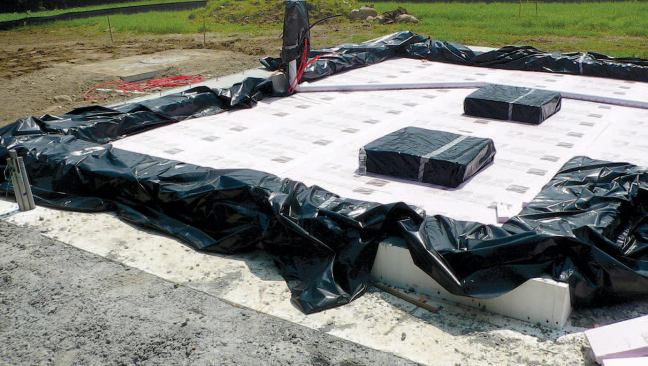
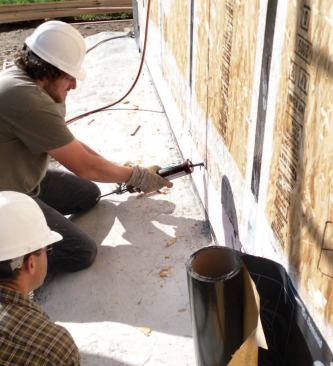
Air-vapor barrier. On top of the foam, we place a continuous polyethylene vapor barrier, running it up the sides of the forms and bonding it to the foam with acoustical sealant. This prevents air and water vapor from rising through the seams between the foam panels. You can actually get quite a lot of air movement through the soil beneath a foundation. Air can find its way into the living space around utility and plumbing stubs, in some cases bringing radon gas with it.
We seal all the penetrations with tape, caulk, and additional pieces of poly. As an added precaution against radon, we also install a length of perforated PVC pipe on top of the foam, with an ell that brings it up through the slab. Then, if testing later reveals an unhealthy level of radon in the home, we’ll vent the PVC through the roof to mitigate.
To make up the difference between the thickened edge and the 5-inch-thick slab, we place compacted bank gravel inside the forms (see illustration). Detailing the gravel to form the inner wall of the thickened edge is a pain; the slope has to be shallow enough to permit compacting, but if you make it too shallow, you have to make up the difference with a lot more concrete.
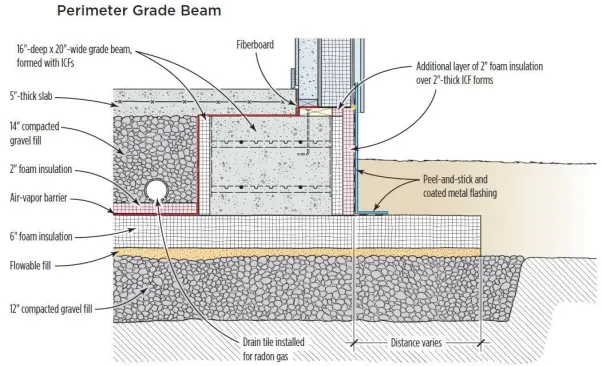
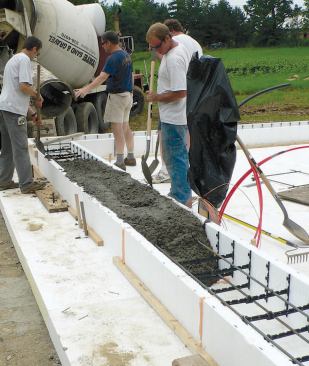
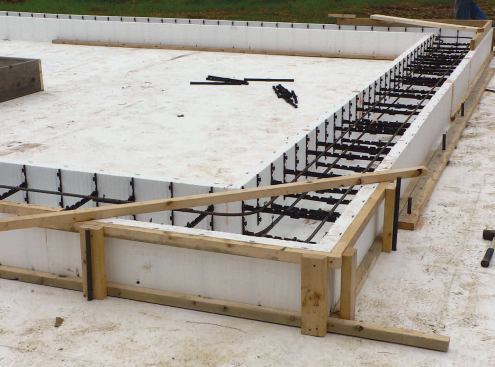
Forming a Perimeter Grade Beam With ICFs
I like monolithic slabs for their structural integrity and because they’re easy to place — one pour and you’re done. But forming and bracing the thickened edge can be time-consuming. So recently we’ve gone to a two-phase process using insulated concrete forms (ICFs) to create a perimeter grade beam and then a separate pour for the slab. While ICFs are typically used to form 8- to 10-inch-thick walls, our design requires a 12-inch-deep, 20-inch-wide grade-beam footing. We found an ICF manufacturer, Arxx Corp. (arxxbuild.com), that offers form ties to accommodate thicker wall designs along with a variety of ICF sizes and configurations to suit our needs.
The ICF grade beam provides an immediate platform for framing.
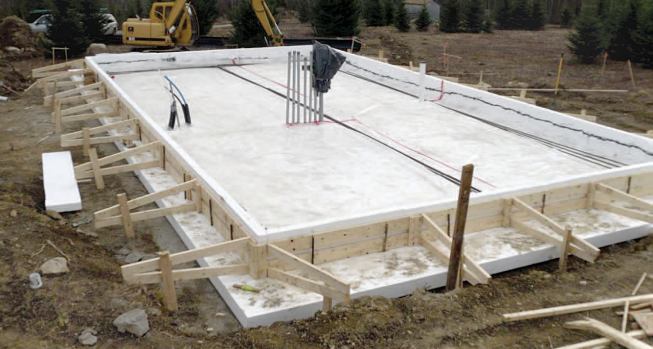
To keep the forms straight, we run lengths of framing lumber along the bottoms, secured through the foam base into the gravel layer beneath with steel stakes. Corners call for extra bracing. To support interior column point-loads, we form 3-foot-by-3-foot pads using 2×12 lumber. The pads get three rows of #4 rebar 3 inches up from the bottom and three more 3 inches down from the top.
As soon as the footing concrete hardens, we install the vapor barrier and radon vent. In some cases, we’ll add another layer of 2-inch foam board over the vapor barrier, increasing the nominal R-value by 10. We fill the slab area to the top of the footings with compacted gravel, and we’re ready to frame the building. Once we’re closed in, the plumber roughs in the waste and supply lines, and we place the rebar or welded wire mesh to get ready for the concrete. Up to this point, the work has been done by my carpenters and our excavation sub, but we turn concrete placement and slab finishing over to a concrete sub.
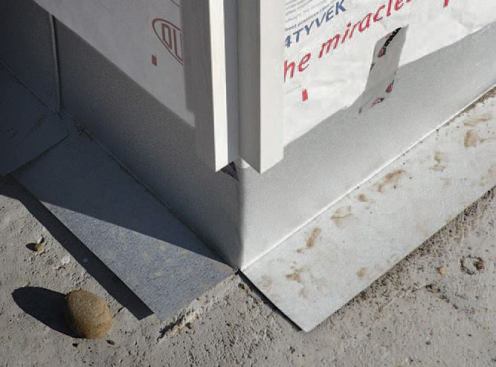
Overall, the two-step grade-beam method actually takes less time and labor than the monolithic slab approach. While I can’t make a completely accurate cost comparison, my sense is that the labor savings offset the added cost of the ICFs. The method offers another significant advantage, too: Pouring the slab inside a dried-in building minimizes the adverse effects of weather and temperature. Should a future job find us pouring the slab after winter sets in, it’ll be relatively easy to heat the building above freezing until the slab is poured and has cured. Before backfilling, we add 2 inches of foam to the outside edge of the foundation, over the ICF forms, which are only 2 inches thick. Here in Maine, carpenter ants find easy nesting in buried foam, so we do what we can to discourage them. We fold ice and water membrane into the corner between horizontal and vertical foam around the entire foundation. Later, after we frame and sheathe the walls, we cover the sill joint with another piece of membrane that overlaps the foundation strip. By code, a minimum 6 inches of vertical foundation edge must remain exposed between the wood line and the final grade. We cover it with Galvalume sheet metal, a neat and durable solution that’s easy to repair if it becomes necessary.
The advantages of an FPSF are considerable: lower cost, faster installation, less disturbance to the site, fewer subcontractors to schedule, and simpler detailing and finishing. Its ready applicability to super-insulated passive-solar design only adds to the list. But because it’s an unfamiliar foundation, it’s critical to resolve all structural questions and to address the clients’ concerns about durability and aesthetics. We find that once these issues are covered, however, a frost-protected shallow foundation is a nearly ideal base.


