
I’ve been building and remodeling homes since 2000, first as an employee, then breaking out on my own in 2010. A couple of years ago, I bought a used telehandler from a local excavator for $30,000 and so far, it’s been a wise investment. Having grown weary of moving stacks of heavy lumber and sheet goods around jobsites (and up and down ladders), I decided to take the plunge and buy this invaluable piece of equipment.
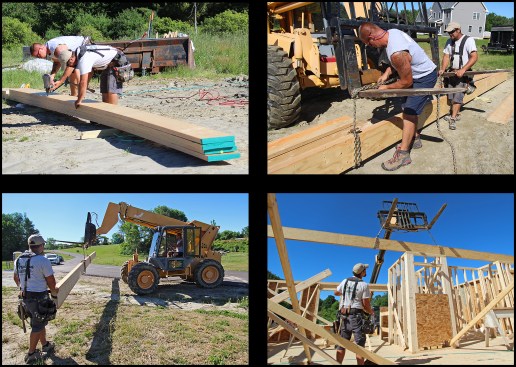
I currently run a two-man home-building company with my colleague, Aaron Guinness, but I used to employ three- and four-man crews. I needed the extra manpower to help lift walls and lug material around. But now with the telehandler, we can build homes faster and more safely than we did with those larger crews. For example, while framing a new two-story home recently, we had to install a 32-foot-long built-up LVL beam. We were able to build the beam safely on the ground, rig it up with chains, and drop it in place without breaking our backs.
Placing the Beam
As part of the purchase of a floor framing package, my lumberyard offers free engineering (I give the yard my plans and it sends me drawings in return, showing where to place the wood I-joists and any needed LVL beams). In this case, the engineering plans called for a built-up, four-ply LVL beam — needed to support second-floor framing over a large open-plan first-floor living room — to be supported by a partition wall at one end and by a double-LVL support beam at the other. The floor system was flush-framed and built with 12-inch-deep wood I-joists and LVLs. To accommodate a stair opening, two of the LVLs needed to be 6 feet shorter than the two 32-foot-long ones. So, we decided to nail together the two 32-footers on the ground and install the joined pair with the telehandler. Afterwards, we lifted the two 26-foot-long ones and nailed them in place.
We began by field-measuring to verify both the main-beam and the support-beam locations, then cut the two longer LVLs to length. We then applied a continuous bead of construction adhesive to one of the LVLs and sandwiched the two together. We nailed off the beam with 16d nails in a robust nailing pattern, keeping the pair aligned by toenailing as needed. While still on the ground, we cut the main beam’s two shorter members and the support-beam LVLs to length.
The four-ply LVL beam was partially built on the ground. Here, the two longer, 32-foot lengths were glued and nailed together (top left), then chained to the telehandler’s forks, ready to be moved (top right). With the beam centered and balanced, it was lifted and slowly driven over to the home (bottom left). Loads can bounce and shift driving over the rough terrain of a jobsite, so it’s best to maintain a safe speed; at most, no more than a fast pace walk. The beam is guided into place via hand signals (bottom right).
Prior to tele-lifting the partial main beam into place, we installed the first of the doubled-up 12-foot-long support beams by hand from ladders (marking where the main beam would butt into it). Then, we attached the 32-footer to the forks of the telehandler with a pair of heavy-duty chains (double wrapping the beam and forks). I slowly brought the beam over to the front of the house and lifted it up and over the first-floor wall. Aaron hand-signaled me as we guided the beam roughly into place.
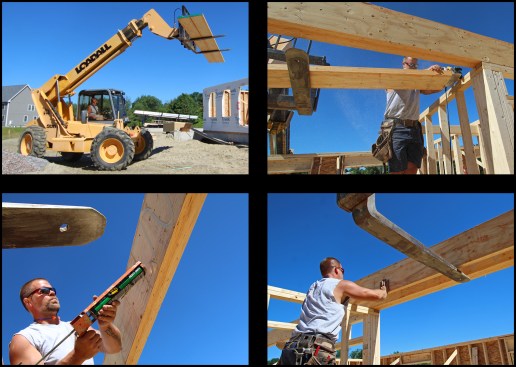
With 32-foot-long LVLs in place, the pre-cut 26-foot-long ones were loaded (centered and balanced) and slowly driven into place with the forks tilted upwards to prevent the LVLs from possibly sliding off the front (top left). Working off to the sides of the forks, the telehandler was used as a temporary work platform for laminating the third and fourth layers. Here, the author trimmed the LVLs to their final length (top right), then applied heavy-duty subfloor adhesive (bottom left). The LVL was tilted up into place (bottom right), then nailed off with 16d nails in a robust nailing pattern.
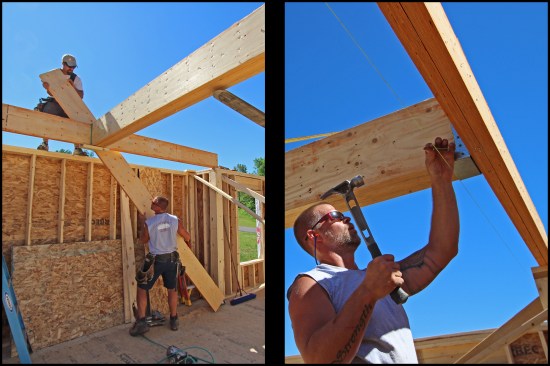
To help hold the main beam’s butted end in place, we nailed a temporary 2×6 block to the bottom of the support beam to serve as a seat. I further tweaked the main beam’s position with the telehandler’s articulating fork setup (tilting it side to side) to line it up with the location mark and rested it into its final position. Aaron end-nailed the butted end while I toenailed the beam to the top plate.
After they laminated the main beam’s four layers, the final step was to install the second 12-foot-long LVL of the support beam (above left) and a beefy beam hanger where the main beam butted into it (above right).
Next, I picked up the main beam’s two remaining 26-foot-long LVLs with the telehandler and lifted them in close proximity to the installed 32-footers (laid across the forks like a work table). On the ground, we had cut these shorter LVLs a little long so we could precisely mark and cut them in place. After we applied construction adhesive on the side of the installed beam, we flipped the third LVL into place and nailed it off. The fourth LVL was installed the same way. Aaron applied construction adhesive to the first support beam, then we lifted the second support LVL into place and nailed it off. Finally, I installed the beefy beam hanger, while Aaron started marking off the I-joist spacing for the floor system.
What once would have taken a three-man crew to complete in four hours (build and install a large beam), Aaron and I were able to do safely in just under two hours with the telehandler.
Lifting Safely
In Vermont, where I work, “VOSHA” (the Vermont Occupational Safety and Health Administration) follows federal OSHA Standard 29 CFR 1910.178, which requires all telehandler operators to be initially trained, then retrained every three years (or sooner if a deficiency is identified in their operating behavior). Training is typically done through third-party consultants or (at larger building companies) by “in-house” trainers. It is the employer’s responsibility to do a performance evaluation of the employee’s knowledge of the machine, as outlined in 1910.178, and to maintain documentation of the training.
I’m fortunate to own my machine and I’m familiar with how it performs. Operating it safely does take skill and a degree of finesse. Loads can bounce and shift while you are driving over the rough terrain of a jobsite and, if you’re not vigilant, projected loads from the machine’s telescoping arm can quickly become too heavy, causing the telehandler to tip forward. If you rent a telehandler, larger rental companies may offer some level of operational training, though smaller equipment rental companies typically do not (for fear of liability issues). If you rent different machines over time, be aware their performance and capabilities vary from manufacturer to manufacturer; one brand (or size) of machine can have a different stability factor from another.
For more information on training and operational requirements, a good place to start is to review OSHA Standard 29 CFR 1910.178 (in particular, 1910.178(m) “truck operations”). Subsection “M” gives a good point-by-point explanation of proper telehandler operating procedures.
Photos by Tim Healey


