Continuous insulation—typically provided by rigid foam board applied to the exterior—increases the thermal performance of a framed wall in two ways. First, rigid foam provides more insulating value per inch than cavity-fill insulations, so it’s the easiest and most cost-effective way to add R-value to a wall with the least increase in wall thickness. Second, continuous insulation (applied over the structural sheathing or directly to the exterior face of wall framing) eliminates much of the thermal bridging—the conduction of heat through studs and headers—that robs most framed walls of energy.
There are three types of foam that can be used as continuous insulation on the exterior of the building.
Faced polyisocyanurate (faced polyiso). At about R-7 per inch, this foil-faced material is hard to beat. Polyiso with no facing is super water-absorbent, but the foil-faced product is very water-resistant, so panels absorb less than 1% by volume. Tape sticks well to the foil facing, creating a lasting bond that will keep water from being absorbed though panel edges. Paper-faced polyiso can also be used. The paper facing sheds water but needs lots of air over it to promote drying; a rainscreen is imperative. The paper-faced product has the advantage of being more permeable than foil and might allow the wall to dry to the outside. With the foil-faced product, the wall cavity can only dry to the inside.
Extruded polystyrene (XPS) skins over during the curing process, making its unfaced surface non-water-absorbent (0.3% by volume). At R-5 per inch, XPS panels are a good value for exterior insulation, but if the budget allows, faced polyiso would be better, owing to its higher R-value.
Faced expanded polystyrene (faced EPS) is the least expensive and has the lowest R-value (about R-4). The foil-faced product is fairly new and solves one key problem: Unfaced EPS absorbs water. While sold in varying densities and configurations, even at the highest density the unfaced material is twice as water absorbent as foil-faced polyiso. A case can be made for installing a weather-resistant barrier (WRB) over unfaced EPS to protect it from water, but this requires some way to secure the WRB.
Assembly design
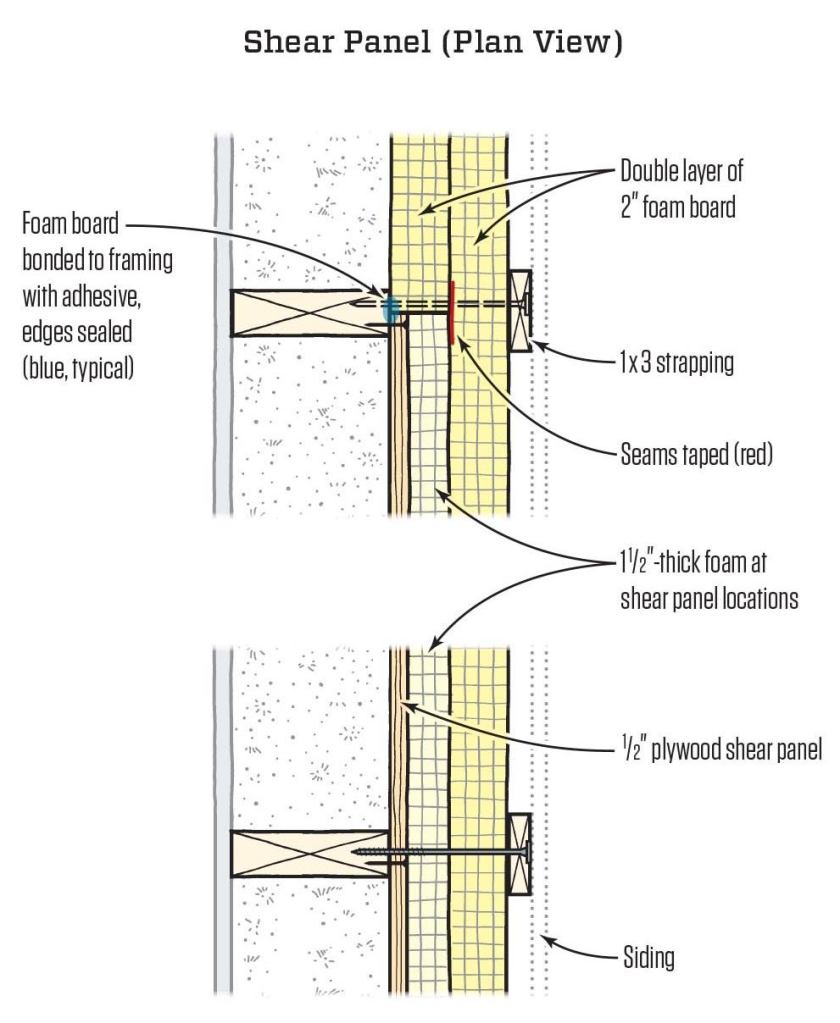
Structure. Foam sheathing doesn’t provide racking resistance. Diagonal bracing, continuous structural sheathing, or intermittent shear panels are imperative beneath rigid foam (see “Bracing Walls for Wind,” July/13). When using intermittent shear panels, the insulation thickness will need to be varied to accommodate the shear panel thickness (Shear Panel).
Insect protection. Carpenter ants can’t digest foam, but they readily burrow through it and would happily set up home in foam panels if you give them the chance. Panel exposed edges need to be sealed off. This happens at most field seams, except at the bottom, where a galvanized metal flashing must be installed (Base Flashing).
An effective WRB. Foam board will leak at the joints. Even foam panels with shiplap joints can’t be relied on to keep out wind-driven rain. Any continuous exterior insulation detail must include a WRB, either under or over the foam. Applying the WRB under the foam makes it easier to fasten the WRB and integrate flashings. If you apply a WRB over foam, install wood sheathing first (see cover photo for this issue). Theoretically, you can secure a WRB against the foam with rainscreen battens, but it’s a bear of a job to get the rainscreen to lie flat without lots of hands on the job.
Two layers. To help reduce water intrusion, install foam panels in two layers. The first layer goes in vertically, with the panel edges sealed to the framing with an adhesive, such as OSI’s GreenSeries adhesive (osipro.com).The second layer goes in horizontally, with the field joints between layers staggered and corner edges woven together (Corner). This way, any water that gets past the first layer will hit a solid panel rather than another seam.
With foil-faced foam, tape all seams and terminations for added protection. Taping XPS or unfaced EPS is not recommended. Foam panels will shrink slightly and will expand and contract with changes in temperature. This movement destroys the tape bond on unfaced material. The bond to foil, however, seems to last. (Dow Weathermate tape, building.dow.com, seems a popular choice for taping foam because it sticks even to wet surfaces.)
Rainscreen. Siding over foam should be placed over a rainscreen that will allow free drainage and promote drying behind the siding. On thick (more than 2-inch) applications, wood battens will provide a nail base for the siding.
Run vertical battens all the way to the base of the foam to allow for drainage. Do not terminate the battens on top of a skirt board; instead, fasten the skirt board over the battens to ensure drainage behind it. Block the base of the battens with a matrix ridge-vent material, such as Cobra Exhaust Vent (gaf.com), and insect screen. The ridge-vent material pushes the screen against the back of the siding; without it, the screen can sag between battens and allow wasps to move in.
Soffits. At the top of walls, the insulation and siding layers butt against the soffit (Soffit Details). Install insulation baffles to prevent ventilation air from blowing through the attic insulation. The best option is to notch the exterior insulation around truss or rafter tails, so it provides the required wind block between rafter bays. This will allow you to use a conventional vent chute, which is far faster to install.
Drying potential. Any wall covered with foil-faced exterior insulation, with more than an inch of XPS (without structural sheathing), or with any foam over plywood or OSB, is not going to dry well to the exterior. These walls should be allowed to dry to the inside: Avoid interior poly vapor retarders and oil-based wall paints. If code requires an interior vapor retarder, use paper-faced batts or another “smart” membrane.


