As a custom home builder in Alaska, I’ve seen how poorly conventional wall assemblies perform in extremely cold weather. In Fairbanks, Alaska, where I work, a “typical” wood-frame wall might consist of 2×6 framing with R-19 batt insulation, OSB sheathing, and housewrap on the outside, and a 6-mil poly vapor retarder on the inside.
There are two problems with this construction. The first is that the wall framing members act as heat conductors between the warm interior and the cold outside. There’s nothing to stop the transfer of heat. But the bigger issue is air leakage. It’s nearly impossible to do a perfect job sealing all the penetrations in the vapor retarder, and just as hard to make the housewrap airtight. On cold winter days, warm, moist indoor air is driven into the wall cavities, where it hits the inside of the cold sheathing, condenses, and freezes. When the weather warms up, the moisture is trapped between the vapor retarder and the relatively impermeable sheathing, where it degrades the insulation and causes mold and even rot.
CCHRC Research
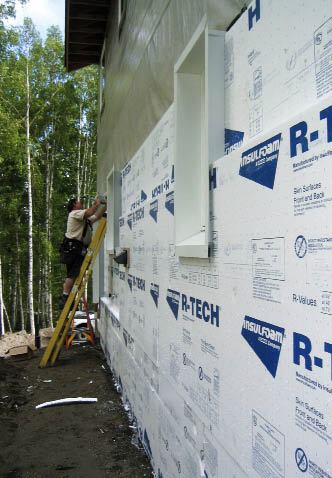
Moisture infiltration into wall cavities is a concern anywhere, but especially in climates like Alaska’s, where extreme winter temperatures and a short drying season exacerbate the problem. To address the shortcomings of standard frame construction, my company has adopted an insulation and air-sealing method developed by builders and researchers working with the Cold Climate Housing Research Center (CCHRC; cchrc.org) here in Fairbanks. Nicknamed the REMOTE Wall System (for Residential Exterior Membrane Outside Insulation Technique), it involves installing a barrier membrane on top of the structural sheathing, followed by several inches of rigid foam insulation. The membrane provides an air seal, while the thick insulation keeps the sheathing and framing above the dewpoint temperature and so prevents condensation from occurring in the wall.
The rigid foam can be supplemented by installing a lesser amount of fiberglass batt insulation in the frame wall. The goal is to increase the wall’s total R-value from the inside, but without allowing the sheathing to cool to the dewpoint. It’s a balancing act: You have to put enough insulation on the outside to keep the sheathing membrane warm, but not too much on the inside else you’ll isolate the sheathing and framing members from indoor heat. This is critical, because besides providing an air barrier, the membrane — either by itself or in combination with the sheathing and exterior insulation — acts as a vapor retarder. So there’s no doubt that in a REMOTE wall, interior moisture vapor will be stopped at the sheathing plane.
Concerns With Exterior Membranes
Mindful of the dangers of a “wrong-side vapor barrier,” the CCHRC has been monitoring REMOTE wall projects around Alaska, in both dry northern areas and the humid coastal region. Using HOBO data loggers (available from onsetcomp.com) that record temperature and humidity over time, the research has confirmed a rule of thumb long used by builders wishing to place vapor retarders inside of walls: It’s generally safe to put approximately one-third of the total R-value to the inside of the vapor barrier. This holds true even for an extremely cold climate like that of Fairbanks, which has 14,000 heating degree days. (Keep in mind this is just a rule of thumb; the ratio may change somewhat depending on project specifics.)
Data loggers on some REMOTE projects have indicated short periods when humidity levels in certain wall cavities rose. The good news is that the cavities also dry out again as soon as conditions are right, because there’s no poly vapor retarder on the inside face of the studs. So if condensation does occur in the wall — say, in extreme cold weather — it can dry to the interior.
I’ve used the REMOTE method on 14 homes to date, with excellent results. I learned years ago that to create a durable, energy-efficient home in a cold climate, you have to meet four goals: adequate insulation, airtightness, moisture control, and good indoor air quality. The REMOTE wall method allows me to meet all of these.
Insulation
I generally use R-Tech IV EPS (expanded polystyrene) on the exterior. It’s made by Insulfoam (800/248-5995, insulfoam.com) and has an R-value of 4.8 per inch at 40°F. (The R-value actually increases as temperatures drop.) I typically install 6 inches — two layers of 3-inch. R-Tech has a polyethylene facing that helps it shed water, though the edges are unfaced. This has led to some concern that moisture might get into the foam board at joints and be unable to get out. But CCHRC tests in the rainy southeast of Alaska have shown that R-Tech performs well in REMOTE walls and that moisture entrapment is not a problem.
Some builders have used XPS (extruded polystyrene) foam, which has a slightly higher R-value and has also performed well on monitored projects.
Note that in cold Fairbanks, I can carry the EPS below grade with no fear of insect damage. Although some foams contain a borate additive intended to repel insects, the treatment may leach out over time in wet soils. In situations where insect damage poses a threat, holding the exposed foam above grade and using a termite shield is a safer option.
On the inside, I supplement the exterior foam with fiberglass batts.
Airtightness and Blower-Door Test
Covering the house with rigid foam board creates a potentially tight structure, but it’s the barrier membrane applied to the sheathing that does most of the work.
The earliest REMOTE walls used peel-and-stick membranes; this produced an incredibly airtight, waterproof shell but it was expensive. So most builders switched to less expensive materials — 6-mil poly or, in very wet zones, vapor-permeable drainage wraps such as Tyvek StuccoWrap or DrainWrap. Poly works fine in Fairbanks, which is fairly dry; in rainy southern Alaska, the Tyvek products are the usual substitute for peel-and-stick. The reason is that rainwater might travel through a nail hole and get trapped behind poly, whereas using a housewrap will allow for evaporation to the outside. (StuccoWrap or something similar is also used on REMOTE houses that receive an EIFS cladding, per the EIFS manufacturer’s specifications.)
On the inside, the 6-mil poly continues across the ceiling below the attic. To avoid stack-effect exfiltration, we refuse to install recessed light fixtures in the ceiling poly and even avoid putting sealed electrical boxes there, pushing customers to put upper-floor lighting fixtures in the walls instead. On most of our jobs the plumbing stack is the only thing that penetrates the lid. Access to the attic is through a gable wall, preferably above an attached garage.
Performance test. Installing the barrier membrane and exterior foam doesn’t in itself guarantee that the structure is airtight. The only way to do that is to do a blower-door test. This is a critically important step in achieving a tight shell, and you have to do it when you can still access the leaks. If you hold off doing the blower-door test until the insulation and drywall are installed, it’ll be too late.
We wait until the electrical, plumbing, and mechanical subs have done their rough-ins, then hang the drywall over the ceiling air barrier. The blower door depressurizes the interior and shows us where the leaks are. There’s no insulation in the stud bays at this point, so it’s easy to seal wall leaks from the inside, using spray foam and acoustical sealant. The attic has not yet been insulated, so we can plug those leaks working from above. When the house is finished, an independent energy rater performs a second blower-door test as part of an energy audit.
Our goal is an airtightness of 0.6 air changes per hour at a pressure of 50 pascals (ACH50) — the same standard required for a Passive House. We’ve achieved this with the 6-mil poly barrier and have gotten down to 0.3 ACH50 with a peel-and-stick membrane. The best we’ve done with StuccoWrap is 0.8 ACH50.


