Not every kitchen remodel requires a pull-and-replace approach, especially if the existing cabinets are in good shape. Where that’s the case, a nice-looking tile job can be a cost-effective way to dress things up. In the project described here, I transformed the entire look of a kitchen in less than two days by covering a tired plastic laminate countertop and a wallpapered backsplash with ceramic tile.
Because the homeowners had just installed new vinyl flooring the week before, my first move was to protect the floor with a layer of cardboard. I also set the stove and sink aside, out of harm’s way.
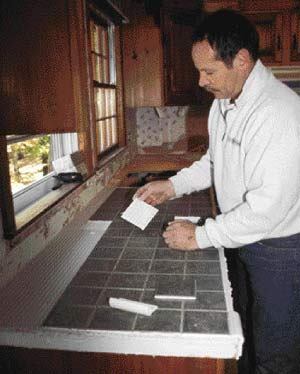
Preparing the Countertop
It’s possible to tile directly over well-bonded old laminate, but I prefer to make my countertops bulletproof by adhering an uncoupling membrane over the substrate. That does take some added effort, but it’s still a lot easier than ripping out the old counter and building a new plywood substrate.
Applying the thinset bed. After pulling off the existing laminate self-edging, I roughened the smooth surface of the laminate with a grinder to allow the thinset cement to bond to it effectively (see Figure 1).
Figure 1.The existing laminate countertop is roughed up with an electric grinder to provide a good bonding surface (top). There’s no need to leave grind marks on every square inch, but the entire surface should be liberally scratched up (center). A uniform coating of latex-modified thinset cement is then spread and combed out with a V-notch trowel (bottom).
As recommended by the manufacturer of the uncoupling membrane, I then used a 3/16-inch V-notch trowel to lay down a uniform layer of bonding mortar. The D-50 Flexible Thinset Mortar I prefer (Durabond, available from Bostik Findley, 888/592-8558, www.bostik findley-us.com) is latex modified and formulated to adhere to many types of surfaces. But because the quality of the thinset bond depends on a mechanical interlock between the mortar and the surface of the substrate, I prefer not to set tile in thinset applied directly to laminate. Local variations in texture mean that the bond strength is likely to vary from one tile to the next.
Roll out the membrane. An uncoupling membrane does away with that uncertainty. Ditra mat, the material I use for this application (Schluter, 800/472-4588, www.schluter.com), is a waterproof polyethylene sheet that has a fleece-like material on one side and a grid of undercut square cavities on the other (Figure 2).
Figure 2.Precut sheets of textured polyethylene membrane go on over the cement (top) and are bedded firmly in place with a wood float (center). An edge view of the proprietary membrane and dry-fitted pieces of tile and nosing reveals the undercut profile of the square depressions, which makes for a solid mechanical bond between the membrane and the layer of cement that will later accept the tile (bottom).
The fleece underside forms a reliable, uninterrupted bond with the underlying laminate, while its exposed face presents a waffle-like surface designed to lock onto the hardened thinset mortar that holds the tiles.
Ditra’s primary application is under floor tile, where it prevents transfer of stresses from substrate movement and diffuses vapor pressure by way of interconnected, open air channels in its underside. Tiles bonded to the mat perform as a cohesive unit, independent of the substrate. Ditra can also be used in place of backerboard when a tile counter is applied over particleboard or plywood, in which case it eliminates a major cause of countertop failure by preventing moisture from penetrating to the substrate. The mat is about 1/8 inch thick, comes in a roll 1 meter (39 inches) wide, and costs about $3 per square foot installed. The countertop is ready for tiling as soon as the mat has been rolled out and bedded firmly into the base layer of thinset with a wood float.


