As a finish carpenter, I would put stairways and curved millwork near the top of my list of most demanding tasks. Combine the two and you’ve got a real challenge: curved handrails. A millwork shop can glue up the curved rail stock, then shape the profile. But for those of us doing the job on site, the most practical method is to laminate the piece from bending rail.
Rail Material
The staircase shown here included a curved balcony and several sections of curved handrail. I used rail parts from Johnson Postman (800/562-3446, johnsonpostman.com), a local manufacturer and distributor of stair parts and millwork. Most of the company’s handrails are 2 1/4 inches wide, but for this project we went with a beefier profile — #6210, which is 2 5/8 inches across. The bending rail consists of nine interlocking strips of wood that, when glued together, have the same profile as the solid rail. Because you can’t clamp directly against the sides, the material comes with a pair of bending molds — negative-profile pieces that protect the molded edges while providing a flat clamping surface.
Getting Set Up
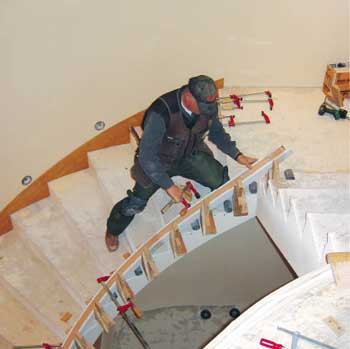
The simplest way to form a spiral rail is to clamp it along the edge of the staircase itself. When I arrived on site, the rough stairs were in place and drywall had been installed on the outside stringer.
I began by locating the centerline of the rail, which depends on the baluster location. I normally line up balusters with the outside face of the skirtboard, or, as in this case, the 3/4-inch-thick decorative brackets. We planned to use 1 3/4-inch balusters, which put the centerline 1/8 inch in from the face of the drywall.
Bending guide. In order to have something to clamp to, I screwed L-shaped bending guides to each tread. I made the guides from 1 1/8-inch plywood with 3/4-inch OSB gussets; they needed to be rugged because they hung over the edge of the staircase and would be subject to considerable stress. We used similar guides to bend the balcony rail, but since we were bending it on the flat there was no need to bend it around the balcony framing. Instead, we scribed the arc on the floor of a nearby room, screwed the guides to the line, and laminated the rail there.
Accounting for springback. To accommodate the springback that occurs when curved laminations are removed from the form, I positioned the guides to overbend the curve slightly. I did this by installing the first guide on layout halfway up the stairs. On each successive step — up and down — I pushed the guide 1/16 inch further out from the edge of the stair, for a total overbend of about 3/8 inch at each end. The rail sprang back a little more than expected, but not enough to cause a problem (see “Calculating Springback,” page 5).
When you don’t use continuous backing, as in this case, a bent lamination will tend to flatten out between the last two clamping points. To prevent fitting problems, I ran the rail long and provided an extra bending guide at the top and bottom. This allowed enough extra length that I could cut off the flat spots and still have a long enough piece.
Twisting the rail. When bending rail is used to create a spiral, the railing needs to be twisted inward slightly as it spirals up the stairs. This requires a lot of downward pressure, so we provided clamping points by screwing short lengths of 2-inch plastic electrical conduit to the rough treads. The end of an F-clamp fits nicely into the pipe, and you can clamp pretty hard against it provided it’s fastened with long washer-head screws. Plastic plumbing pipe won’t work because it’s too brittle.
Glue-Up
Glue-laminating is all about preparation. I always do a dry run first to make sure the guides will hold up and that everything I’ll need is in reach. Once you start gluing, there’s no time to run out to the truck for something you forgot.
The better you plan, the more time you’ll have for clamping before the glue begins to set. For simple laminations, I use regular Titebond, spreading it quickly with a 3-inch paint roller. Since this was a complicated glue-up, I tried Titebond Extend — which has a longer open time — but it helped less than I expected: Some of what we gained by using slow-setting glue was lost because the glue was thick and had to be spread with a stiff bristle brush.
Before gluing, we sealed the MDF molds with lacquer and a coat of wax to keep them from sticking to the work. Then, working on a nearby bench, we placed a side ply in one of the molds, spread glue on it, stacked the next piece on top, spread more glue, and so on until all the pieces were glued and stacked between the molds. I secured the bundles every few feet with plastic stretch wrap to keep them together while we moved them into place and clamped them to the guides.
Clamping. With bending rail, I have a simple formula for how many clamps to use: every one you’ve got (see “Homemade Bending-Rail Clamps”.
We used one clamp per guide and two smaller clamps between guides, starting in the middle and working toward the ends one guide at a time. You don’t want to clamp too far ahead, or you could capture a wrinkle and create a gap between laminations.
There’s always a lot of squeeze-out, so we protected the finish surfaces below and used damp rags for cleanup. Rather than wipe the excess glue off the rail, we waited until it firmed up to scrape and sand it off. This doesn’t make extra work — we always have to sand because the plies don’t line up perfectly.
Finishing up. We left the clamps in place until the glue had fully cured, then scraped and sanded the railing to create a smooth profile. From that point, installation was much the same as with straight rails.
Chas Bridge is a finish carpenter in Sequim, Wash. Special thanks to Candy Pitman for photographing this project.


