Grades and Types
Wood shingles are sawn on both sides to produce a smooth, uniform surface. Shakes, on the other hand, are split from logs, leaving both sides rough (see Types of Wood Shingles and Shakes, below, for both shake and shingle types).
Lengths and Weights
Shingles come in three lengths: 16-in. (sometimes called 5X), 18-in. (perfections), and 24-in. (royals). See Typical Wood Shingles and Shakes, below, for specification information.
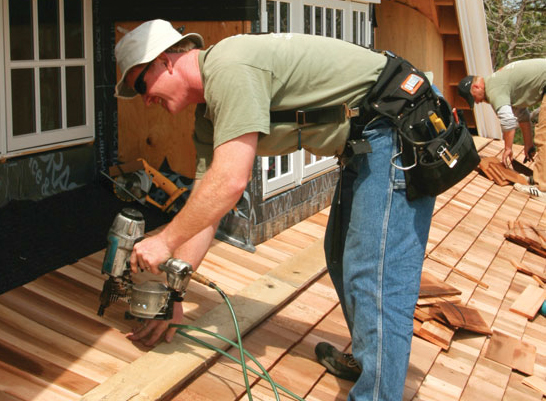
Shakes come in 18- and 24-in. lengths, as well as in a 15-in.-long starter/finish shake. They’re available in two weights: mediums have 1/2-in. butts; heavies have 3/4-in. butts on average.
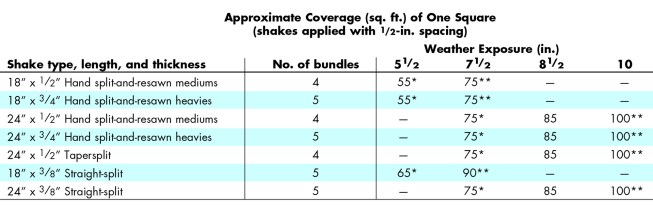
Estimating Wood Shakes and Shingles
A nominal square of shingles is four bundles, and a nominal square of shakes is five bundles, but this depends on the course exposure (Wood Shingle Coverage and Wood Shake Coverage, below). The steeper the slope, the more shingle that can be exposed.
- For starter courses, add one square for every 240 lin. ft. of eaves.
- For valleys, order one extra square per 100 lin. ft. of valley to account for waste.
Figure: Wood Shingle Coverage
| Length & Thickness {{fn|Sum of the shingles stacked; e.g., 5/2” means 5 butts = 2” thick.}} | Weather Exposure (in.) | ||||||||
|---|---|---|---|---|---|---|---|---|---|
| 3 1/2 | 4 | 4 1/2 | 5 | 5 1/2 | 6 | 6 1/2 | 7 | 7 1/2 | |
| 16″ x 5/2″ {{fn|Sum of the shingles stacked; e.g., 5/2” means 5 butts = 2” thick.}} | 70 | 80 | 90 | 100 {{fn|Maximum exposure recommended for roofs.}} | — | — | — | — | — |
| 18″ x 5/2 1/4″ | — | 72 1/2 | 81 1/2 | 90 1/2 | 100 {{fn|Maximum exposure recommended for roofs.}} | — | — | — | — |
| 24″ x 4/2″ | — | — | — | — | 73 1/2 | 80 | 86 1/2 | 93 | 100 {{fn|Maximum exposure recommended for roofs.}} |
* Maximum recommended exposure for 3-ply roof. ** Maximum recommended exposure for 2-ply roof.
Figure: Fasteners Per Square for Wood Shakes or Shingles
| Roofing Type | Nail Type | Nail Quantity (per square) |
|---|---|---|
| 24″ | 4d shingle | 2 lbs. |
| 16″–18″ | 3d shingle | 2 lbs. |
| Hand-split shakes | 6d shingle | 2 lbs. |
Note: Use only hot-dipped, stainless-steel, or aluminum nails for shakes and shingles. Do not use electrogalvanized or copper.
Underlayment
A permeable 15# or 30# felt is typically installed only over the solid sheathing area at eaves (below).
Figure: Sheathing and Underlayment for Wood Roofs
| Sheathing | Interlayment | Underlayment {{fn|Underlayment at eaves should extend to a point 12-24 in. inside building. Bituminous eaves flashing recommended in cold, snowy climates.}} | |
|---|---|---|---|
| Wood Shingles | Spaced {{fn|Recommended in hot, humid climates.}} | none | 15# or 30# felt over section of solid sheathing at eaves |
| Solid {{fn|Used to protect against windblown snow or where required for structural reasons. May shorten life of shingles and shakes. Ceader Breather® is recommended to provide ventilation between underlayment and shingles.}} |
none | 15# or 30# felt at eaves. Optional over field of roof | |
| Wood Shakes | Spaced {{fn|Recommended in hot, humid climates.}} | 30# asphalt-saturated felt | 30# felt over section of solid sheathing at eaves |
| Solid {{fn|Used to protect against windblown snow or where required for structural reasons. May shorten life of shingles and shakes. Ceader Breather® is recommended to provide ventilation between underlayment and shingles.}} |
30# asphalt-saturated felt | 30# felt at eaves |
Sheathing Options for Shingles
It is best to install wood roofing over spaced sheathing — evenly spaced 1x4s or 1x6s (Shingle Installation, below). Shingles installed on solid sheathing can’t dry out as well. Because their back sides stay wet while the sun beats on their face, they decay faster and are more likely to cup, curl, and split.
Spaced Sheathing
- One option is to space 1x4s to coincide with the weather exposure of the shingles as shown in Shake Installation, below.
- The other option is to use 1x6s such that two courses of shingles are nailed to each 1×6, as shown in Shingle Installation, below.
Solid Sheathing
Solid sheathing is required for wood shingles only for structural reasons — such as in seismic zones — or for protection against wind-blown snow. If the job demands solid sheathing, strap the roof or use a ventilating underlayment, as follows:
Strapping Over Plywood
- Sheathe the roof deck with plywood;
- Cover the plywood with 15- or 30-lb. asphalt-impregnated felt paper;
- Install horizontal 1×3 strapping over the plywood, cutting 1/2-in. notches at 4 ft. o.c. on the bottom of the strapping for drainage;
- Install the shingles over the strapping, following the installation details for spaced sheathing. An alternative to notching is to lay vertical strapping first, and then horizontal strapping.
Ventilating Underlayment
Another option for ventilating shingles installed over plywood is a product called Cedar Breather® (Benjamin Obdyke, Horsham, Pa., www.obdyke.com). The 3/8-in.-thick material comes in 39-in.-wide rolls. Its matrix of synthetic fibers is stiff enough to resist crushing, so it provides continuous airflow between the roof deck and the wood roofing.
- Install Cedar Breather® course by course just ahead of the shingles, tacking it in place with 5d galvanized box nails.
- The seams are butted (not overlapped), and can be cut easily with shears.
Sheathing Options for Shakes
Because the irregular surface of hand-split shakes makes them somewhat self-ventilating, they may be installed over either spaced or solid sheathing in most cases.
Spaced sheathing for shakes is a must in hot, humid regions, however, because the shakes need a greater drying potential. For shakes, spaced sheathing usually consists of 1x6s spaced on centers equal to the weather exposure of the shakes.
Solid sheathing for shakes is preferable in three instances: on roofs with slopes of less than 4:12; in snowy regions where windblown snow could penetrate the shakes; and in earthquake-prone regions where the sheathing must act as a shear diaphragm.
Interlayment for Shake Roofs
Because of the rough profile, each course of cedar shakes must be laid over an 18-in.-wide interlayment of 30-lb. felt. The felt serves as a baffle against wind-driven snow and rain (Shake Installation, above).
Install interlayment by fastening the strips to the sheathing, then apply the shakes by slipping their top edges under the felt interlayment strips.
Interlayment Layout
- The first strip of interlayment protects the eaves overhang, so its bottom edge should be twice the distance from the eaves edge as the weather exposure you plan to use.
- The second strip starts two exposure widths up from the bottom edge of the roof.
- Install the remaining strips on centers that equal the weather exposure. Make sure the top edge of each layer of felt rests on a section of sheathing, or it won’t provide a good baffle.
Underlayment on Shallow Roofs
CABO sets a minimum slope of 3:12 for wood shingles and 4:12 for shakes. For lower slopes, NRCA and the Cedar Shake and Shingle Bureau recommend installing wood roofing on a lattice-like framework of pressure-treated strapping over a watertight membrane (below).
Maintenance and Repair
Shingles and shakes need more care than other types of roofs. Fungus and rot are very much at home on wood roofs, particularly low-pitched roofs in humid, wooded areas. Parts of the roof beneath overhanging trees are especially vulnerable since wet debris such as needles and leaves can trap moisture, leading to fungus growth, premature rot, and leaks.
Cleaning a Wood Roof
Cleaning with a power washer or garden sprayer can double a wood roof’s service life. Clean roofs yearly, paying particular attention to the keyways between adjacent -shingles.
- A high-pressure water sprayer works best. Use a power washer with a flow rate of 4 to 6 gallons per minute.
- Or use a 50/50 solution of water and household bleach (for an even stronger solution, replace the bleach with
2 to 4 ounces of swimming-pool chlorine) in a garden pump. Spray 1 to 11/2 gallons of this solution over each square of roof area. Let it stand for 15 to 30 minutes, and then rinse it off with a power washer or garden hose. - Protect the surrounding shrubs and grass: Hose them down with clean water before, during, and after application, or cover them with tarps (see Landscape Protection).
Minor Repairs
Cracked Shingles
- If both sides of a cracked shingle are still present, nail them to the roof deck.
- Drill pilot holes first to prevent splitting the shingle and cover both the joint and the nail heads with roofing cement.
Temporary Repair
- A damaged shingle can be temporarily repaired by inserting a piece of galvanized steel or aluminum under it and nailing through the shingle and metal with two nails.
- The metal should extend 2 in. beyond both edges of the shingle and 1 in. under the butt line of the overlying shingle in the next course.
Shingle Replacement
- Individual shingles can be removed by first splitting them and removing the pieces. Cut the roofing nails with a shingle ripper or hacksaw blade. Make sure that the nails are cut off flush with the sheathing; use caution when cutting the nails to avoid damage to the roof deck sheathing or underlayment.
- Next, trim the replacement shingle to the required width and slide it into place. Tap it gently into place with a hammer and wood block. Nail it to the roof deck and cover the nail heads with roofing cement.
Bowed Shingles
- Split a bowed shingle down the center and remove about 1/4 in. of wood from the inside edge of one section to form a joint for roofing cement.
- Nail the two sections on either side of the joint and cover the joint and nail heads with roofing cement.


