Finding good help has always been tough, and the current boom economy has made it tougher. I tackled a recent labor problem by hiring a company to panelize a 2,400-square-foot house. By shifting the labor burden to the panelizer, I only had to hire an inexperienced helper and pay for some crane time, rather than assembling an entire crew. We erected the shell in four weeks, or about the same amount of time it would have taken an experienced four-person crew to stick-frame the same structure.
Planning and Design
I shopped around among several panel manufacturers before settling on Sprowl Building Components in Searsmont, Me. — a relatively small shop that was willing to work with my custom design, rather than trying to steer me to a preset package. The company will also modify its framing details to suit customer preferences, as long as the details conform to code. For example, double rough window sills could be substituted for Sprowl’s single-sill detail. Drawing the plans. I hired a residential designer to draw a set of floor plans and elevations for the 1 1/2-story house, which has a shed dormer on the south and a gable dormer over the stairway on the north. The first floor has an open floor plan with a step down to the living room; bedrooms and two bathrooms are on the second floor. Unlike some panelizers, Sprowl doesn’t preinstall windows. I planned to use Eagle windows and doors, so the drawings noted the center-to-center distances between rough openings. Each opening was identified by a letter, and a separate window schedule gave rough opening dimensions. I specified 2×6 exterior and plumbing walls, 2×4 framed interior walls, and 5-ply fir plywood sheathing, which I prefer to OSB. The floors and roof were framed with trusses. Sprowl redrew the plans with their proprietary software (which will import AutoCad files, if you have your plans on disc), then printed out about 35 pages that detailed each panel and truss (see Figure 1).
Figure 1.The panelizer’s schematics detail each panel (left) and its place in the floorplan (below). The wall panel drawing labels components and provides a cut list. Similar information is given for truss layout and construction. Booklets shipped with the panels contain the final schematics for all components as well as bracing patterns for the roof and floor trusses. | |
Proofing makes perfect. Because the panel manufacturer works out all the details of the framing, you never have to do a takeoff. But another important responsibility takes its place: The necessity of going over each sheet, comparing it to the original plans, and making any necessary corrections. Once you’ve signed off on the manufacturer’s plans, any inconsistencies are your problem. I proofed the plans carefully, but I failed to catch one minor glitch. The original plans included a step down to the living room, and this should have been taken into account in the framing of the exterior walls. Because it wasn’t — and because I didn’t notice the omission in the proofs — I had to deal with it on the job site, by stick-framing a low wall to fill the gap. I’ll be more careful next time.
Assembling the House
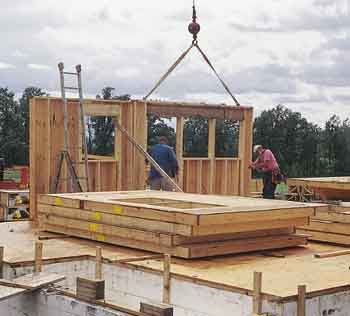
About two weeks after I signed off on the plans, the panels and trusses were ready to ship. As luck would have it, the two flatbed trucks arrived at the site during pouring rain. We piled everything on the ground and called it a day. When the weather cleared, we called the crane back to set the first-floor girder and floor trusses on the foundation, then stacked the subfloor sheathing on top. (Given better weather, we could have done this as part of the initial unloading and saved an hour or two of crane time.) Wall connections. After spending a couple of days gluing and screwing down the subfloor, I scheduled an afternoon session with the crane to set, line, and brace the first-floor exterior wall panels (see lead photo at the beginning of this article). The exterior wall corners were framed with 12-inch-wide “ladders” at the end of one panel, to which the end stud of the adjoining panel is toe-nailed.
The next morning, I positioned and nailed the first-floor interior wall partition, while my helper readied the second-floor trusses and subflooring to be lifted into place (Figure 2).
Figure 2. Bundled second-floor trusses are set atop the first-floor walls. The lumberyard strapped together several sheets of plywood subfloor before delivering it to the job site. The 20-foot-high stairwell panels are visible in the background. |
As with the exterior wall panels, partition walls were joined at “ladders” built into the framing. This worked very well and made it easy to align the walls while providing some flexibility in the floor plan (Figure 3). If it doesn’t cause problems elsewhere, nonbearing partitions can easily be shoved one way or the other by a few inches to alter the size of a room or closet.
Figure 3. Partition-wall intersections are simplified by the presence of framing “ladders.” The end stud of the adjoining wall is nailed to the ladder, as shown here, making it easy to adjust the final position of nonbearing partitions as needed. |


