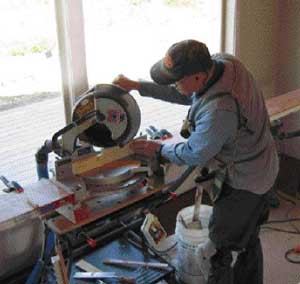
About 90% of the finish carpentry I do involves the miter saw, so it’s important to me to have a saw table that goes together quickly, serves as an efficient workstation, and then breaks down into small enough pieces for me to load in my van. You can buy a ready-made saw station, but it means settling for someone else’s design. I built my first saw table years ago and have been refining the design ever since. My current setup consists of a miter saw, portable table saw, shop vac, folding stands, and a customized duct system and extension tables.
At the core of this station is my DeWalt model 705 12-inch single-compound non-slide miter saw. This saw has the capacity to make all the cuts I need without the added weight, expense, and complications of a slider. The saw is supported by a Stanley WorkMate 400 (now 450). This sturdy, stable tool folds flat for transport and is able to resist all the turning stress of left/right mitering. The earlier generations of my workstation had homemade wooden stands that quickly became wobbly under the side-to-side stress of swinging the saw.
The saw is bolted to blocks that fit between dogs on the WorkMate’s top and are clamped in place by its vice. The blocks are sized to put the table at 38 inches, which is my favorite work height.
Extension Wings
The wings don’t have to be strong enough to support framing lumber, but I like them to work as a light-duty workbench. I made the wings by ripping 9-inch strips off a 1 3/4-inch hollow-core door, pushing back the cardboard honeycomb, and gluing in a 3/4-inch plywood strip to fill the edge. My saw will cut boards up to 8 inches wide, so the 9-inch wings are plenty. The extra inch is to the rear of the fence so I can store spring clamps there. If I used a bigger saw, I’d make wider wings.
The hollow wings provide a lightweight work surface that’s stiff enough for tasks such as belt sanding, routing, and coping. They’re not as good as a separate bench, but they’re much better to work on than the extensions on most commercial stands.
Connection hardware. The 9-inch strips came off an 80-inch door, so the wings provide over 7 feet of support on each side of the blade. I attach the wings to the saw with 6-inch bed rail fasteners, the kind that mortise in. I got them by mail order from Rockler Woodworking and Hardware (800/279-4441, www.rockler.com). The slotted half is mortised into the end of the wing. The hooked half is mortised into a piece of plywood that is bolted to holes I drilled in the edge of the saw table. I like this hardware because it locks the wings to the saw left and right while supporting them up and down. To keep the wing from coming loose, I drop a 16-penny nail through a hole drilled in the wing. The wings won’t come off unless you remove the nail.
The ends of the wings are supported by simple fixed wooden legs. I’ve tried using adjustable legs, but it’s not worth the trouble. It’s easy enough to level the wings by shimming the legs or leaning them at a slight angle.
Table Saw
I use a 10-inch Makita table saw that’s equipped with an older PortaMax fence and table extension (Rousseau Co., 800/635-3416, www.rousseauco.com). This fence works better than the one that comes with the saw and gives me over 24 inches of rip capacity. A second WorkMate supports the table saw at the same 38-inch height as the miter saw. The saw is bolted to blocks that are grasped by the stand’s dogs and vise. Because the table saw is deeper than the miter saw, I leave the lower legs in the folded position. The upper part of the WorkMate is offset to the rear, so I face the saw backward in the stand so it won’t tip over when I rip.
With this arrangement, the miter wings double as outfeed for the table saw and the table saw gives me another 2 feet of support for 16-foot MDF moldings. The wings aren’t that wide, but they’re big enough for the narrow stuff I usually rip. If I need to rip sheet goods, I set up the saw by itself and use an 18-inch or 30-inch hollow-core door for the outfeed.
Dust Transport
A recent addition to my saw setup is a dust transport system. I don’t call it a dust collector because I’m not saving the dust; I’m just moving it away from me. This is very important with all the MDF trim carpenters use these days: It creates a lot of fine dust, so it’s great to get rid of it.
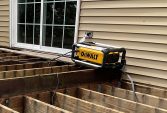
The dust system is powered by a 16-gallon Craftsman shop vac. The filter has been removed and the exhaust is vented outdoors through a 2-inch ABS pipe. This probably affects the warranty, but a $100 vac lasts about two years and I can live with that. It is very satisfying to look out the window and see a big plume of dust far away from me. Aside from the health benefits, there’s a lot less cleanup when the dust goes outside.
Automatic switch. The heart of the setup is an automatic switch called the Automater (R.F. St. Louis Associates, 800/526-0602). It plugs into an electrical receptacle and the saws and vacuum plug into it. When you turn on a saw, the device sends power to the vacuum (the vac switch is always on) so it can transport the dust. To avoid tripping breakers, there’s a half-second delay between the start of the saw and the start of the vac. After the saw stops, the vac runs for a few more seconds to clear hoses. This setup may not be perfect for shop use, but it works pretty well on site and breaks down into small pieces to fit in my van.
Homemade air valve. To maximize suction, I rigged up a “valve” that prevents the vacuum from drawing from more than one machine at a time. There are ready-made products that do this, but they’re expensive and designed to be permanently installed in a shop. Mine is made from inexpensive parts you can get at the lumberyard. The body of the valve is an ABS 3×2 double-sani plumbing tee with a 2-inch reducer in the bottom. The vac hose connects to the reducer and the hoses to the saws connect to the sides of the tee. I take a short piece of 21/2-inch electrical conduit and slide it into the top of the tee until it bottoms out. Then I glue a short length of 3-inch ABS over the other end of the conduit and cap it off with a test plug. There’s a hole cut in one side of the conduit so if you twist it one way it connects one saw to the vac, and if you twist it the other way it connects the other saw.
It may sound like I go to an excessive amount of trouble to evacuate dust, but it makes a difference to my bottom line. Because I’m able to keep my work area very clean, many of the contractors I work with allow me to set up inside the house instead of outside or in the garage. This means I can spend less time walking and more time working.
Flexibility
The best part of the system is its flexibility. Every house presents a different situation and with a small supply of 2-inch ABS pipe fittings and some short flexible hoses, I can always get the dust outside. Sometimes there isn’t space to put the table saw in the same room as the miter saw. That’s not a problem because I have two complete vac setups and separate outfeed tables that work with the table saw alone. The outfeed has its own support leg and clips onto the saw with an aluminum angle and a 16-penny nail. Another Automator, shop vac, and 2-inch ABS fitting complete the setup.
It takes about 45 minutes to unload and assemble the entire saw station. Since I’m usually on the same job site for two to four weeks, it’s well worth the time. I own two complete miter saw setups, so if I need to go to another job in the meantime, I’ll take the spare. This saves me from having to break down the original setup and reassures the contractor that I’ll be coming back. (After all, if I was leaving, I would have taken my tools.)
There are a number of smaller refinements to the system. I always keep a scrap bucket nearby because there’s no reason to handle any offcut more than once. A power strip with enough outlets for all my tools hangs from the stand. There’s a clothespin super-glued to the motor housing of my chop saw. I always work from two cut lists. One is in my bib pocket and the previous list is in the clothespin facing me on the saw.
When I arrive at the saw with a new list, I switch from pocket to pin and pin to pocket so I’m always ready to jot down a measurement.
Chas Bridge is a finish carpenter in Sequim, Wash.