Few places in construction are mistakes harder to correct than the surface of a concrete slab, so you’ve got to pay attention to the basics if you want to get the quality and finish your customers expect, whether it’s a driveway, patio, or floor deck.
The basics of finishing concrete start before you take the float out of your truck. First, you have to work closely with your supplier to order the right mix for your project. Then when the truck arrives, you must ensure it can move onto the site safely and effectively. Only then can you be in position to bring the mix to grade, strike-it off, float it, finish it, and cut control joints before you get it to cure properly and achieve good strength. This, of course, helps avoid serious finish failures like scaling and craze cracking. Those are harder to fix than a stud wall nailed to the deck in the wrong place.
Site Prep & Safety
Proper placement of the truck and chutes makes jobs safer, easier, and faster.
On average, the farthest distance concrete can be placed using a chute is 18 feet, measured from the truck’s tires to the point of discharge.
- The wheels of the ready-mix truck must be kept 1 foot away from below-grade walls and 1 foot away from excavations and trenches. (Rule of thumb: Stay 1 foot away from an excavation trench for each 1 foot of depth.)
- Typically, the first five minutes per cubic yard of unloading time are free; additional unloading time is charged hourly or even by the minute.
- Only contractors or homeowners can direct ready-mix trucks to cross sidewalks, curbs, or lawns, or allow onsite access to areas that can be damaged by the truck’s weight. A truck and load can weigh 70,000 pounds.
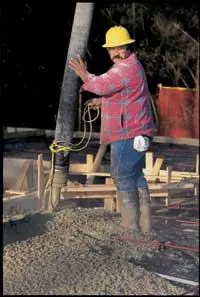
Be Safe. When placing concrete, workers should wear:
Full-length shirts and trousers.
- Rubber boots and gloves.
- Eye protection when exposed to concrete splatter.
Placing Concrete
Efficiency is the key word when placing concrete.
Place as close to its final location as possible–the less you move it, the better.
- Start in a corner, then work away from the corner.
- If on a slope, start at the low end and work uphill.
- Place into, instead of away from, fresh concrete.
- Use square-nose shovels, come-alongs, or concrete rakes to move concrete; other tools cause segregation.
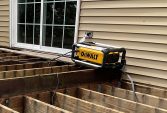
Strike-off
Strike-off is the initial phase of finishing. It creates a smooth concrete surface, pitched to the proper elevations.
Tools
Hand straightedges can be wood or magnesium.
- Magnesium straightedges minimize surface tearing and are preferred on some specialty toppings.
- Wood straightedges should be clean and straight (2×4 with no bow).
- Straightedges should be 1 foot to 2 feet longer than the width of the pour.
-
Technique
Proper strike-off removes excess concrete and brings the top surface to grade.
- Start as soon as possible after placing concrete.
- End before bleed-water appears.
- To strike-off, tip the board forward about 15 degrees and pull straight. Usually about three passes are made to get the surface to its right position.
- Tilt the straightedge slightly backward to create a single cutting edge.
- Keep about an inch of concrete in front to fill low spots.
- Make a second pass if the surface isn’t to grade.
- Pull concrete into (not away from) edge forms.
-
Bull Floating
Bull floating flattens the surface after the strike-off process and removes all irregularities left by the strike board. It also depresses the large aggregate a little bit, making more fine aggregate available for the finishing steps.
Use a bull float or darby to level ridges and fill voids left during strike-off.
- Start immediately after strike-off and finish before bleed-water appears.
- Use at a right angle to the direction of strike-off.
- Push the bull float with the front edge slightly off the surface to cut bumps; pull the bull float with the back edge slightly off the surface to fill voids.
- For air-entrained concrete, use magnesium tools, which are really made from an alloy of aluminum and magnesium.
- Darbies serve the same purpose as bull floats but for smaller areas; use in a sawing arc motion.
Waiting Period
Finishing the concrete too early causes problems just as finishing it too late is a nightmare. To gauge how long to wait between bull floating and finishing:
Begin final finishing when all the bleed-water has evaporated. While the exact time on how long this takes varies based on the mix contents and ambient temperature, plan for about three hours from the time the concrete is batched (meaning poured in the truck at the ready-mix plant) until there is an initial set–which means the concrete is too hard to work anymore.
- Finishing while bleed-water is present can cause surface crazing, dusting, or scaling.
-
Final Finishing
This process increases the density of the top surface of the concrete and creates the final smooth finish on the slab. Edgers, groovers, hand floats, and trowels are required.
Edgers
Use edgers to produce a clean slab edge that is less likely to chip. Edges usually have radii that can vary from 1/8 inch to 1 inch.
- An edger is less likely to dig into concrete or leave a bumpy surface if a margin trowel is first used in a vertical sawing motion to dislodge aggregate particles from the edge forms.
- Run the edger back and forth with the leading edge slightly raised. Do not press the radius side of the edge downward. This will depress the edge below the form.
- Don’t start in a corner and don’t raise the edger off the concrete unless the tool is in motion.
- Use a wide edger for the first pass, then a narrow edger for the second pass.
-
Groovers
Use groovers to control crack location by cutting joints to a depth of at least one-quarter the slab thickness.
- Push the groover into the concrete, then move it forward while applying pressure to the back of the tool.
- After the joint is cut, turn the groover around, running it back over the cut for a smoother finish.
- For a straight cut, use a chalk line or straightedge as a guide.
- Plan joints in accordance with the rules established by the American Concrete Paving Association.
-
Hand Floats
Use hand floats to remove imperfections and to depress large aggregate below the surface for a smoother troweled finish.
- Hold the float flat and at arm’s length, moving it in a wide semicircular motion until the surface is smooth and flat.
- Use magnesium tools for air-entrained concrete.
- More than one float pass may be required.
-
Trowels
Use trowels to produce a hard, dense surface.
- After floating, begin troweling.
- Hold the trowel at a slight tilt at arm’s length and move it in a semicircular motion, overlapping each pass by one-half until the surface is smooth.
Jointing Concrete
Cutting proper control (or contraction) joints is vital for preventing cracks and callbacks. Control joints:
Create weakened sections to control crack locations.
- Accommodate movements caused by temperature changes and drying shrinkage.
- Prevent vertical, but permit slight horizontal, movement.
- Are neater in appearance and easier to keep sealed than uncontrolled cracks, and cause fewer maintenance problems.
-
Layout is key to getting control joints to do what they are intended to do–control cracking. To get the best layout for your project:
Divide large floor areas into small rectangular panels, as nearly square as possible.
- Limit rectangular panels so the long side is no more than 11/2 times the short side.
- Avoid re-entrant (inside) corners and sharp angles (less than 60 degrees).
- Align with changes in slab thickness, plan dimensions, and joints in adjoining slabs.
- Terminate at the edge of the slab, not at an intersecting joint.
- Spacing should be two times the thickness of a slab for exterior work. Interior floors shouldn’t exceed 15-foot spacing.
-
Curing Concrete
Curing enables concrete to become stronger and more durable. Proper curing requires sufficient moisture content. Do this by supplying or retaining moisture on and in the concrete surface for a minimum of seven days or until concrete reaches 70 percent of its specified strength. Favorable temperatures–50 degrees F to 90 degrees F–also play an important factor in proper curing.
Technique
Keeping the slab wet during the curing process is crucial to properly curing it.
Keep the slab surface continuously wet by sprinkling or spray-fogging it. Alternate wet/dry cycles cause craze cracking.
- Use low water pressure and flow to avoid washing away the fresh concrete surface.
- Use water with a temperature that is within 20 degrees F of the concrete temperature.
- Do not use sprinkling if water runoff can damage the surrounding environment.
- Keep material continuously wet or cover with plastic sheets and wet frequently.
- Avoid materials that discolor concrete.
- Prevent materials from blowing away.
-
Curing Compounds
Curing compounds are intended to put an impervious coating on the concrete surface, keeping moisture in the concrete from escaping and therefore available to hydrate the concrete as it cures.
Apply curing agents after the last finishing step.
- Apply in two applications, at right angles, to form a continuous film.
- Typical coverage rates are 150–200 square feet per gallon.
- Avoid using on surfaces that will be covered with paint or toppings, unless approved by the manufacturer.
-
Attention to sound placing, finishing, and curing practices will dramatically improve safety as well as performance on site. And, it will help ensure that the product you deliver your customer performs.
–Joe Nasvik is senior editor for Concrete Construction, a sister publication of Tools of the Trade . This article originally appeared in Concrete Construction.
Good Jointing Practice
Joint spacing should not exceed, in feet, two times the slab thickness, in inches (Example: Space joints 8 feet apart for a 4-inch-thick slab).
- Mark joint locations on edge forms.
- Use a straightedge as a joint guide.
- Start with a wide groover, then use a narrower groover on later passes.
- Cut joints a minimum of one-quarter the slab thickness (1 inch deep for a 4-inch slab).
- If using a saw to cut joints, cut them as soon as you can walk on the slab. The concrete is still fresh enough to cut easily, but hard enough to bear your weight so you can carefully layout and snap joint locations.
- Cut joints right after final finishing with a cut-off saw.
-
–Joe Nasvik
Under Wraps
Plastic sheets or waterproof paper can really help the curing process go off as planned, but it’s important to use the right material, installed properly, and at the right time.
Lay flat, lap edges 6 inches, and cover exposed concrete edges.
- Use minimum 4-mil-thick plastic sheet: white in hot weather and black in cold weather.
- Don’t use on architectural concrete.
- Secure covering to prevent concrete exposure.
–Joe Nasvik