I pride myself on being a good listener. But the whole time my clients were describing the extensive remodel planned for their 1950s cape, I kept thinking, “If I get this job, I have to get started soon so I can take my family camping.”
We’d been planning the trip for more than a year, but there was no way I could leave an extensive remodel in limbo for the two-and-a-half weeks I’d be gone — especially a job that involved ripping off the house’s sloped-ceiling second floor and replacing it with a full second story. Obviously, getting the roof off and back on again as quickly as possible would be critical to the project’s success.
Besides a new second floor, the job included a new kitchen, a rear deck, and a family-room addition on the back of the house.
Tight Schedule Rules
As soon as I got home from that initial meeting, I created an 11-week construction schedule to ensure that most of the critical work would be done before our vacation.
The first two weeks of the project would be the most stressful — laying the family-room foundation, completing the demo, and getting the roof back on, all while the clients were living in the first-floor den. My goal was to demo the existing second story on a Tuesday, frame the new second-story walls on Wednesday, set and sheathe the roof trusses on Thursday, and finish installing shingles by the end of Friday.
To keep up the pace, I decided to use wall panels supplied by the truss manufacturer. As usual, I had done the design work for the project in Chief Architect, so I supplied the truss company with accurate drawings of both existing conditions and the proposed construction. The company, in turn, provided engineer-stamped drawings to submit with the building-permit application.
Dealing With Debris
With a permit in hand and the roof trusses and wall panels on order, I went about putting in the foundation for the family-room addition and gutting the second floor in preparation for ripping off the roof.
The site’s narrow driveway meant I couldn’t set a dumpster there because it would prevent the excavation and foundation contractors from reaching the back of the house for the addition. Instead, I used my excavator’s dump-body trailer for the debris; it could simply be rolled out of the way when the need arose.
Tuesday: The Tearoff
Fortunately, the weather turned nice the week of the tearoff. In keeping with the schedule, a crew of seven guys tackled the house with bars and recip saws. By lunch, most of the structure was down.
Using the dump-body trailer to catch the debris had another advantage beyond mobility: The axles underneath the trailer make it much taller than a conventional dumpster, so dropping in material from the second-floor level was relatively easy.
Demolishing the second floor and existing kitchen generated about 16 tons of debris, filling the trailer three times.
Later that day, the wall panels and trusses showed up. We had the driver drop them in the driveway as far back as he could, so there would be room for the crane.
We spent the rest of the day cleaning up smaller debris and adding rim joists and floor sheathing in areas that had previously been hidden behind the cape’s knee walls. Though the weather looked clear, we tarped the house at the end of the day for good measure.
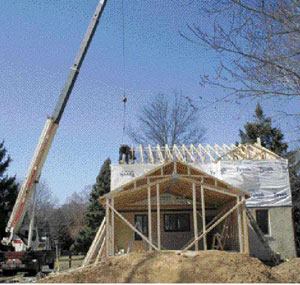
Wednesday: Standing Walls
The next morning, we finished patching the floor framing and subfloor. When the crane arrived, just after lunch, we set the wall panels and trusses for the family-room addition. Then we had the crane lift the walls for the second story onto the floor deck, setting them directly over a bearing wall to avoid cracks in the finishes below.
Rather than keep the crane sitting around while we set the walls, I sent the operator away, which kept the bill to a three-hour minimum charge. This gave us the whole afternoon to set walls, so we spent a little extra time wrapping them with housewrap before standing them.


