While listening to a home-improvement call-in show on the radio the other day, I was struck by the large number of callers who sought solutions to wet-basement problems. Not surprisingly, the nationally syndicated columnist who hosts the show said that wet basements are the leading source of letters and e-mails sent to his weekly newspaper column.
Barrier System vs. Water Management
My company, Tri-State Basement Systems, based in Berlin, Vt., concentrates on basement waterproofing and, as the radio show indicated, there is always plenty of work. Unlike most DIY efforts and “miracle coatings” that attempt to prevent ground-water entry with a barrier, our techniques don’t try to stop the water, but rather to manage it. Sometimes we use exterior perimeter drains and waterproofing, but more often we install water-management systems on the building’s interior. Most homeowners prefer this approach because it costs less than excavating around the foundation and is less destructive to their landscaping.
One recent project involved a 1950s ranch home with a block foundation. The basement in this house was literally soaking wet. Water running down the walls accumulated on the floor, making the space virtually unusable — even for storage. And when you opened the basement door, you were greeted by a wave of humid air and the pungent smell of mold. The homeowner had tried numerous coats of waterproof paint, grading around the foundation, and a cheap sump pump illegally piped into the waste stack, but all these efforts were of little help. Another contractor suggested excavating around the foundation and installing a perimeter drain, but the plan was twice as expensive as ours and required removing a large deck.
So the homeowners decided to treat the problem using the WaterGuard system, one of the proprietary basement-drainage systems manufactured and supplied by our franchiser, Basement Systems (www.basementsystems.com). WaterGuard is a perimeter drainage system installed on the inside of the foundation. We dig a trench around the perimeter of the basement slab and install perforated pipe that drains to a sump. The collected water is pumped through a 2-inch pipe to the building’s exterior. We give our customers a lifetime guarantee on the work we do, and we almost never get callbacks.
Trenching
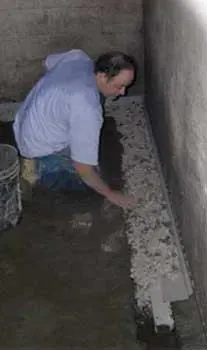
The first step is to break up the floor at the edges of the concrete slab to create a 5- to 6-inch-wide trench around the perimeter. We use electric jackhammers instead of concrete saws because the jackhammers create less dust and can cut through slabs of almost any thickness. Also, the rough surface created by the jackhammer helps to key in the concrete patch at the end of the process. As we’re running the demo hammers, we carry out the concrete rubble in five-gallon pails.
Once the slab is cut around the perimeter, we clean off the footing and, just inside it, dig a small trench about 4 inches deep. While one or two crew members are excavating the trench, another drills a series of weep holes in the base of the wall with a rotary hammer. Water stored in the cells of the concrete blocks often pours out of the wall for several seconds after a hole is drilled.
We line the trench with 2 inches of crushed stone and install our proprietary WaterGuard drainage pipe, sloping it toward the sump 1/4 inch over the length of each wall. There are two styles of WaterGuard pipe. The standard version is placed directly against the foundation wall with a plastic flange extending up the foundation wall. The flange is designed to leave a small gap along the wall so any water flowing down the wall can reach the subslab drainage pipe (see “Basement Interior Drain,”). The other version works similarly, but comes in two pieces. It’s used in applications where the footing prevents placing the drainage pipe against the foundation wall. The pipe comes in 10-foot lengths that we miter at the corners with an inexpensive miter saw.
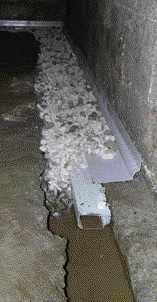
The job described here required the two-piece version because the footing prevented placing the pipe against the wall.
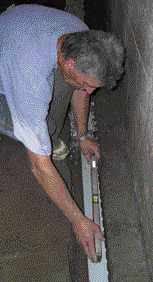
The piping is sloped toward the pump — 1/4 inch over the length of the wall is usually enough.
Installing the Sump
While the drainage pipe is being installed, we start digging the sump pit. Water often fills the hole as we’re digging, so we need to bail as we dig. Again, we use pails to carry out the rocks and muck.
WaterGuard drainage pipe comes in one- and two-piece configurations. The one-piece pipe installs more quickly, but the two-piece version is needed where there isn’t enough space to place the pipe between the slab and the top of the footing. Both types have a weep flange, which allows water seeping through the wall to reach the drainage pipe.
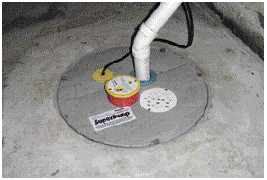
When the hole is finished, we place a layer of washed stone in the bottom, insert the sump liner — making certain it’s level — and then backfill around the basket with washed stone. We connect the sump basket to the WaterGuard pipe with a proprietary adapter and a length of 4-inch PVC.
The sump we use has features that improve its performance and durability, including a perforated basket to drain water from below the floor and heavy-duty plastic components. The high-quality Zoeller pump (www.zoeller.com) is placed on a plastic stand, which prevents the pump from clogging with sediment. The sump basket has an airtight, two-piece, screw-down lid to prevent kids and pets from getting inside.
Running the Discharge Line
With the sump pump installed and the cover in place, we run the discharge line up the wall and across the ceiling to the exterior. Ordinarily we take the most direct route, but sometimes we’ll go out of our way to place the outlet in an inconspicuous spot on the home’s exterior. The discharge pipe is tucked inside a joist cavity whenever possible so it won’t interfere with finishing the ceiling.
Where the pipe exits the house, we seal the penetration with urethane caulk and install a plastic trim ring for a finished look.
Preventing the discharge line from freezing is an important consideration in our area, where winter temperatures can stay below 0°F for days. If the outlet were to freeze, the pump would still run, but the backed-up water could cause a flood or pump failure. We use a proprietary outlet called an IceGuard, supplied by our franchiser. It has openings that allow the water to escape even if the pipe below becomes clogged with ice or debris. We also slope the discharge pipe down toward the outside so water won’t remain in the pipe near the outlet where it’s more vulnerable to freezing.
To direct the discharged water away from the foundation, we use a couple of methods. The least expensive and simplest option is to install a plastic tray called a Rain Chute. The chute has low-profiled sides so you can mow right over it, and it’s placed in a sloping trench so the water is carried away from the house. We’re mindful of where we locate the open-ended chute; we don’t want the discharged water to pond in the yard.
Another option is to run an underground pipe to daylight, but some homeowners don’t want to damage their lawns and some properties don’t have enough slope for a daylight drain.
Finishing Touches
After the pipe is run and the system tested, we patch the concrete around the sump, and cover the WaterGuard pipe with at least an inch of concrete. The only part of the pipe that’s visible is the vertical lip that catches water running down the wall. We also install a battery-powered high-water alarm that alerts the homeowner if the system is not working properly. Often we install fiberglass-reinforced panels over the interior basement walls as a final step. The plastic panels won’t support mold growth, are easy to clean, and give the basement walls a better appearance.
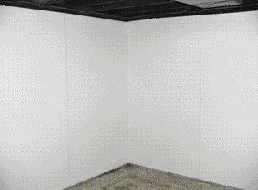
Many customers opt to finish the basement walls with white fiberglass-reinforced panels, a big improvement over the moldy masonry typically found in wet basements.
The panels are fastened with drive anchors instead of adhesive, leaving space for seeping water to drain to the WaterGuard piping. These pictures were taken only a few days after the sump was installed. Note that the floor is completely dry.
Basement projects on small homes like this 1,200-square-foot ranch typically range from $1,500 to $8,000, depending on the extras selected by the client.
Scott Andersonis the owner of Tri-State Basement Systems in Berlin, Vt.


