Tearing out an existing tub or shower unit during a bathroom remodel is a real pain — especially if it was installed during the framing stage and won’t fit back through the bathroom door. But if the only thing wrong with the unit is its color or a dull, scratched surface, then refinishing is an option worth considering. First, forget about epoxy and polyurethane paints and do-it-yourself refinishing kits. Those products don’t hold a candle to the quality and durability of professionally applied spray-on products. Whether the old tub is porcelain-glazed cast iron, enamel on steel, or fiberglass, it can be refinished on site to a like-new appearance. You can even have ceramic wall tile refinished, as long as the backing wall is in sound condition. Just replace any broken tile, clean out the joints, and refloat with new grout before refinishing.
A tub with major defects is not a good candidate for refinishing. A cracked or crazed fiberglass tub bottom generally indicates inadequate support under the basin at the time of installation. Delamination and blistering are common defects in older fiberglass tubs — suction-type bath mats are often to blame, as the cups pull on the surface 24 hours a day, every day. Rust and mineral stains also tend to form around the cups under those mats. Stains, superficial scratches, and chipped porcelain are routine repairs in a standard refinishing process, while blistering and delamination must be repaired by a fiberglass specialist or a refinisher who includes those services. I’ll repair screw holes from shower door installations, superficial scratches, and accidental chips and dings. I’ve even repaired valve holes after the plumber attacked the wrong end of the tub (easier if the cutout is saved).
Pros and Cons of Refinishing
Professional finishes come in two primary systems: four-part catalyzed high-gloss acrylic polymer (epoxy) and isocyanate. Both systems have been in use for over 20 years, although advances in chemical composition have improved durability, application quality, and color fastness, especially in the acrylic polymer formulations. I work with a high-quality acrylic polymer system from European Coatings (800/643-4098, www.europeancoatings.com). These materials are costly, but worth every penny. I offer a five-year guarantee on the finish, and I don’t expect callbacks.
Advantages of Spray-On Recoat• It’s a no-tear-out, one-day process • The unit is ready for use in 12 to 48 hours (depending on the product) • Custom colors can match any shade • The finish is indistinguishable from the original surface • Existing chips and scratches are filled during surface prep • The finish bonds to porcelain, ceramic tile, fiberglass, and plastic laminate • Restoration provides a typical 10- to 15-year finish • The cost ranges from $425 to $650 per tub (depending on type) Disadvantages• Refinishing is not as durable as relining; acrylic liners are considerably more resistant to chipping or cracking from incidental impact • Certain chemical cleaners can damage a refinished surface; abrasive cleaners must not be used • Ambient dust can mix with the spray-on coating and affect the look of the finish • Anyone can set up a refinishing business, making quality unpredictable |
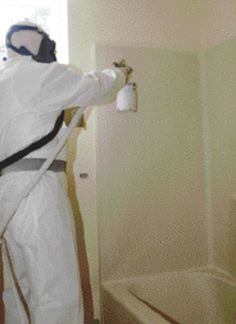
Prepping the Job
The first step in the refinishing process is to pull the shower head and arm, the valve trim, and the filler spout, along with any after-market shower fittings. It’s usually a good idea to replace those parts, as they’re often worn out (and look it). All caulking, soap scum, and oily deposits must be completely removed from the surface to be refinished, using a chemical cleaner. On a fiberglass surface, lacquer thinner does a good job, although removing all traces of caulk may require hand work and a scraping tool. Old silicone caulk can be softened for scraping by dosing it with ordinary lighter fluid (but don’t light it!) like Ronsonol.
To provide better “bite” for the finish, fiberglass and porcelain must be roughened. I use 180-grit wet-sanding paper and thoroughly hand-sand the surface. An oscillating sander might seem faster, but the pad can easily gum up with and distribute contaminants all over the surface. Hand sanding is really the only way to get at the tight inside corners of a fiberglass tub-shower, and it also allows me to feel surface flaws missed by eye. The new finish tends to highlight imperfections, so careful prep accounts for 80% of the job.
To fix small scratches and old screw holes, I use a two-part paste filler called Half Time (U.S. Chemical and Plastics, 800/321-0672, www.uschem.com), which sets up fast and sands easily. Porcelain glazing, ceramic tile, and grout are prepared by brushing on a thick, liquid formulation of 10% muriatic acid, followed 10 to 15 minutes later by a flush of clean water. The acid leaves an almost chalky finish on porcelain enamel or ceramic tile, which I then wet-sand with 180-grit paper. A standard tack cloth does a good job of removing the surface sanding dust.
The surface must be completely dried before refinishing. I wipe it down with lacquer thinner, which effectively drives out every trace of moisture from the surface.
Before moving to the spray operation, I prep the room to remove residual dust and protect surfaces from overspray. I use a portable fan or exhaust system to exhaust fumes and to deflect airborne dust from the refinishing area, then cover the walls, floor, cabinets, and fixtures with paper and masking tape.
Spraying
The “grip” coat, a three-part liquid consisting of base, activator, and a reducer, is sprayed on first to provide a tenacious bond between the prepped surface and the topcoat. Next, reducer is added to maintain a “wet edge” to eliminate lap marks during HVLP (high-volume low-pressure) spraying. The topcoat consists of acrylic resin, hardener, catalyst, and reducer, and remains viable in the gun for about 45 minutes before beginning to set up, or catalyze.
Because of the warm air produced by the HVLP turbine and rapid drying times of the epoxy coatings, the spraying process is relatively swift. The grip coat can be built up without drying time and is followed quickly by the topcoat. The topcoat, sometimes referred to as “synthetic porcelain,” is available in standard tub colors like white, almond, and bone, and in hundreds of custom colors to match any manufacturer’s fixtures or color scheme. But most refinishing is done to cover a vintage shade in white or bone.
Although the odor and vapors from the spraying operation quickly dissipate, they’re nothing you’d want to breathe; I’m firm about keeping people and pets away from the vicinity until I’m all done spraying.
Equipment cleanup requires a thorough solvent rinse, which must be responsibly disposed of after use. Professional installers are subject to periodic unscheduled inspections and must maintain an approved holding tank for collection by a hazardous waste firm.
Depending on the finishing system, the tub can be put to use in as few as 12 hours or as many as 48 hours. When using a professional refinisher, look for a warranty of three to five years on the installation and finish. However, those warranties are likely to come with a few common cautions to the user:
• Avoid letting soap, shampoo, or any other wet item rest directly on the surface for extended periods of time
• Make sure faucets don’t drip or leak and cause a mineral stain
• Avoid abrasive cleaners and bleach; foam cleaners and soap scum removers are best
• Use only a nonsuction type of bath mat and remove it after each use
• Clean the tub on a regular basis
Final Wrap
Although it’s almost instantly dry to the touch, the finish requires some curing time — from 12 to 48 hours, depending on the product — so I leave it to the contractor to replace the plumbing trim. But I do recaulk the joints between tub and wall surround. I use either PolySeamSeal (OSI Sealants, 888/445-0208, www.osisealants.com) or Phenoseal Kitchen and Bath Sealant (Phenoseal, 800/343-4963, www.phenoseal.com); both tool well, clean up easily with water, and provide mildew resistance after curing.
Don Hanrahanowns and operates Fantastic Finishers in East Sandwich, Mass.