Exterior insulated finish system, or EIFS, has been on the market in North America since the early 1970s. EIFS came here from Europe, where it had been used successfully since the late 1940s, gaining popularity as an effective and affordable way to renovate older buildings and restore buildings that were damaged in the Second World War.
Unfortunately, the version of EIFS that was brought to this country was very different from the system that had worked so well in Europe. Modifications were made to the system with very little testing and engineering analysis. Problems started to crop up soon after EIFS entered the U.S. market, and as most people know, North America had widespread EIFS failures in the 1980s and 90s. Our company has prospered investigating many of those problem installations, serving as consultants in court cases involving everything from houses to high-rises.
We’ve learned a lot about why and how EIFS can fail, but we haven’t given up on it as a system. EIFS has advantages: It’s fast, it’s economical, and it offers a lot of control over style and appearance. And done right, it works. If you understand the design issues, the materials, and the installation process, you can get good results with EIFS. We don’t just investigate failures — our company has supervised millions of square feet of EIFS work on new and existing buildings, and we have confidence that those installations will perform acceptably.
As a result of our investigations of EIFS problems on buildings nationwide, we’ve proposed a number of changes in American codes and standards that apply to EIFS. Some of our recommendations have been adopted by the codes or by manufacturers, and some haven’t. Since everyone hasn’t seen fit to change their specifications, we’ve developed our own standards for jobs we supervise.
Our company reviews plans, writes specifications, and inspects or supervises EIFS work on site. We provide advice on system design, materials selection, and installation methods. How the system is installed is usually the critical factor, but the design and the materials can also affect performance.
Barrier EIFS Versus Drainage EIFS
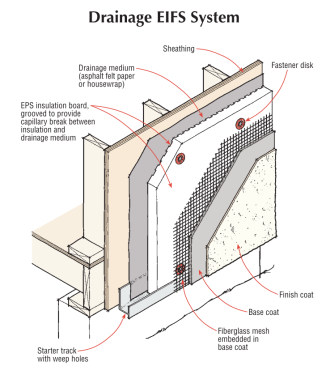
To put EIFS cladding on a building, the EIFS contractor first attaches expanded polystyrene (EPS) insulation board to the wall structure. This rigid foam base then gets covered with a base coat formulated from water, acrylic polymer, Portland cement, aggregates, and fillers. Fiberglass reinforcing mesh is embedded in the wet base coat. After the reinforced base coat sets up, all joints are sealed with caulk or sealant; a finish coat is applied to the whole system for color and texture. The result is a (mostly) waterproof skin with an attractive appearance.
In the original EIFS system, the insulation board was attached directly to the building with adhesive, and the base and finish coatings (along with the sealants) were the building’s main defense against rain. That system is called “barrier EIFS,” and it has worked well on concrete and masonry buildings in both Europe and America. Over time, there are sure to be cracks in the lamina (composed of base coat, mesh, and finish coat), as well as partial sealant failures at joints; but concrete and masonry buildings don’t tend to suffer damage from the relatively small amounts of water that pass the exterior weather barrier.
Buildings made with water-sensitive materials are a different story. If a building has wood framing and OSB sheathing (or light-gauge steel framing and gypsum board sheathing), the amounts of water that enter the wall through window assemblies, at interfaces between EIFS and abutting wall components, or through cracks in the EIFS lamina are sufficient to do serious damage to the structure below. The EIFS may look great on the exterior, but underneath, the building could be disintegrating. As the substrate deteriorates and the bond between the building and the EPS weakens, the foam and lamina experience more movement, the cracking gets worse, more water enters, and the problem grows. Sometimes large areas of EIFS can lose their bond to the building and hang loose, held in place by nothing but the caulking around the windows. In the end, the wind may tear off whole sections of the exterior cladding. For wood buildings, hidden structural rot can be fatal.
We’ve investigated commercial buildings where underneath the EIFS, some of the backup walls were constructed of concrete or masonry, and other sections were made of steel framing with gypsum board sheathing. Often in those structures, the masonry sections are in good shape, with the EPS still well attached, while the parts of the building with a moisture-sensitive backup wall are basically falling apart. The difference comes down to how well the substrate can tolerate moisture.
That doesn’t mean that EIFS is restricted to masonry buildings. It can be effectively installed on a wood-sheathed or gypsum-sheathed structure. But wherever the sheathing consists of moisture-sensitive substrates like OSB or gypsum board, we recommend a “drainage EIFS” (also called “water-managed EIFS”) design. This is also what the newer versions of the model codes require for residential construction (although not all jurisdictions have adopted that change). Since almost all houses are wood-framed with moisture-sensitive OSB or plywood sheathing, residential EIFS in general should be a drainage system.
Click to enlarge image below.
Drainage EIFS Details
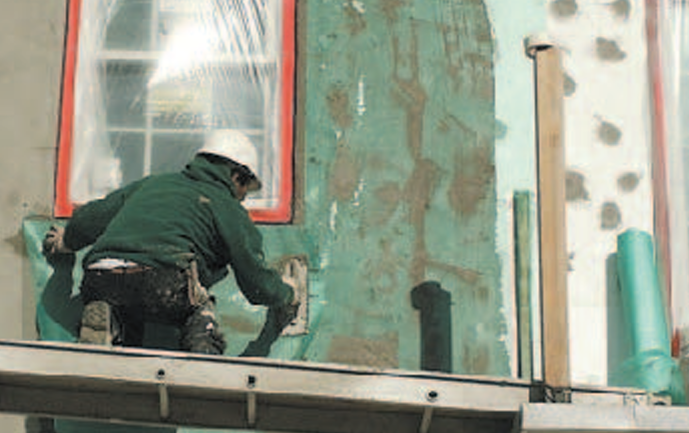
In a drainage EIFS system for wood-frame buildings, the wall is first covered with a protective water-shedding drainage plane material; then mechanical fasteners are used to attach the EPS board to the wall system (see Figure 1). This works well in buildings sheathed with plywood or OSB. (For commercial buildings that use gypsum sheathing, there are also drainage EIFS systems that rely on a liquid or troweled-on waterproofing layer and use adhesively attached EPS, but these are seldom if ever used for residential work.)
Major EIFS manufacturers that supply drainage EIFS systems all have some sort of requirement for creating an air space or capillary break between the EPS board and the drainage material covering the wall. One method is to use a “crinkle wrap” variety of housewrap such as Tyvek’s StuccoWrap. Another method is to use a type of EPS board that has a grooved, wavy, or waffled back profile, so that the board contacts the wall only in spots, creating drainage channels between the board and the weather-barrier drainage material. Both systems work acceptably.
In fact, we’ve tested EIFS systems using ordinary flat-backed EPS board over regular housewrap or asphalt felt and found that drainage occurs readily even without the “drainage channels.” If you apply the EPS board flat to the paper, apply base and finish coats in the regular way, then cut a hole in the EIFS eight or ten feet up the wall and actually pour water in, you’ll soon see the water drain out through the weep holes in the drainage track at the bottom of the wall. Water drains behind the EPS, as well as through it. It’s true that our own specs, like the major manufacturers’ specs, do call for drainage-channel EPS board or crinkled housewrap, but that is mainly because we want the warranty to hold.
The “secondary weather barrier” beneath the EIFS should include not just a water-shedding drainage material (typically asphalt felt or housewrap), but also a system of flashings for all penetrations in the envelope, including windows, doors, outside lights, dryer vents, hose bibbs, and exterior electric outlets. Transitions where exterior decks are attached or where roofs abut walls also need foolproof flashings. All the flashings have to be integrated with the water-shedding drainage plane so that water flowing downward will always go on top of the drainage material, not behind it. Before the EIFS goes on, you should be able to spray the whole building with a hose and have no water contact the framing or sheathing.
To work right, the whole drainage plane system has to be carefully considered and properly installed. We’ve created some standard flashing details that are adaptable to most situations, but it’s not possible to design a standard detail that will cover every possible scenario. In unusual cases, the trick is to “think like a raindrop.” Water on a surface will generally seek to go down, although it may travel sideways or even up when it contacts very small cracks and capillary openings. When you come to a building element that calls for a custom flashing detail, just make sure that gravity will pull the water down and away from the wall, without bringing it into contact with fine cracks or narrow openings.
EIFS Materials and Installation
When the secondary weather barrier is done right, the building will be resistant to water damage even if the EIFS, windows, or caulking has some leaks. Nevertheless, the EIFS also should be installed correctly. The more waterproof and durable the EIFS skin, the better. Installation details matter, and so does the choice of materials. The goals are to prevent leaks, to resist weathering, and to minimize cracking and sealant failures over time.
Our company has investigated every material used with the EIFS system — the EPS board, the base coats, the fiberglass mesh, the sealants, and the finish coats. We’ve noticed that the European standards for most of those materials are stricter than the American standards, and in most cases, we believe that the stricter European standards are better. Unfortunately, because of the relatively weak U.S. industry standards, it’s not always possible to get the same materials in America that are available in Europe. EIFS made with American materials may be less durable than EIFS in Europe, even if the installation details are the same (all the more reason to be careful about the secondary weather barrier). However, given what’s available on the U.S. market, it’s still worth the effort of choosing materials carefully and applying them correctly.
On our jobs, we use materials supplied by the major manufacturers that have been in the EIFS business for many years: Dryvit, Parex, Senergy, and Sto. However, all those companies offer installers a menu of choices in drainage wrap, EPS board, reinforcing mesh, and coatings. Our specs call for certain choices from that menu.
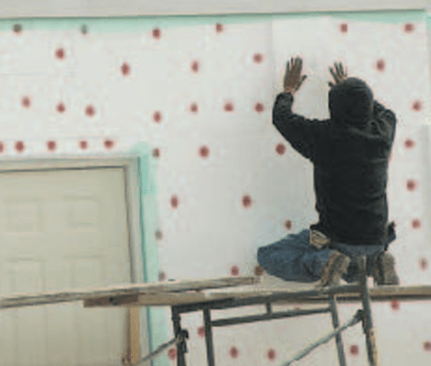
A worker attaches soft EPS “beadboard” with screws to form the base of the EIFS cladding. The close-up, below, shows the voids between the plastic beads. EPS allows water to leak through and can hold moisture against the building. That is why careful joint sealing and an effective secondary weather barrier are critical to system performance.
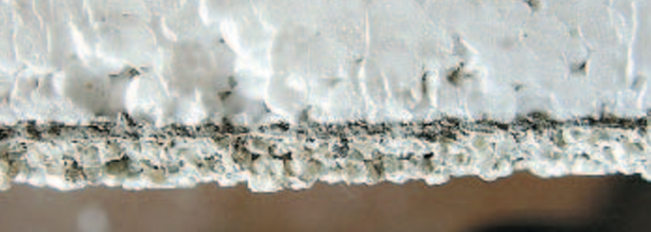
EPS board. EIFS requires a soft insulation board that can move without cracking. Because it must be soft, the board is not dense, and the nominal one-pound EPS board that is typically used for EIFS is not watertight. In Europe, EPS board is generally made using a vacuum process that results in a denser, less porous board. American EPS is most often made with a steam process and is generally less dense and more porous. The American manufacturing standards for a nominal one-pound-density board require an actual density of only .9 pounds per cubic foot; but in tests we have performed, most boards on the market achieve that density barely, if at all. The standards also allow the board to absorb 2.5 times its own weight in water; in effect, the foam is allowed to be a sponge.
Water can take minutes or hours to pass through EPS board, depending on the density of the board. But in any case, the EPS generally does not protect the house against water. Water that gets to the foam will trickle through it or through joints between foam pieces, and if the water can’t drain out, it will collect at low spots. Trapped moisture in the foam can create moist conditions next to the wall. So it’s critical to prevent cracking in the EIFS surface, to seal all joints effectively, to detail the secondary weather barrier carefully, and to allow drainage throughout the system.
For mechanically attached EPS, our spec calls for foam boards greater than one inch thick.
Fiberglass mesh. There are many types and grades of fiberglass mesh. It’s all made with glass fiber and an alkaline-resistant polymer coating, but the weight of the glass and the thickness of the protective coating vary. So does the way the fabric is made: Some mesh is woven, and some is non-woven.
Heavier mesh is stronger and stiffer than lighter mesh, and mesh with a thicker coating generally holds up better against the alkaline chemistry of cement compounds in the EIFS base coat. We prefer non-woven mesh because its coating is more continuous: The woven mesh can have gaps in the coating where the fibers contact each other in the weave. Unfortunately, it is difficult to find mesh manufacturers willing to fabricate non-woven mesh.
Manufacturers generally offer a “standard” 4-ounce mesh (weighing 4 ounces a square yard), which is actually their lightweight mesh. They also offer higher-weight mesh types that they describe as medium-impact, high-impact, and so on. There is also a very light 2.5- to 4-ounce “detail mesh” that is used for corners, V-joints, and the like. It’s common for installers to use the 4-ounce standard mesh in the field and use detail mesh wherever they need to bend around corners (ironically, the corners and joint areas that are most likely to crack often receive the lightest-weight mesh).
We usually recommend a minimum 6-ounce mesh. For the first floor, or at least the first 4 feet of the wall — really, in any high-traffic area where there are likely to be lawn mowers, weed trimmers, snow shoveling, and other activities that can damage the wall — we call for high-impact mesh. You can’t overlap the high-impact mesh, so you butt the pieces together, then cover the whole thing with an additional layer of the 6-ounce mesh. With that reinforcement, EIFS is almost as strong as some stucco systems, particularly a one-coat stucco.
For corners, some manufacturers provide specially formed pieces made of the heavier mesh. If you have to wrap a corner with lighter mesh, you can double it up.
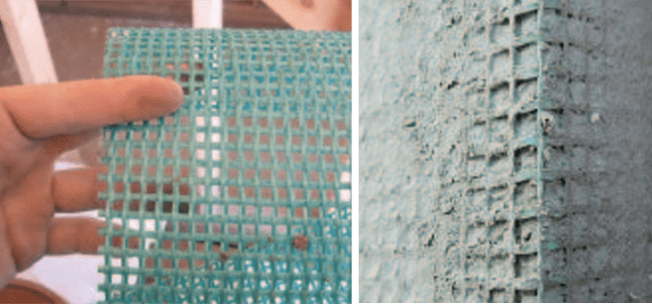
Woven reinforcing mesh (top left) serves to stop the cement and acrylic base coat from cracking. A coating protects the mesh against the alkaline cement, but mesh may still be weakened by moisture and chemical attack. Exposed mesh (right) tends to lose strength over time.
The mesh strength is important, because it is the only thing keeping the surface lamina from cracking and allowing water penetration. Contractors may try to convince the owner that the 4-ounce standard mesh is sufficient, but our experience is that the 6-ounce or heavier mesh achieves better results.
Base coat. Base coats are usually formulated with an acrylic resin combined with Portland cement. They may also contain silica sand and lime or lime byproducts. Most manufacturers offer a choice of several base coat types. The applicator can either add water to a dry mix, or add just the dry cement to a premixed wet formula that already contains water, the acrylic resin, and other ingredients. In our experience, the wet mixes are far superior to the dry mixes. We never specify a dry mix. The proportions of cement and acrylic in the base coat formulas have been an issue in recent years. European manufacturers traditionally use no more than 25% to 33% cement by weight in a base coat formula, but U.S. manufacturers typically use 50% cement. High cement content makes the base coat harder but also more brittle and more prone to cracking. In addition, the highly alkaline chemistry of cement attacks and weakens the fiberglass mesh, which also promotes cracking. Some U.S. manufacturers have developed lower-cement-content base coat formulas recently, but so far, testing has not shown these modified mixes to perform any better than the original mix. So the best advice we can give at present is to use any manufacturer’s standard wet mix, but not the dry mixes.
Sealants. Joint sealing is an issue in all construction, but especially with EIFS. EIFS has been promoted as a maintenance-free cladding, and it’s true that the EIFS itself often doesn’t need much maintenance. But sealant joints do need maintenance, and they usually don’t get any. Building owners often don’t notice when the sealants fail, and sometimes they just don’t care enough to maintain them well.
But with EIFS, sealant joints are difficult to maintain even when someone does want to. To repair a caulk joint, you have to scrape it out or grind it back, and that can damage the EIFS surface.
The bottom line is, you need to use a sealant that will last without a lot of maintenance. You can choose from sealants made with acrylic, polyurethane, polysulfide, or silicone. For several reasons, silicone is the best choice.
First of all, silicone has a service life many times longer than other sealants can expect. It’s a stable mix that normally doesn’t break down from ultraviolet rays in sunlight, and it will tend to retain its properties for decades to come. Silicone has been on the market for many years, and our company has rarely if ever seen it break down.
Second, silicone has better properties to begin with. In particular, it’s very flexible, and it stays flexible at cold temperatures. In very cold weather, the EIFS panels shrink, the joint has to enlarge, and the sealant has to flex; but urethane or acrylic sealants typically get hard in cold weather, while silicones remain flexible.
Silicones, unfortunately, tend to attract dust and dirt, and most silicone sealants can’t be painted. On the other hand, you can get silicone sealants in colors to match just about any EIFS color coat or paint. Use 100% silicone sealants, not the “siliconized acrylic” varieties.
Installation Concerns
Materials are important, but most EIFS problems are caused by incorrect installation. The major manufacturers all have installation specifications, which we are generally comfortable with. They also offer installation details that over the years have gotten quite specific and comprehensive. When you do EIFS work, it’s important to study those details carefully and follow directions conscientiously.
One common flaw is a base coat that is too thin and does not fully cover the mesh. In one broad survey of 80 buildings in 34 states (conducted in the 1980s), our company found that 92% of the current projects had base coats that were too thin. On projects up to three years old, only about 50% had thin base coats; and on projects between three and eight years old, about 40% had thin base coats. Basically, the more recent projects more commonly had thin base coats. Apparently, as the market became more competitive, people had stopped trying to apply the material according to the instructions. Contractors reduced the amount of material they applied in order to cut costs.
A base coat that is too thin will not properly resist water penetration or protect the reinforcing mesh. And if mesh is exposed to sun and rain, it will lose strength. Specs typically call for a base coat thickness of 1/16 inch (ours call for 3/32 inch). It’s important to enforce the thickness requirement. However, a base coat that is too thick (5/16 inch or more) has a tendency to crack because the lamina becomes too stiff.
We recommend applying the base coat in two layers: First apply a thin layer, and then partially embed the mesh in the wet coat; later apply a second layer over the partially embedded mesh and trowel it smooth. The second layer fills in the pin holes in the first layer and covers the mesh well. For an installer who is trying to do a good job — a nice smooth layer of adequate thickness — this two-step application is just about as fast as trying to get good coverage with a single layer, and you get a much better product. It’s especially important at transitions and joints, because exposed mesh and poor coverage at those points will reduce the performance of sealant joints.
Joints in the EIFS System
Whether they’re part of a drainage system or a barrier system, EIFS walls seldom leak in the middle. Most leaks occur at joints and transitions. In our extensive studies, more than 97% of all water damage was found under windows; around decks; at wall-roof intersections; around penetrations for plumbing, electric, and the like; or at failed movement joints. Window leaks alone accounted for more than half the damage. Correctly installing and sealing all those joints will greatly reduce the amount of water intrusion.
EPS board joints. EIFS walls have a large number of naturally occurring joints where EPS board pieces butt together. Those board joints are covered with continuous base coat and reinforcing mesh, but they are a possible cracking point for reinforced laminas. Stresses are high at window corners, so don’t break the EPS board at the edge of a window — instead, cut the window corner out of a continuous piece of board. Also, don’t break the EPS board over a joint in the sheathing, and it’s best not to break the sheathing itself at windows or other openings.
Click to enlarge image below.
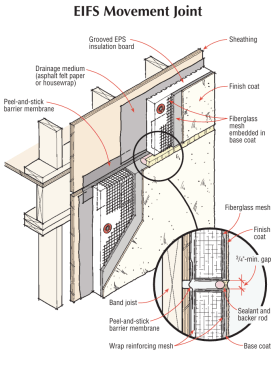
Movement joints. EIFS itself doesn’t require many movement joints. Unlike traditional stucco, which needs a joint every 10 to 15 feet to allow for thermal expansion and contraction, EIFS can have a jointless run of 50 or 75 feet, so you seldom need expansion joints on an EIFS house.
However, EIFS does need joints between floors in wood-frame construction. The EIFS itself doesn’t move, but the wall plates and band joists of wood-frame houses develop significant cross-grain shrinkage. So an EIFS house should have a joint at every floor, as shown in the illustration below, to allow the EIFS to move instead of buckling or cracking.
The other thing we’ve found is that when two large EIFS panels connect at a narrow point, the resulting stress concentration can cause cracking at the narrow section (see photo below). At such locations, we like to install an expansion joint to allow wall areas to move independently.
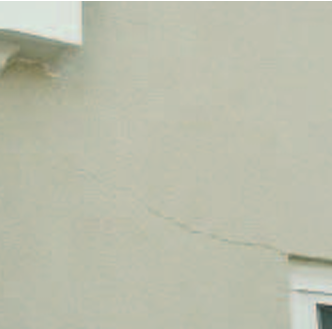
Window corners and narrow intersections between large wall sections are points of stress concentration where cracking may occur. If possible, the design should allow for isolation joints to relieve stress at such locations. In any case, the secondary weather barrier must provide protection for wall materials beneath the EIFS.
Window flashings and joints. Wherever a window, a door, or an electrical or plumbing fixture interrupts the EIFS surface, a proper joint must be constructed. Create a caulked joint at the EIFS surface; beneath the caulked joint, integrate a reliable flashing into the secondary weather barrier.
Window leaks account for the majority of water damage in EIFS houses. The EIFS itself isn’t usually leaking; instead, water is entering between the window and the EIFS, or the window itself is leaking water. The solution requires a window flashing that works, as well as a correctly detailed joint between the window and the EIFS wall.
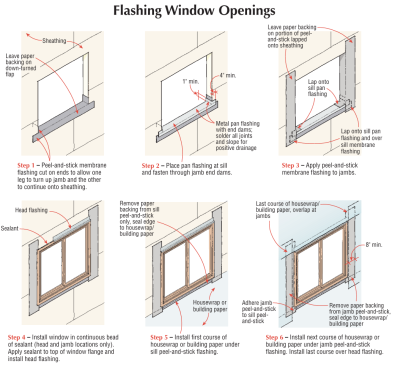
On a lot of job sites, one subcontractor installs the windows, and another installs the EIFS. The EIFS contractor usually puts up the building paper before attaching the foam board, but he can’t flash the windows, because those get installed before he comes onto the job. So we devised a flashing detail for the window installer that allows the EIFS installer to tie the flashing into the building paper later (see details in illustration below). It uses strips of peel-and-stick flashing membrane for the bottom, sides, and top of the window, all tied into a soldered metal sill pan that is easily made to order by a metal shop. We leave the paper backing attached to the peel-and-stick at the sides and bottom of the window; that way, when the EIFS contractor attaches paper or other membrane to the building, he or she can seal the membrane over the barrier for a watertight assembly.
The EIFS is then installed over the drainage material, and the joint between window and EIFS must be sealed. Surprisingly, on many houses we investigate, none of the joints have any sealant at all. Typically, the owner didn’t want the look of the sealant, and the contractor didn’t think sealant was needed. On jobs we supervise, we explain to the owner that a well-sealed joint is a requirement to prevent a costly failure, and we detail one joint for them so they can see how it looks. Generally, once they understand the risks, they’ll agree that the appearance is acceptable for the sake of performance.
Click to enlarge image below
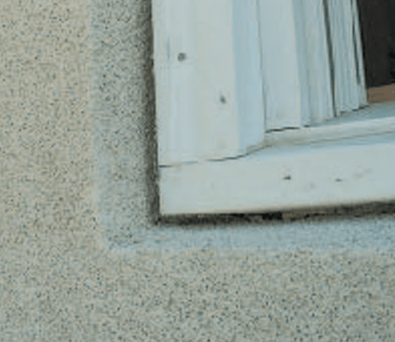
This joint between the EIFS and the brick-mold window casing should be sealed with backer rod and silicone sealant. Apply sealant to the base coat before the finish coat is applied. Be aware that many windows allow water to pass between the casing and the sill or jamb, so that surface joint sealing provides only partial protection. To protect the sheathing and framing, the secondary weather barrier and window flashing must be in place beneath the EIFS and the window.
A proper joint needs to have a sufficient gap, with backing and sealant. The rule of thumb is that the joint space should be four times the anticipated movement — so, if you expect 1/8 inch of movement, you would need a 1/2-inch gap so that the sealant would be able to flex. At windows, most manufacturers call for a 1/2-inch gap in their written specs. In practice, however, there isn’t much movement at window joints, and a 3/8-inch joint is often sufficient.
As important as the gap size is the quality of the surface. Sealant has to be applied to the base coat, not the finish coat, because in moist conditions, the finish coat itself will often suffer cohesive failure and come apart under stress, allowing the joint to open up. Also, the base coat has to be thick enough to fully cover the mesh — a big reason to apply the base coat in two layers, especially at panel edges.
Behind every sealant joint, there must be backer rod. This lets the sealant stretch between the sides of the opening without sticking to the back.
Penetrations such as hose bibbs and electrical boxes should be sealed just as thoroughly as windows, with a flashing tied into the drainage plane, as well as a surface seal where the EIFS meets the attached element (Figure 8).
Aesthetic joints. When the finish coat is being applied, the installer has to run it continuously, keeping a wet edge; if the coat dries out in the middle of the process, there will be a visible cold joint. You can’t run the finish more than a limited amount of square feet before it dries out, so the installers cut a V-groove in the foam as a stopping point. This “aesthetic joint” lets the installer work within a manageable area without causing cold joints.
Aesthetic joints can’t occur at an EPS board joint — they can cross a board joint, but not line up with it. Also, the aesthetic joint can’t be routed too deep, or it will cause a crack. At least a 3/4-inch thickness of EPS board has to remain when the joint is made.
Aesthetic joints are coated with base coat and reinforced with standard or lightweight detail mesh. The process requires care: The installer should use a specialty trowel to embed the mesh, because standard trowels may cut the mesh.
To EIFS or Not to EIFS?
When people ask us, “Should we use EIFS on our building?” it always makes us stop and think. It’s important to distinguish between barrier EIFS and drainage EIFS. Our company uses both, and we’re comfortable with the risks. However, we are experts in the system, and even we have to work to avoid problems. We know what the materials issues are, but not every product in the market has been thoroughly tested. We also know what the problems with details and installation are, but we can’t be on every side of the building 24 hours a day to make sure every task is done right. The fact is, barrier EIFS can be troublesome. If you don’t understand it well, and if you aren’t extremely careful, you are risking problems. Drainage EIFS, on the other hand, can be as reliable as traditional claddings — it all depends on how well the secondary weather barrier is installed.
In fact, that secondary weather barrier is critical under almost any kind of siding. Our company has gotten a lot of calls on moisture and rot problems under traditional stucco. We’ve also investigated houses with wood siding in the same parts of the country that were hit by widespread EIFS failures, and found the exact same kinds of destructive water damage.
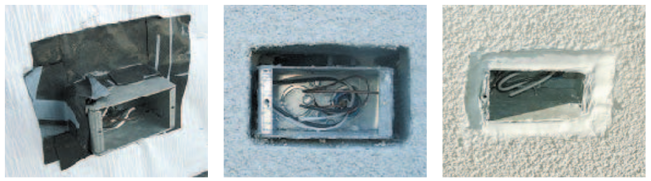
All penetrations should be flashed beneath the EIFS, as well as surface-sealed at the joint. In this example, peel-and-stick membrane is used to seal the electrical box to the housewrap (left). A gap is left between the EIFS and the box (center), and the gap is then filled with backer rod and sealant (right).
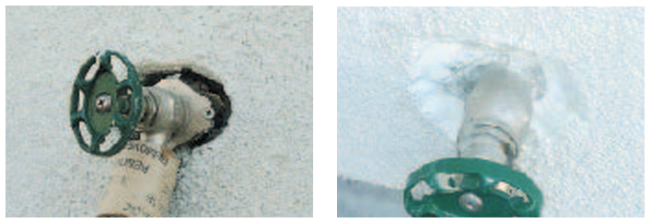
Hose bibbs receive a similar treatment as the penetrations described for photos above.
Anyplace where buildings see rain — especially heavy, wind-driven rain — it all comes down to the secondary weather barriers and flashings. If you install that system right, the building will be protected no matter what siding material you use; and if you don’t, you can expect trouble under any siding material. The problem is that a lot of people have been installing weather barriers and flashings poorly.
On the other hand, EIFS itself has vulnerabilities some cladding systems don’t have. One issue is that the EPS board can act like a sponge, holding water against the building, and that’s not really true of other claddings such as vinyl or clapboards. The second thing is that EIFS is a tight system — not tight enough to keep every drop of water out (because often there is a penetration or flashing defect allowing water in behind it), but tight enough that it doesn’t breathe well at all. With EIFS, there is very little drying potential — so even relatively small amounts of wetting can lead to some trouble.
Success with drainage EIFS requires special attention to the secondary weather barrier, as well as painstaking attention to the water-shedding surface details. And there’s no doubt that a proper EIFS job costs more than a hurried job with thin base coats and careless joint sealing. Typically, the details and extra care we require add $2.25 or more per square foot to the cost of the system. For example, we supervised a 100,000-square-foot EIFS job in Montgomery, Ala., that was bid at $525,000 before we became involved. After we explained that the contractor would have to follow all the manufacturer’s requirements, and that the EIFS application would be inspected, the price went up to $825,000. That was a little steep, but installers do have to charge a premium for careful work.
So if you use EIFS on a building, don’t lock your installer into a cheap bid — you’ll get a system that is likely to suffer water damage. Don’t look at EIFS as cheaper than more traditional claddings. If you want the cheapest cladding system, use something besides EIFS. And regardless of the siding system you choose, pay attention to the weather barrier beneath the siding. That’s what is really protecting the building.


